
Mazda 3 Service Manual: Oil Pressure Inspection [Mzr 2.0, Mzr 2.5]
WARNING:
-
Hot engines and engine oil can cause severe burns. Turn off the engine and wait until it and the engine oil have cooled.
-
A vehicle that is lifted but not securely supported on safety stands is dangerous. It can slip or fall, causing death or serious injury. Never work around or under a lifted vehicle if it is not securely supported on safety stands.
-
Continuous exposure to USED engine oil has caused skin cancer in laboratory mice. Protect your skin by washing with soap and water immediately after working with engine oil.
1. Remove the battery cover..
2. Disconnect the negative battery cable.
3. Remove the aerodynamic under cover No.2..
4. Remove the oil pressure switch.
NOTE:
-
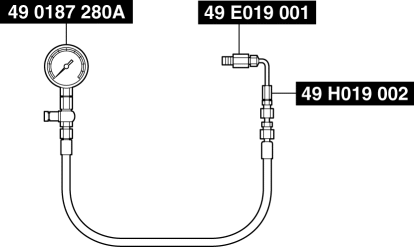
This inspection can be performed using a combination of SSTs 49 0187 280A
(oil pressure gauge), 49 E019 001
(adapter) and 49 H019 002
(adapter), or using the following combination of the SSTs
.
-
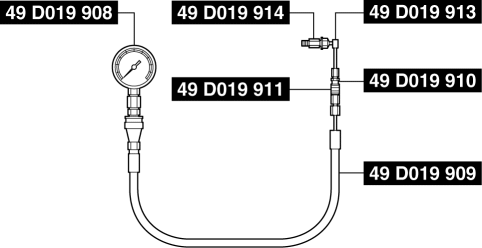
49 D019 908
(gauge), 49 D019 909
(hose), 49 D019 910
(adapter), 49 D019 911
(adapter), 49 D019 913
(adapter), and 49 D019 914
(adapter)
5. Install the SSTs
to the oil pressure switch installation hole using the following procedure.
-
Using SSTs 49 0187 280A, 49 E019 001 and 49 H019 002
-
Assemble SSTs 49 0187 280A
and 49 H019 002
outside of the engine compartment beforehand.
-
Install SST 49 E019 001
to the oil pressure switch installation hole.
-
Install SST 49 H019 002
to the SST 49 E019 001
.
-
Using SSTs 49 D019 908, 49 D019 909, 49 D019 910, 49 D019 911, 49 D019 913,
and 49 D019 914
-
Assemble SSTs 49 D019 910
, 49 D019 913
and 49 D019 914
outside of the engine compartment beforehand.
-
Assemble SSTs 49 D019 908
, 49 D019 909
and 49 D019 911
outside of the engine compartment beforehand.
-
Install SST 49 D019 914
to the oil pressure switch installation hole.
-
Install SST 49 D019 911
to the SST 49 D019 910
.
6. Connect the negative battery cable..
7. Warm up the engine to normal operating temperature.
8. Run the engine at the specified speed, and note the gauge readings.
-
If not within the specification, inspect for the cause and repair or replace if necessary.
NOTE:
-
The oil pressure can vary with oil viscosity and temperature.
-
Oil pressure (reference value) [oil temperature: 100 °C {212 °F}]
-
MZR 2.0: 234—521 kPa {2.39—5.31 kgf/cm2, 34.0—75.5 psi} [3,000 rpm]
-
MZR 2.5: 395—649 kPa {4.03—6.61 kgf/cm2, 57.3—94.1 psi} [3,000 rpm]
9. Stop the engine and wait until it is cools.
10. Disconnect the negative battery cable.
11. Remove the SSTs.
CAUTION:
-
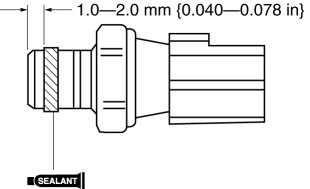
Be sure there is no sealant between 1.0—2.0 mm {0.040—0.078 in} from the end of the oil pressure switch to prevent a possible operation malfunction.
12. Apply silicone sealant to the oil pressure switch threads as shown in the figure.
CAUTION:
-
Install the oil pressure switch before the applied sealant starts to harden.
13. Install the oil pressure switch.
-
Tightening torque
-
12—18 N·m {123—183 kgf·cm, 107—159 in·lbf}
14. Connect the negative battery cable..
15. Start the engine and confirm that there is no oil leakage.
-
If there is oil leakage, repair or replace the applicable part.
16. Install the aerodynamic under cover No.2..
17. Install the battery cover..
 Oil Pan Removal/Installation [Mzr 2.0, Mzr 2.5]
WARNING:
Hot engines and engine oil can cause severe burns. Turn off the engine and
wait until it and the engine oil have cooled.
A vehicle that is lifted but not securely supported ...
 Oil Pump Removal/Installation [Mzr 2.0, Mzr 2.5]
WARNING:
Hot engines and engine oil can cause severe burns. Turn off the engine and
wait until it and the engine oil have cooled.
A vehicle that is lifted but not securely supported ...
Other materials:
Winter driving tips
When operating the Subaru Solterra in winter conditions, it is essential
to carry out thorough preparation and regular inspections before driving. Always
adapt your driving style to current weather and road conditions to ensure maximum
safety, efficiency, and vehicle performance.
Pre-winter p ...
Filament Repair
1. Clean the filament using isopropyl alcohol.
2. Attach tape to both sides of the filament.
3. Using a small brush or marking pen, apply silver paint.
4. After 2—3 min, carefully remove the tape without damaging the applied
area.
CAUTION:
Do not operate the rear window defro ...
Manual Transaxle Removal/Installation [G66 M R]
CAUTION:
Secure the steering wheel using tape or a cable to prevent the steering shaft
from rotating after disconnecting the steering shaft. If the steering wheel
rotates after the steering shaft and the steering gear and linkage are disconnected,
the internal parts of the clock spr ...
