Mazda 3 Service Manual: Quarter Window Glass Installation
WARNING:
-
Using a razor with bare hands can cause injury. Always wear gloves when using a razor.
CAUTION:
-
If a door is opened or closed when all the window glass is closed, the resulting change in air pressure could cause the sealant to crack preventing the proper installation of the glass. Keep the door glass open until the quarter window glass installation is completed.
1. Remove sealant along the perimeter of the glass using a razor or scraper. (when reusing the glass)
2. Clean and degrease the ceramic part along the perimeter of the glass.
3. Inspect the glass for cracks. If it is cracked, chamfer it using sandpaper.
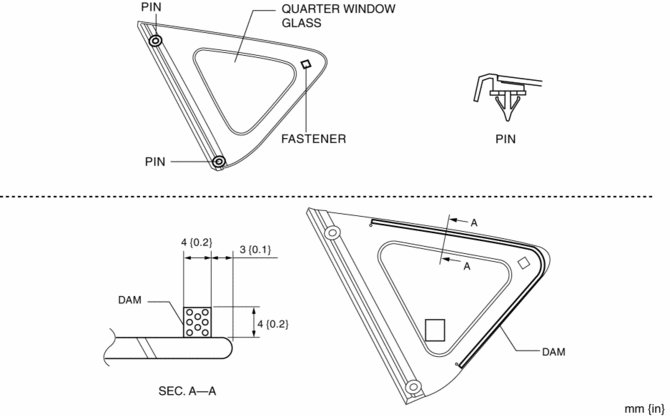
4. If the glass is reused, attach the pins to the glass as shown in the figure.
NOTE:
-
Align with the alignment marks marked before removing the glass.
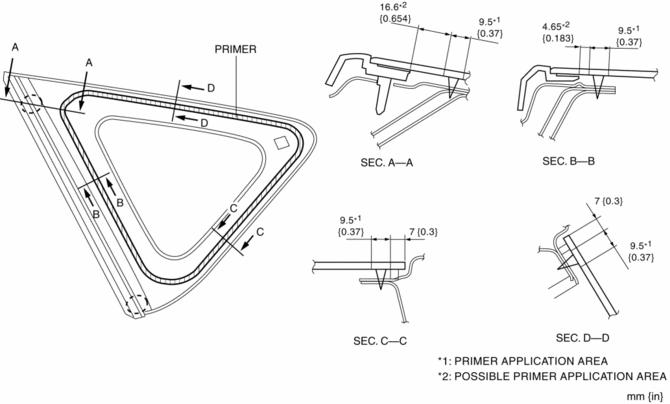
5. Apply glass primer along the hollowed marks in the ceramic coating on the new glass, along the sealant tracks on the reused glass, then allow it to dry for approx. 30 min.
CAUTION:
-
To prevent weakening of the primer adhesion, keep the bonding surface free of dirt, moisture, and grease. Do not touch the surface with your hand.
NOTE:
-
Apply primer to the hollowed marks in the ceramic coating.
6. Cut away the old sealant using a razor or scraper so that 1—2 mm {0.04—0.079 in}
thickness of sealant remains along the perimeter of the frame.
7. If the sealant has come off completely in any one place, apply some primer after degreasing, and allow it approx. 30 min
to dry. Then apply 2 mm {0.079 in}
thickness of new sealant.
8. Clean and degrease the bonding surface along the perimeter of the body.
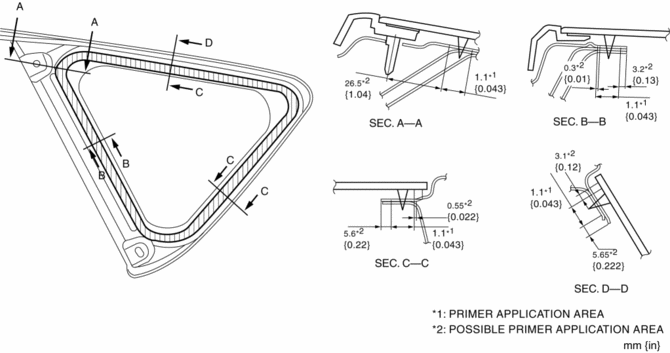
9. Apply body primer on the body as shown in the figure, then allow it to dry for approx. 30 min.
CAUTION:
-
To prevent weakening of the primer adhesion, keep the bonding surface free of dirt, moisture, and grease. Do not touch the surface with your hand.
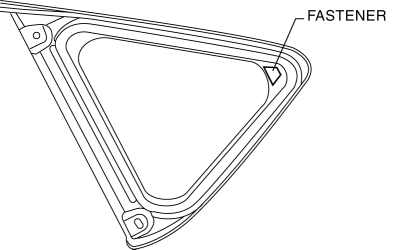
10. Install the fastener to the bead on the body side.
11. After the primer has dried, apply 11 mm {0.43 in}
in thickness, 5 mm {0.20 in}
in width of sealant using a sealant gun. Where it is not applied properly, correctly apply it using a spatula.
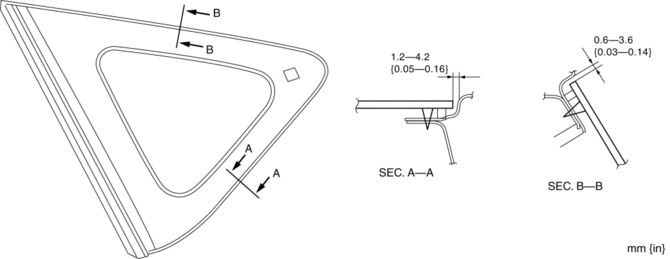
12. Insert the positioning pins to the body and install the quarter window glass.
13. Install the following parts:
a. C-pillar trim.
b. Trunk side upper trim.
c. Tire house trim.
d. Rear scuff plate.
e. Rear seat cushion.
14. Allow the sealant to harden completely. Sealant hardening time: 24 h
 Power Window System Preliminary Inspection [Power Window System]
Manual Open/close Function Inspection
STEP
INSPECTION
ACTION
1
Switch the ignition to ON.
Operate the ...
 Quarter Window Glass Removal
1. Remove the following parts:
a. Rear seat cushion.
b. Rear scuff plate.
c. Tire house trim.
d. Trunk side upper trim.
e. C-pillar trim.
2. Apply protective tape along the edge of the bod ...
Other materials:
Oil Pressure Switch Inspection [FS5 A EL]
CAUTION:
Water or foreign objects entering the connector can cause a poor connection
or corrosion. Be sure not to drop water or foreign objects on the connector
when disconnecting it.
On-Vehicle Inspection
1. Perform the following procedures.
a. Remove the aerodynamic under co ...
Oil Cooler Removal/Installation [Fw6 A EL]
1. Remove the battery cover..
2. Disconnect the negative battery cable..
3. Remove the aerodynamic under cover NO.2..
4. Drain the ATF..
5. Drain the engine coolant..
6. Remove in the order indicated in the table.
1
Water hose (connected to the water pipe)
...
Battery Inspection [Mzr 2.3 Disi Turbo]
WARNING:
Since battery acid is toxic, be careful when handling the battery.
Since battery acid is highly corrosive, be careful not to allow it to contact
clothing or the vehicle.
In case battery acid contacts skin, eyes, or clothing, flush it immediately
with running wa ...
