
Mazda 3 Service Manual: Radiator Drain Plug Replacement [Mzr 2.0, Mzr 2.5]
WARNING:
-
Never remove the cooling system cap or loosen the radiator drain plug while the engine is running, or when the engine and radiator are hot. Scalding engine coolant and steam may shoot out and cause serious injury. It may also damage the engine and cooling system.
-
Turn off the engine and wait until it is cool. Even then, be very careful when removing the cap. Wrap a thick cloth around it and slowly turn it counterclockwise 2.5 turns. Step back while the pressure escapes.
-
When you are sure all the pressure is gone, turn the cap using the cloth, and remove it.
1. Remove the aerodynamic under cover No.2..
2. Drain the engine coolant..
3. Loosen the radiator drain plug completely.
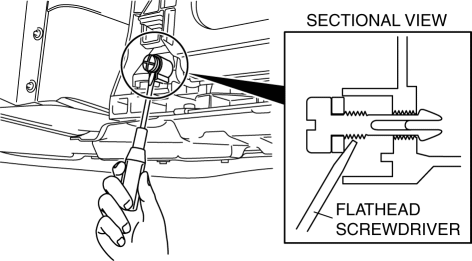
4. Using a flathead screwdriver or equivalent, pry out the radiator drain plug.
CAUTION:
-
Do not apply excessive force to the flathead screwdriver or equivalent as doing so can damage the drain bore. Slowly and carefully pry out the radiator drain plug when removing it.
5. Install a new radiator drain plug with a new O-ring.
-
Tightening torque
-
1.2—1.5 N·m {13—15 kgf·cm, 11—13 in·lbf}
6. Refill the engine coolant..
7. Inspect for engine coolant leakage..
 Fuel Gauge Sender Unit Removal/Installation
MZR 2.0, MZR 2.5
NOTE:
Fuel pump unit cannot be disassembled.
1. Remove the fuel gauge sender unit..
MZR 2.3 DISI Turbo
NOTE:
Fuel pump unit cannot be disassembled.
1. ...
 Radiator Removal/Installation [Mzr 2.0, Mzr 2.5]
WARNING:
Never remove the cooling system cap or loosen the radiator drain plug while
the engine is running, or when the engine and radiator are hot. Scalding engine
coolant and steam may ...
Other materials:
Warning Light
The warning light turns on when the
system has a malfunction.
Refer to Warning Lights on .
Brake Pad Wear Indicator
When the disc brake pads become worn,
the built-in wear indicators contact the
disc plates. This causes a screeching noise
to warn that the pads should be replaced.
When ...
Engine Coolant Temperature (ECT) Sensor Inspection [Mzr 2.0, Mzr 2.5]
ECT Sensor No.1
Resistance inspection
WARNING:
When the engine is hot, it can badly burn. Turn off the engine and wait until
it is cool before removing the ECT sensor.
1. Remove the battery cover..
2. Disconnect the negative battery cable..
3. Drain the engine coolant..
4. R ...
PID/Data Monitor Inspection [Bcm]
1. Connect the M-MDS (IDS) to the DLC-2.
2. After the vehicle is identified, select the following items from the initialization
screen of the IDS.
a. Select “DataLogger”.
b. Select “Modules”.
c. Select “BCM/GEM”.
3. Select the applicable PID from the PID table.
4. Verif ...
