Mazda 3 Service Manual: Rear Center Speaker Removal/Installation
1. Disconnect the negative battery cable..
2. Remove the following parts:
a. Rear seat cushion.
b. Rear scuff plate.
c. Tire house trim.
d. C-pillar trim.
e. Rear package trim.
3. Remove the screw.
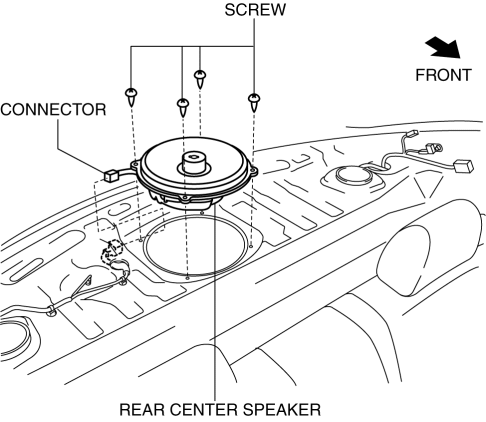
4. Disconnect the connector.
5. Remove the rear center speaker.
6. Install in the reverse order of removal.
 Rear Center Speaker Inspection
1. Disconnect the negative battery cable..
2. Remove the following parts:
a. Rear seat cushion.
b. Rear scuff plate.
c. Tire house trim.
d. C-pillar trim.
e. Rear package trim.
f. Rear c ...
 Rear Door Speaker Inspection
1. Disconnect the negative battery cable..
2. Remove the rear door trim..
3. Remove the rear door speaker..
4. Verify the resistance between the rear door speaker terminals.
If not w ...
Other materials:
Rear Window Wiper and
Washer
The ignition must be switched ON to use
the wiper.
Rear Window Wiper
Turn the wiper on by turning the rear
wiper/washer switch
Rear Window Washer
To spray washer fluid, turn the rear wiper/
washer switch to the position. After the
switch is released, the washer will stop.
If the w ...
Front Seat Removal/Installation
WARNING:
Handling a front seat (with built-in side air bag) improperly can accidentally
operate (deploy) the air bag, which may seriously injure you. Read the service
warnings before handling a front seat (with built-in side air bag)..
CAUTION:
After removing a front seat ...
Rear ABS Wheel Speed Sensor Inspection
Installation Visual Inspection
1. Inspect for the following:
If there is any malfunction, replace the part.
a. Excessive looseness or play of the rear ABS wheel-speed sensor
b. Deformation of the rear ABS wheel-speed sensor
c. Deformation or damage of the rear ABS sensor rotor
C ...
