Mazda 3 Owners Manual: Seat Operation
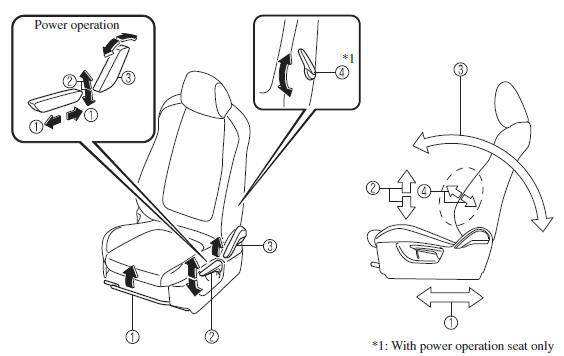
*1: With power operation seat only
1. Seat Slide
(Manual Seat)
To move a seat forward or backward, raise the lever and slide the seat to the
desired position
and release the lever.
Make sure the lever returns to its original position and the seat is locked in place by attempting to push it forward and backward.
(Power Seat)
To slide the seat, move the slide lifter switch on the outside of the seat to
the front or back
and hold it. Release the switch at the desired position.
2. Height Adjustment (Driver's Seat)
(Manual Seat)
To adjust the seat height, move the lever up or down.
(Power Seat)
To adjust the seat height, move the switch up or down.
3. Seat Recline
(Manual Seat)
To change the seatback angle, lean forward slightly while raising the lever.
Then lean back
to the desired position and release the lever.
Make sure the lever returns to its original position and the seatback is locked in place by attempting to push it forward and backward.
(Power Seat)
To change the seatback angle, press the front or rear side of the reclining
switch. Release the
switch at the desired position.
4. Lumbar Support Adjustment (Driver's Seat) *
To increase the seat firmness, move the lever downward. Move the lever upward to decrease firmness.
 Front Seat
...
 Seat Warmer
The front seats are electrically heated. The
ignition must be switched ON.
Press the seat warmer switch to illuminate
the indicator light while the ignition
is switched ON. The mode changes as
...
Other materials:
Intermediate Sensor Inspection [FS5 A EL]
On-Vehicle Inspection
1. Inspect the power supply circuit for the intermediate sensor.
a. Set the battery component (ex: battery, battery tray and PCM component) out
of the way.
b. Disconnect the intermediate sensor connector.
c. Switch the ignition to ON (engine off).
d. Measure the ...
Brake Pedal Inspection
Pedal Height Inspection
1. Measure the distance from the center of the upper surface of the pedal pad
to the floor covering and verify that it is as specified.
If not within the specification, replace the brake pedal.
Brake pedal height (reference value)
MZR 2.0, SKYACTI ...
Oil Seal (Differential) Replacement [A26 M R]
1. On level ground, jack up the vehicle and support it evenly on safety stands.
2. Drain the oil from the transaxle..
3. Remove the front tires..
4. Remove the splash shield..
5. Remove the aerodynamic under cover No.2..
6. Separate the drive shaft and joint shaft from the transaxle..
7 ...
