Mazda 3 Owners Manual: Clock
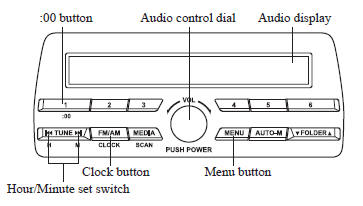
Setting the time
The clock can be set at any time when the ignition is switched to ACC or ON.
- To adjust the time, press the clock
button (
 ) for about 2 seconds
until a beep is heard. - The clock's current time will flash.
Time adjustment
- To adjust the time, press the hour/
minute set button (
 ,
,
 ) while the
clock's current time is flashing. - The hours advance while the hour set
button (
 ) is pressed. The
minutes advance while the minute set button ( ) is pressed.
- Press the clock button (
) again to start the clock.
Time resetting
- Press the clock button (
 ) for about
2 seconds until a beep is heard. - Press the :00 button ( 1 ).
- When the button is pressed, the time
will be reset as follows:
(Example)
12:01—12:2912:00 12:30—12:591:00
NOTE
- When the :00 button ( 1 ) is pressed, the seconds will start at “ 00 ”.
- Switching between 12 and 24-hour
clock time:
Press the menu button (
 )
)
several times until 12 and 24-hour clock time are displayed. Turn the audio control dial in either direction, select the desired clock setting while the preferred clock time is flashing
 Power/Volume/Sound Controls
Power ON/OFF
Switch the ignition to ACC or ON. Press
the power/volume dial to turn the audio
system on. Press the power/volume dial
again to turn the audio system off.
Volume adjustment
To a ...
 Operating the Radio
Radio ON
Press a band selector button ( )
to
turn the radio on.
Band selection
Successively pressing the band selector
button ( ) switches the bands as
follows: FM1→FM2→AM.
...
Other materials:
Power Brake Unit Removal/Installation [Mzr 2.0, Skyactiv G 2.0, Mzr 2.5]
CAUTION:
Once the brake switch clearance has automatically been adjusted, it cannot
be adjusted again. Therefore, replace the switch with a new one when replacing
the power brake unit or performing any procedure that changes the pedal stroke.
Secure the steering wheel using tap ...
Stay Damper Disposal
NOTE:
The stay damper contains colorless, odorless, nontoxic gas.
1. Wear protective eye wear.
2. Position the stay damper horizontally.
3. Drain gas and oil by cutting the position indicated in the figure to a
2—3 mm {0.08—0.11 in} depth using a metal saw.
CAUTION:
...
My Settings
In the Subaru Solterra, the My Settings function enables personalized
driver recognition using various authentication devices, automatically restoring
individual driving preferences and vehicle configurations upon entry.
By linking a specific device—such as an electronic key—to a registered ...
