Mazda 3 Service Manual: Trunk Lid Stay Damper Disposal
NOTE:
-
The gas in the trunk lid stay damper is colorless, odorless, and non-toxic.
1. Wear protective eye wear.
2. Lay the trunk lid stay damper flat.
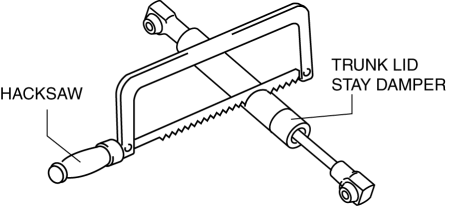
3. Hacksaw 2—3 mm {
0.08—0.11 in}
into the trunk lid stay damper using a hacksaw, and allow the gas to escape from the trunk lid stay damper.
4. Verify that the gas has escaped from the trunk lid stay damper.
5. Discard the trunk lid stay damper.
 Trunk Lid Removal/Installation
WARNING:
Removing the trunk lid stay damper without supporting the trunk lid can be
dangerous. The trunk lid may fall and injure you. Be sure to open the trunk
lid completely and support ...
 Trunk Side Trim Removal/Installation
4SD
Left-side
1. Remove the following parts:
a. Rear scuff plate.
b. Tire house trim.
c. Trunk mat.
d. Trunk board.
e. Trunk end trim.
f. Service hole cover
2. Remove the fasteners.
...
Other materials:
Antenna Feeder No.4 Removal/Installation
Removal
NOTE:
The antenna feeder No.4 is integrated with the dashboard wiring harness.
1. Refer to DASHBOARD DISASSEMBLY/ASSEMBLY.
Installation
CAUTION:
If the antenna feeder No.4 is installed with tension on the cable and wiring
harness it could result in loosening of t ...
i-ELOOP
On conventional vehicles, the kinetic energy that is generated when the
vehicle is
decelerated by applying the brakes or during engine braking ends up being
discarded as
heat. By utilizing this discarded kinetic energy to generate electricity and use
it to power the
vehicle's electrical dev ...
Oil Pump Removal/Installation [Mzr 2.3 Disi Turbo]
WARNING:
Hot engines and engine oil can cause severe burns. Turn off the engine and
wait until it and the engine oil have cooled.
A vehicle that is lifted but not securely supported on safety stands is dangerous.
It can slip or fall, causing death or serious injury. Never work ...
