Mazda 3 Service Manual: Joint Shaft Removal/Installation [Mzr 2.0, Mzr 2.3 Disi Turbo, Mzr 2.5]
CAUTION:
-
Performing the following procedures without first removing the ABS wheel-speed sensor may possibly cause an open circuit in the wiring harness if it is pulled by mistake. Before performing the following procedures, remove the ABS wheel-speed sensor connector (axle side) and fix it to an appropriate place where the sensor wiring harness will not be pulled by mistake while servicing the vehicle.
1. Remove the aerodynamic under cover No.2 and splash shield as a unit..
2. Drain the transaxle oil or ATF..
3. Remove the WU-TWC bracket. (MZR 2.3 DISI Turbo).
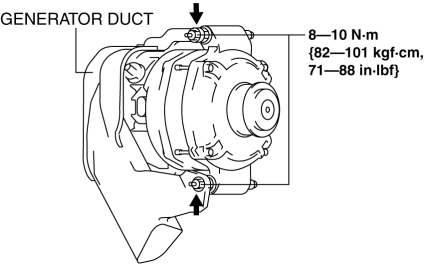
4. Remove the generator duct fitting nuts, and position it in the engine compartment in a location where no part can be damaged as shown in the figure. (MZR 2.3 DISI Turbo)
5. Remove in the order indicated in the table.
6. Install in the reverse order of removal.

|
1 |
ABS wheel-speed sensor connector |
|
2 |
Tie-rod end ball joint . |
|
3 |
Stabilizer control link upper nut |
|
4 |
Dynamic damper |
|
5 |
Front lower arm ball joint . |
|
6 |
Joint shaft . |
|
7 |
Joint shaft bracket (MZR 2.0) (See Joint Shaft Bracket (MZR 2.0) Installation Note.) |
|
8 |
Joint shaft clip . |
Joint Shaft Removal Note
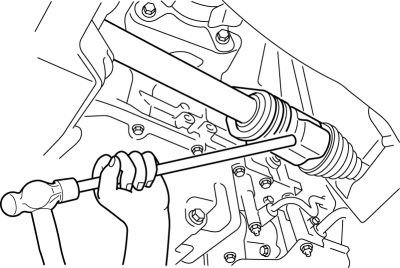
1. Disconnect the drive shaft (RH) from the joint shaft by tapping the transaxle side outer ring with a brass bar and hammer.
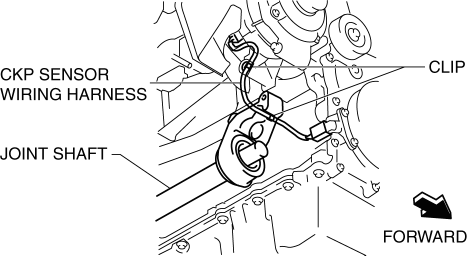
2. Disconnect the clips to set the CKP sensor wiring harness out of the way to prevent interference with the joint shaft. (MZR 2.5)
3. Remove the joint shaft installation bolts.
4. Remove the joint shaft.
CAUTION:
-
The sharp edges of the joint shaft can slice or puncture the oil seal. Be careful when removing the joint shaft from the transaxle.
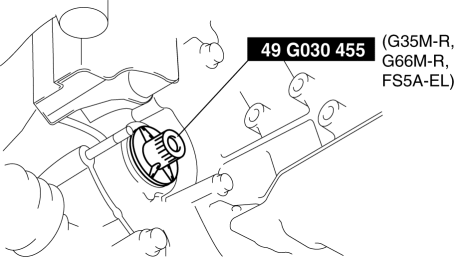
5. Install the SST to the transaxle after the joint shaft is removed.
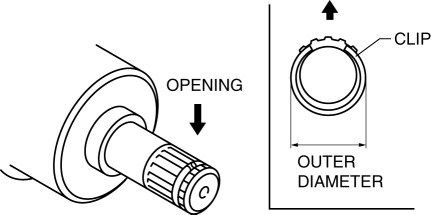
Joint Shaft Clip Installation Note
1. Install a new joint shaft clip to the clip groove at the end of the joint shaft with the clip opening facing upward and the clip width within the specification.
2. After installation, measure the outer diameter.
-
If it exceeds the specification, repeat installation using a new clip.
-
Standard
-
31.2 mm {1.23 in} or less
Joint Shaft Bracket (MZR 2.0) Installation Note
1. Temporarily tighten the bolts A and B.
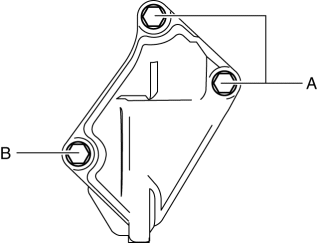
2. Tighten the bolts A, then tighten the bolt B to the specified torque.
-
Tightening torque
-
42—62 N·m {4.3—6.3 kgf·m, 31—45 ft·lbf}
Joint Shaft (MZR 2.3 DISI Turbo, MZR 2.5) Installation Note
1. Insert the joint shaft into the transaxle.
2. Temporarily tighten the bolts A and B.
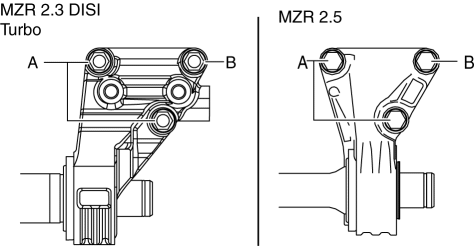
3. Tighten the bolts A, then tighten the bolt B to the specified torque.
-
Tightening torque
-
42—62 N·m {4.3—6.3 kgf·m, 31—45 ft·lbf}
Front Lower Arm Ball Joint Installation Note
NOTE:
-
The bolt insertion direction can be either front or rear of the vehicle, however, keep the insertion direction the same on both the left and right sides of the vehicle.
 Joint Shaft Inspection
1. Verify that there is no torsion or cracks on the joint shaft.
If there is any malfunction, replace the joint shaft.
2. Turn the joint shaft by hand and verify that the bearing rotates ...
 Joint Shaft Removal/Installation [Skyactiv G 2.0]
CAUTION:
Performing the following procedures without first removing the ABS wheel-speed
sensor may possibly cause an open circuit in the wiring harness if it is pulled
by mistake. Before ...
Other materials:
Battery Recharging [Skyactiv G 2.0]
Using GR8-1291:
(See GR8-1291 INSTANT TRAINING MODULE (VIDEO) .)
WARNING:
Keep all flames away from the battery, otherwise evaporated gas from the
battery fluid may catch fire and cause serious injury.
1. Remove the battery filler caps and check the water level. If necessary, add ...
Windshield Defrosting and
Defogging
Set the mode selector dial to the
position.
Set the temperature control dial to the
desired position.
Set the fan control dial to the desired
speed.
If dehumidified heating is desired, turn
on the air conditioner.
WARNING
Do not defog the windshield using the
pos ...
Generator Inspection [Mzr 2.0, Mzr 2.5]
CAUTION:
Do not apply direct battery positive voltage to generator terminal D, otherwise
it could cause damage to the internal parts (power transistor) of the generator.
Generator Warning Light
1. Verify that the battery is fully charged.
2. Verify that the drive belt is correct. ...
