Mazda 3 Service Manual: Windshield Washer Hose Removal/Installation
1. Remove the following parts:
a. Windshield wiper arm and blade.
b. Front fender molding.
c. Cowl grille.
d. Front mudguard (RH).
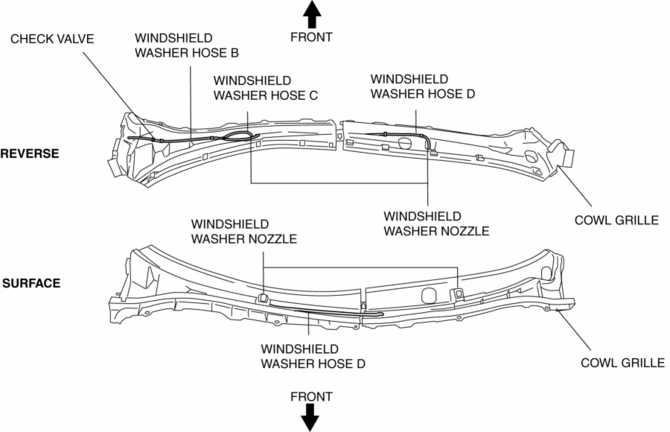
2. Disconnect joint pipes, then remove windshield washer hose B, C and D.
3. Remove the windshield washer hose B.
4. Disconnect windshield washer hose C from the washer nozzle.
5. Remove the windshield washer hose C.
6. Disconnect windshield washer hose D from the washer nozzle.
7. Remove the windshield washer hose D.
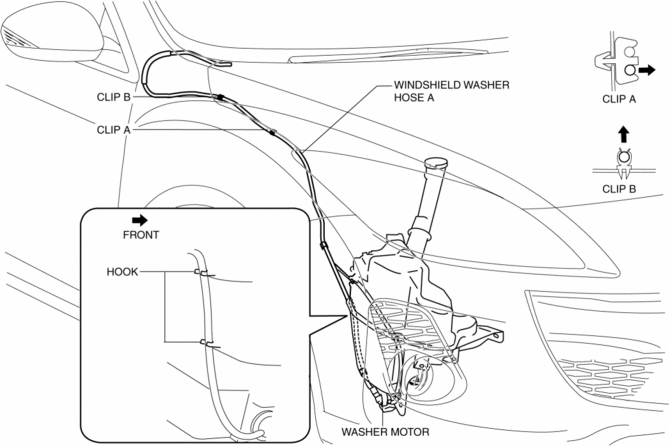
8. Disconnect the windshield washer hose A from the windshield washer motor.
9. Remove the clip A and B.
10. Disconnect joint pipes, then remove windshield washer hose A.
11. Remove the windshield washer hose A.
12. Install in the reverse order of removal.
 Washer Tank Removal/Installation
Vehicles with the washer fluid-level sensor
1. Disconnect the negative battery cable..
2. Remove the front bumper..
3. Remove in the order indicated in the table.
1
...
 Windshield Washer Nozzle Removal/Installation
1. Remove the following parts:
a. Windshield wiper arm and blade.
b. Front fender molding.
c. Cowl grille.
2. Remove the windshield washer hose from the windshield washer nozzle.
3. Squeeze ...
Other materials:
Using the charging schedule function
The Subaru Solterra allows AC charging to be conveniently scheduled
in advance, enabling drivers to optimize charging times according to their daily
routine and energy cost preferences.
■ Calendar settings
The charging schedule of the Subaru Solterra operates based on the date and time
con ...
Mass Air Flow (MAF) Sensor/Intake Air Temperature (Iat) Sensor No.1 Removal/Installation
[Skyactiv G 2.0]
CAUTION:
Be careful not to hit the sensor element or allow foreign matter to get on
it during sensor removal/installation. If the sensor element is hit or foreign
matter gets on it, an error may occur in the sensor output signal resulting
in deterioration in the engine control.
...
Liftgate Lower Trim Removal/Installation
1. Remove the liftgate upper trim..
2. Remove the liftgate side trim..
3. Remove the screw and fasteners.
4. Pull the liftgate lower trim in the direction of arrow (1), (2), (3), then
detach clips A, B, pin C and D from the liftgate.
5. Remove the liftgate lower trim.
6. Install ...
