Mazda 3 Service Manual: Windshield Wiper Arm And Blade Removal/Installation
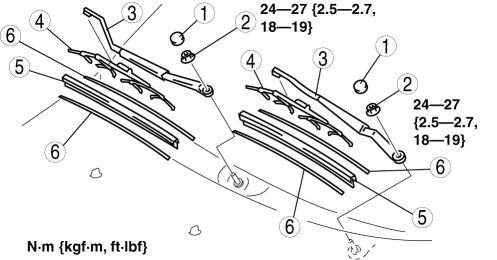
1. Remove in the order indicated in the table.
|
1 |
Cap |
|
2 |
Nut |
|
3 |
Windshield wiper arm (See Windshield Wiper Arm Installation Note.) |
|
4 |
Windshield wiper blade |
|
5 |
Rubber brush |
|
6 |
Backing plate |
2. Install in the reverse order of removal.
3. Adjust the windshield wiper arm and blade..
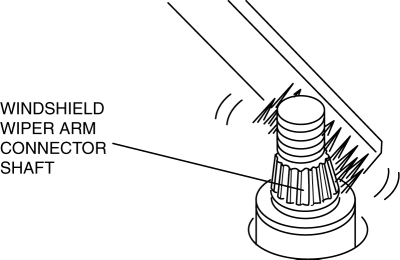
Windshield Wiper Arm Installation Note
1. Clean the windshield wiper arm connector shafts using a wire brush before installing the windshield wiper arms.
 Windshield Wiper Arm And Blade Adjustment
1. Operate the windshield wipers, and then turn off the windshield wiper motor
to set the wipers in the auto stop position.
2. Slide the serrated connecting part and adjust the windshield wiper ar ...
 Windshield Wiper Motor Disassembly/Assembly
1. Disassemble in the order indicated in the table.
1
Wiper link No.1
(See Ball Joint Assembly Note.)
2
Wiper link No.2
(See Ball Joint ...
Other materials:
PID/Data Monitor Inspection [Instrument Cluster]
1. Connect the M-MDS (IDS) to the DLC-2.
2. After the vehicle is identified, select the following items from the initialization
screen of the IDS.
a. Select “DataLogger”.
b. Select “Modules”.
c. Select “IC”.
3. Select the applicable PID from the PID table.
4. Verify the ...
Engine Exhaust (Carbon monoxide)
WARNING
Do not drive your vehicle if you smell exhaust gas inside the
vehicle:
Engine exhaust gas is dangerous. This gas contains carbon monoxide (CO),
which is
colorless, odorless, and poisonous. When inhaled, it can cause loss of
consciousness and
death. If you smell ...
How to Use Stitcher™* Radio
What is Stitcher™ Radio?
Stitcher™ radio is an application which can be used to listen to Internet radio
or stream
podcasts.
Recommended content is automatically selected by registering content which you
put into
your favorites, or by pressing the Like or Dislike button.
For details ...
