Mazda 3 Service Manual: Child Restraint Seat Anchor Removal/Installation
4SD
1. Remove the cover.
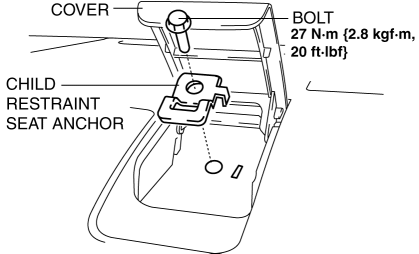
2. Remove the bolt and child-restraint seat anchor.
3. Install in the reverse order of removal.
5HB
1. Remove the trunk end trim..
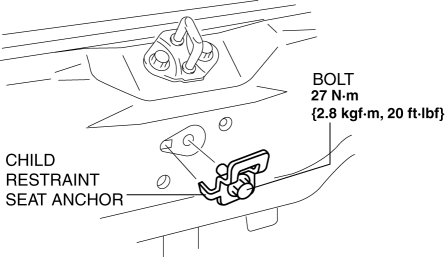
2. Remove the bolt and child-restraint seat anchor.
3. Install in the reverse order of removal.
 Active Headrest Inspection
1. Push the bottom of front seat back in the direction of arrow shown in the
figure.
2. While inspecting for move the front seat back. ...
 Front Seat Back Component [Vehicles Without Power Seat System] Removal/Installation
WARNING:
Handling a front seat (with built-in side air bag) improperly can accidentally
operate (deploy) the air bag, which may seriously injure you. Read the service
warnings before han ...
Other materials:
Timing Chain Removal/Installation [Mzr 2.0, Mzr 2.5]
1. Remove the battery cover..
2. Disconnect the negative battery cable..
3. Remove the plug hole plate..
4. Disconnect the wiring harness.
5. Remove the ignition coils..
6. Remove the spark plugs..
7. Remove the ventilation hose.
8. Remove the coolant reserve tank with the hose still c ...
Storage Compartments
WARNING
Keep storage boxes closed when
driving:
Driving with the storage boxes open is
dangerous. To reduce the possibility of
injury in an accident or a sudden stop,
keep the storage boxes closed when
driving.
Do not put articles in storage spaces
with no lid:
...
Turning the Engine Off
WARNING
Do not stop the engine while the vehicle
is moving:
Stopping the engine while the vehicle
is moving for any reason other than in
an emergency is dangerous. Stopping
the engine while the vehicle is moving
will result in reduced braking ability
due to the loss of ...
