Mazda 3 Owners Manual: Operating the Radio
Radio ON
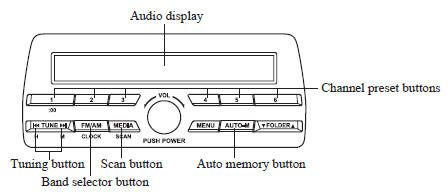
Press a band selector button (  )
)
to
turn the radio on.
Band selection
Successively pressing the band selector
button ( ) switches the bands as
follows: FM1→FM2→AM.
The selected mode will be indicated.
NOTE If the FM broadcast signal becomes weak, reception automatically changes from STEREO to MONO for reduced noise.
Tuning
The radio has the following tuning methods: Manual, Seek, Scan, Preset channel, and Auto memory tuning. The easiest way to tune stations is to set them on preset channels.
Manual tuning
Select the station by pressing the tuning
button (  ,
,
 ) lightly.
Seek tuning
Automatic search for radio stations starts
when the tuning button (  ,
,
 ) is pressed
until a beep sound is heard. The search
stops when a station is found.
NOTE If you continue to press and hold the button, the frequency will continue changing without stopping.
Scan tuning
Press and hold the scan button (  )
)
to
automatically sample strong stations.
Scanning stops at each station for about 5
seconds. To hold a station, press and hold
the scan button ( ) again during
this
interval.
Preset channel tuning The 6 preset channels can be used to store 6 AM and 12 FM stations.
- To set a channel first select AM, FM1, or FM2. Tune to the desired station.
- Press a channel preset button for
about 2 seconds until a beep is heard.
The preset channel number or station frequency will be displayed. The station is now held in the memory.
- Repeat this operation for the other
stations and bands you want to store.
To tune one in the memory, select AM, FM1, or FM2 and then press its channel preset button. The station frequency or the channel number will be displayed.
Auto memory tuning
This is especially useful when driving in an area where the local stations are not known.
Press and hold the auto memory button
( ) for about 2 seconds until a beep
is heard; the system will automatically
scan and temporarily store up to 6 stations
with the strongest frequencies in each
selected band in that area.
After scanning is completed, the station
with the strongest frequency will be tuned
and its frequency displayed. Press and
release the auto memory button (  )
)
to recall stations from the auto-stored
stations. One stored station will be
selected each time and its frequency and
channel number will be displayed.
NOTE If no stations can be tuned after scanning operations, “ A ” will be displayed.
 Clock
Clock
Setting the time
The clock can be set at any time when the
ignition is switched to ACC or ON.
To adjust the time, press the clock
button ( ) for about 2 seconds
until
a beep is heard. ...
 Operating the Compact Disc (CD) Player
NOTE
If a disc has both music data (CD-DA)
and MP3/WMA/AAC files, playback of the
two or three file types differs depending on
how the disc was recorded.
Inserting the CD
Insert the CD i ...
Other materials:
Antenna Feeder No.4 Removal/Installation
Removal
NOTE:
The antenna feeder No.4 is integrated with the dashboard wiring harness.
1. Refer to DASHBOARD DISASSEMBLY/ASSEMBLY.
Installation
CAUTION:
If the antenna feeder No.4 is installed with tension on the cable and wiring
harness it could result in loosening of t ...
Blind Spot Monitoring (Bsm) Off Switch Removal/Installation
1. Disconnect the negative battery cable..
2. Remove the switch panel in the direction of the arrow shown in the figure.
3. Disconnect the connector.
4. Remove the BSM OFF switch in the direction of the arrow (2) shown in the figure
while pressing the tabs in the direction of the arrow ...
Replacing a Wheel
WARNING
Always use wheels of the correct size on
your vehicle:
Using a wrong-sized wheel is
dangerous. Braking and handling
could be aff ected, leading to loss of
control and an accident.
CAUTION
A wrong-sized wheel may adversely
aff ect:
Tire fit
...
