Mazda 3 Owners Manual: Clock
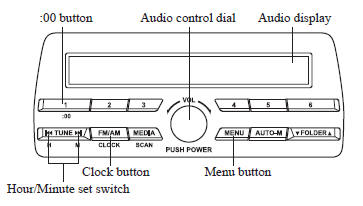
Setting the time
The clock can be set at any time when the ignition is switched to ACC or ON.
- To adjust the time, press the clock
button (
 ) for about 2 seconds
until a beep is heard. - The clock's current time will flash.
Time adjustment
- To adjust the time, press the hour/
minute set button (
 ,
,
 ) while the
clock's current time is flashing. - The hours advance while the hour set
button (
 ) is pressed. The
minutes advance while the minute set button ( ) is pressed.
- Press the clock button (
) again to start the clock.
Time resetting
- Press the clock button (
 ) for about
2 seconds until a beep is heard. - Press the :00 button ( 1 ).
- When the button is pressed, the time
will be reset as follows:
(Example)
12:01—12:2912:00 12:30—12:591:00
NOTE
- When the :00 button ( 1 ) is pressed, the seconds will start at “ 00 ”.
- Switching between 12 and 24-hour
clock time:
Press the menu button (
 )
)
several times until 12 and 24-hour clock time are displayed. Turn the audio control dial in either direction, select the desired clock setting while the preferred clock time is flashing
 Power/Volume/Sound Controls
Power ON/OFF
Switch the ignition to ACC or ON. Press
the power/volume dial to turn the audio
system on. Press the power/volume dial
again to turn the audio system off.
Volume adjustment
To a ...
 Operating the Radio
Radio ON
Press a band selector button ( )
to
turn the radio on.
Band selection
Successively pressing the band selector
button ( ) switches the bands as
follows: FM1→FM2→AM.
...
Other materials:
Oil Seal (Differential) Replacement [G35 M R]
1. On level ground, jack up the vehicle and support it evenly on safety stands.
2. Remove the aerodynamic under cover No.2..
3. Drain the oil from the transaxle..
4. Remove the front splash shield..
5. Separate the drive shaft and joint shaft from the transaxle..
6. Remove the oil seals u ...
How to Use Aha
Aha is an application which can be used to enjoy various Internet content
such as Internet
radio and podcasts.
Stay connected to your friends activities by getting updates from Facebook and
Twitter.
Using the location-based service, nearby services and destinations can be
searched or re ...
Security Setting (Type A)
If a passcode is set, the system cannot be
activated unless the passcode is input.
NOTE
Do this function only when parked. It is
too distracting to attempt while driving
and you may make too many errors to be
effective.
Passcode setting
Press the pick-up button or talk button
with a sho ...
