Mazda 3 Service Manual: Transaxle Fluid Temperature (Tft) Sensor Inspection [FS5 A EL]
CAUTION:
-
Water or foreign objects entering the connector can cause a poor connection or corrosion. Be sure not to drop water or foreign objects on the connector when disconnecting it.
On-Vehicle Inspection
1. Perform the following procedures.
a. Remove the battery cover..
b. Disconnect the negative battery cable.
c. Remove the air cleaner component..
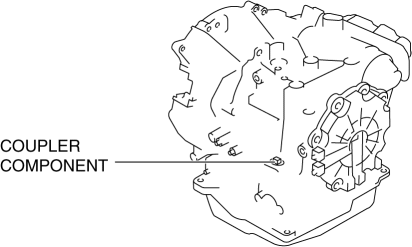
d. Disconnect the coupler component connector.
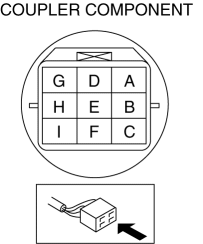
2. Measure the resistance between the coupler component terminals E and H.
-
If there is any malfunction, replace the TFT sensor..
|
ATF temperature (°C{°F}) |
Resistance (kilohm) |
|
-20 {-4} |
236—324 |
|
0 {32} |
84.3—110 |
|
20 {68} |
33.5—42.0 |
|
40 {104} |
14.7—17.9 |
|
60 {140} |
7.08—8.17 |
|
80 {176} |
3.61—4.15 |
|
100 {212} |
1.96—2.24 |
|
120 {248} |
1.13—1.28 |
|
130 {266} |
0.87—0.98 |
Off-Vehicle Inspection
1. Place the TFT sensor and a thermometer in ATF as shown, and heat the ATF gradually.
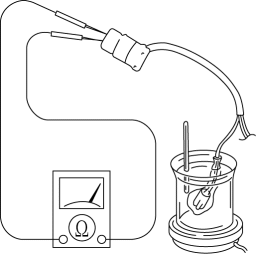
WARNING:
-
A hot ATF and beaker can cause severe burns. Do not touch them.
2. Measure the resistance between the coupler component terminals E and H.
-
If there is any malfunction, replace the TFT sensor..
|
ATF temperature (°C{°F}) |
Resistance (kilohm) |
|
-20 {-4} |
236—324 |
|
0 {32} |
84.3—110 |
|
20 {68} |
33.5—42.0 |
|
40 {104} |
14.7—17.9 |
|
60 {140} |
7.08—8.17 |
|
80 {176} |
3.61—4.15 |
|
100 {212} |
1.96—2.24 |
|
120 {248} |
1.13—1.28 |
|
130 {266} |
0.87—0.98 |
 Inspection After Transaxle Installation [G66 M R]
NOTE:
Perform the following inspection only when the transaxle has been overhauled.
1. Perform a road test and inspect the following items:
a. No abnormal noise in each shift position. ...
 Transaxle Fluid Temperature (Tft) Sensor Removal/Installation [FS5 A EL]
WARNING:
A hot transaxle and ATF can cause severe burns. Turn off the engine and wait
until they are cool.
1. Remove the primary control valve body.
a. Remove the battery cover..
...
Other materials:
Emission Control System
This vehicle is equipped with an emission control system (the catalytic
converter is
part of this system) that enables the vehicle to comply with existing exhaust
emissions
requirements.
WARNING
Never park over or near anything fl ammable:
Parking over or near anything fl ammable ...
Parking Brake Cable Removal/Installation
1. Remove the following parts:
a. Upper panel.
b. Shift knob (MTX).
c. Selector lever knob (ATX).
d. Shift panel.
e. Side wall.
f. Console.
2. Remove the under cover..
3. Remove the tunnel member (rear). (MZR 2.0, MZR 2.5, MZR 2.3 DISI Turbo).
4. Remove the brace bar. (SKYACTIV-G ...
Driving range
The driving range displayed on the multi-information display of the
Subaru Solterra represents an estimated reference distance based on current conditions.
The actual distance that can be traveled may vary depending on multiple factors
and may differ from the displayed value.
Displayed value
...
