Mazda 3 Service Manual: Power Brake Unit Inspection
NOTE:
-
The following inspection methods are simple inspection methods to judge the function of the power brake unit.
-
If there is any malfunction in the power brake unit, replace the power brake unit as a single unit.
Without Using SST
Operation inspection
1. With the engine stopped, pump the pedal a few times.
2. With the pedal depressed, start the engine.
3. If the pedal moves down slightly immediately after starting the engine, the unit is normal.
Vacuum function inspection
1. Start the engine.
2. Stop the engine after driving the vehicle for 1—2 min
.
3. Depress the pedal with normal force.
4. If the first pedal stroke is long and becomes shorter with subsequent strokes, the unit is normal.
-
If a problem is found, inspect for damage to or improper installation of the check valve and vacuum hose. After repairing, inspect again.
Vacuum loss function inspection
1. Start the engine.
2. Depress the pedal with normal force.
3. With the pedal depressed, stop the engine.
4. Hold the pedal depressed for approx. 30 s
.
5. If the pedal height does not change during this time, the unit is normal.
Using SST
Pre-inspection preparation
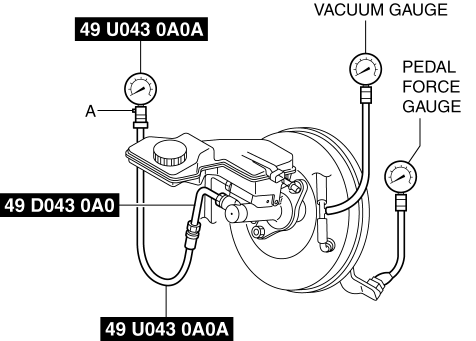
1. Install the SST
(49 D043 0A0) to the master cylinder (secondary side) in the orientation shown in the figure.
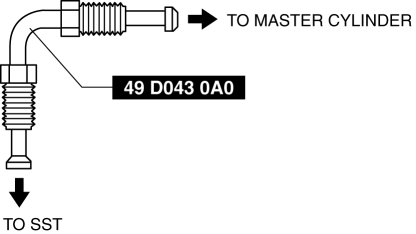
NOTE:
-
When installing the SST
(49 D043 0A0) to the master cylinder, use a commercially available flare nut wrench.
-
Flare nut across flat: 12 mm {0.47 in}
2. Connect the SSTs
, a vacuum gauge, and a pedal force gauge to the master cylinder, and bleed the air from the SSTs
and the brake line. (Bleed the air from the SSTs
using air bleed valve A.)
Checking for vacuum loss (loaded condition)
1. Start the engine.
2. Depress the brake pedal with a force of 200 N {20.4 kgf, 45.0 lbf}
.
3. Stop the engine when the vacuum gauge reading reaches 68 kPa {510 mmHg, 20 inHg}
with the brake pedal depressed.
4. Measure the amount of vacuum decrease for 15 s
immediately after stopping the engine.
5. If the amount of vacuum decrease is 3.3 kPa {25 mmHg, 0.97 inHg}
or less, the power brake unit is normal.
Lack of hydraulic pressure inspection
1. If the pedal force and fluid pressure correlation is within the specification with the engine stopped and a vacuum amount of 0 kPa {0 mmHg, 0 inHg}
, the system is normal. Master cylinder fluid pressure
|
Vacuum amount at 0 kPa {0 mmHg, 0 inHg} |
|
|
Pedal force |
Fluid pressure |
|
200 N {20.4 kgf, 45.0 lbt} |
500 kPa {5.10 kgf/cm2, 72.5 psi} or more |
Hydraulic pressure inspection
1. Start the engine. Depress the brake pedal when the vacuum reaches 66.7 kPa {500 mmHg, 19.7 inHg}
.
2. At this time, apply the indicated pedal force and if the fluid pressure is within the specification, the unit is normal. Master cylinder fluid pressure (MZR 2.0, SKYACTIV-G 2.0, MZR 2.5)
|
Vacuum amount at 66.7 kPa {500 mmHg, 19.7 inHg} |
|
|
Pedal force |
Fluid pressure |
|
200 N {20.4 kgf, 45.0 lbt} |
6,500 kPa {66.28 kgf/cm2, 942.7 psi} or more |
Master cylinder fluid pressure (MZR 2.3 DISI Turbo)
|
Vacuum amount at 66.7 kPa {500 mmHg, 19.7 inHg} |
|
|
Pedal force |
Fluid pressure |
|
200 N {20.4 kgf, 45.0 lbt} |
7,000 kPa {71.38 kgf/cm2, 1,015 psi} or more |
 Master Cylinder Removal/Installation [Mzr 2.3 Disi Turbo]
1. Remove the battery and battery tray..
2. Pinch open the clamps using pliers and disconnect the vacuum hoses from the
insulator bracket as shown in the figure.
3. Remove in the order indic ...
 Power Brake Unit Removal/Installation [Mzr 2.0, Skyactiv G 2.0, Mzr 2.5]
CAUTION:
Once the brake switch clearance has automatically been adjusted, it cannot
be adjusted again. Therefore, replace the switch with a new one when replacing
the power brake unit or ...
Other materials:
Auxiliary Jack/Usb Port Removal/Installation
1. Disconnect the negative battery cable..
2. Remove the following parts:
a. Upper panel.
b. Shift lever knob (MTX).
c. Selector lever knob (ATX).
d. Shift panel.
e. Side wall.
f. Console.
3. Remove the auxiliary jack/USB port in the direction of the arrow (2) shown
in the figure w ...
Tire information
Typical tire symbols
Location of treadwear indicators
Maximum load rating at the specified cold tire pressure for the Subaru Solterra
Maximum cold tire inflation pressure
This value indicates the highest pressure level permitted for safe tire inflation.
Tire size designation used ...
If the EV system will not start
If your Subaru Solterra does not power on as expected, the underlying
cause can vary depending on environmental conditions, system status, or component
functionality. Carefully review the following scenarios and apply the appropriate
solution to restore operation safely and efficiently.
The E ...
