Mazda 3 Service Manual: Power Brake Unit Removal/Installation [Mzr 2.0, Skyactiv G 2.0, Mzr 2.5]
CAUTION:
-
Once the brake switch clearance has automatically been adjusted, it cannot be adjusted again. Therefore, replace the switch with a new one when replacing the power brake unit or performing any procedure that changes the pedal stroke.
-
Secure the steering wheel using tape or a cable to prevent the steering shaft from rotating after disconnecting the steering shaft. If the steering wheel rotates after the steering shaft and the steering gear and linkage are disconnected, the internal parts of the clock spring could be damaged.
1. Remove the battery and battery tray..
2. Remove the master cylinder..
3. Disconnect the brake pipes from the brake pipe joint.
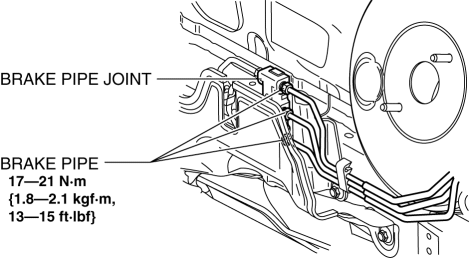
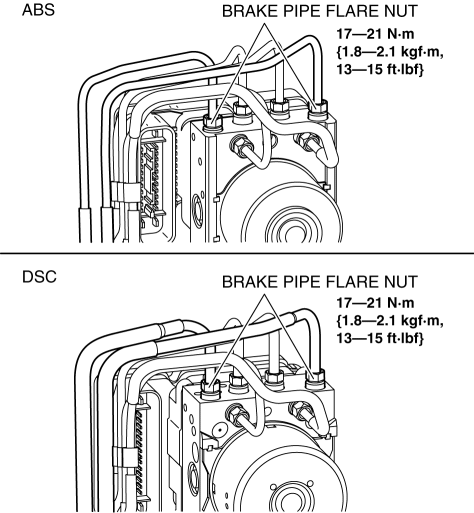
4. Loosen the brake pipe flare nuts as shown in the figure.
5. Move the brake pipes as shown in the figure.

6. Disconnect the steering shaft from the steering gear and linkage..
7. Remove in the order indicated in the table.
8. Remove the brake switch..
9. Install in the reverse order of removal.
10. After installation, inspect the brake pedal..

|
1 |
Vacuum hose (See Vacuum Hose Removal Note (MZR 2.0, MZR 2.5).) (See Vacuum Hose Removal Note (SKYACTIV-G 2.0).) (See Vacuum Hose Installation Note (MZR 2.0, MZR 2.5).) (See Vacuum Hose Installation Note (SKYACTIV-G 2.0).) |
|
2 |
Joint pin (See BRAKE PEDAL REMOVAL/INSTALLATION.) |
|
3 |
Nut |
|
4 |
Power brake unit |
|
5 |
Gasket |
Vacuum Hose Removal Note (MZR 2.0, MZR 2.5)
1. Remove the vacuum hose from the vacuum hose clip.
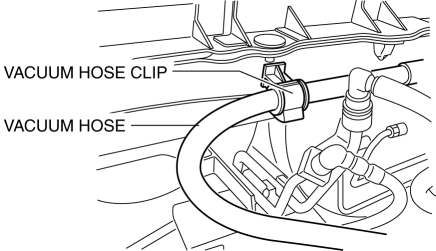
2. Disconnect the vacuum hose connector from the power brake unit while pressing the tabs of the vacuum hose connector.

Vacuum Hose Removal Note (SKYACTIV-G 2.0)
1. Remove the vacuum hose..
Vacuum Hose Installation Note (MZR 2.0, MZR 2.5)
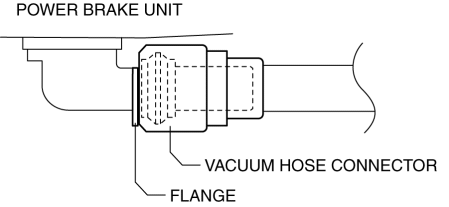
1. Insert the vacuum hose connector to the power brake unit.
2. Verify that the vacuum hose is inserted so that the connector contacts the power brake unit flange.
3. Install the vacuum hose to the vacuum hose clip.
Vacuum Hose Installation Note (SKYACTIV-G 2.0)
1. Install the vacuum hose..
 Power Brake Unit Inspection
NOTE:
The following inspection methods are simple inspection methods to judge the
function of the power brake unit.
If there is any malfunction in the power brake unit, replace the ...
 Power Brake Unit Removal/Installation [Mzr 2.3 Disi Turbo]
CAUTION:
Once the brake switch clearance has automatically been adjusted, it cannot
be adjusted again. Therefore, replace the switch with a new one when replacing
the power brake unit or ...
Other materials:
Front Outer Handle Removal/Installation
1. To access the glass installation bolt, position the front door glass so that
the distance from the top of the front door glass to the upper part of the front
beltline molding is approx. 80 mm {3.1 in}.
2. Disconnect the negative battery cable..
3. Remove the following parts:
a. Inne ...
Blind Spot Monitoring (Bsm) Off Switch Removal/Installation
1. Disconnect the negative battery cable..
2. Remove the switch panel in the direction of the arrow shown in the figure.
3. Disconnect the connector.
4. Remove the BSM OFF switch in the direction of the arrow (2) shown in the figure
while pressing the tabs in the direction of the arrow ...
Transaxle Range (TR) Switch Removal/Installation [FS5 A EL]
CAUTION:
Water or foreign objects entering the connector can cause a poor connection
or corrosion. Be sure not to drop water or foreign objects on the connector
when disconnecting it.
1. Engage the parking brake and use wheel chocks at the front and rear of the
wheels.
2. Shi ...
