
Subaru Solterra 2023-2026 Owner's Manual: Child restraint systems
Before installing a child restraint system in your Subaru Solterra, it is essential to carefully review all safety precautions, understand the different types of restraint systems available, and follow the correct installation procedures outlined in this manual.
Whenever traveling with a young child who is not yet able to properly use a standard seat belt, always use a suitable child restraint system. For maximum safety, the system should be installed in one of the rear seats of the Subaru Solterra.
Always follow the specific installation instructions provided by the manufacturer of the child restraint system, in addition to the general guidelines described in this Subaru Solterra manual.
Points to remember
In many regions, including all 50 U.S. states and Canada, the use of child restraint systems is required by law. Compliance with these regulations is essential when operating your Subaru Solterra.
- Always prioritize safety warnings and strictly follow all applicable laws and regulations regarding child restraint systems in your Subaru Solterra.
- Continue using a child restraint system until the child grows large enough to properly and safely use the vehicle’s seat belt.
- Select a child restraint system that is fully compatible with the Subaru Solterra and appropriate for the child’s size, weight, and age.
WARNING
■ When a child is riding
Carefully observe the following precautions to ensure child safety in the Subaru Solterra.
Failure to follow these guidelines may result in serious injury or fatal consequences.
- To provide effective protection during sudden braking or collisions, children must always be properly secured using a correctly installed seat belt or child restraint system. Refer to the manufacturer’s manual for detailed installation instructions, and use this Subaru Solterra guide as a general reference.
- Subaru strongly recommends installing child restraint systems in the rear seats of the Subaru Solterra, as statistics show that children are significantly safer when seated in the rear rather than the front passenger seat.
- Never hold a child in your arms or on your lap while driving.
In the event of a collision, the child may be crushed between the occupant and the interior of the Subaru Solterra or thrown forward with dangerous force.
■ Handling the child restraint system
If a child restraint system is not securely installed, it may move or detach during sudden maneuvers or an accident, putting the child and other occupants of the Subaru Solterra at serious risk.
- If the Subaru Solterra has been involved in a significant collision, the child restraint system may have sustained hidden damage. In such cases, do not reuse the system and replace it immediately.
- Ensure that all installation steps provided by the child restraint system manufacturer are followed precisely and that the system is firmly secured in the Subaru Solterra.
- Even when not in use, always keep the child restraint system securely fastened to the seat. Do not leave it loose inside the passenger compartment.
- If removal is necessary, either take the child restraint system out of the Subaru Solterra or store it safely in the luggage compartment to prevent movement.
Child restraint system
■ Types of child restraint system installation methods
Always verify installation procedures by consulting the instruction manual provided with your specific child restraint system before installing it in the Subaru Solterra.
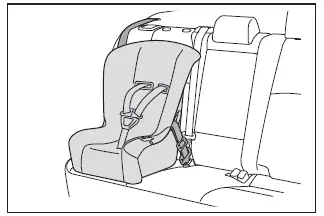
Seat belt attachment
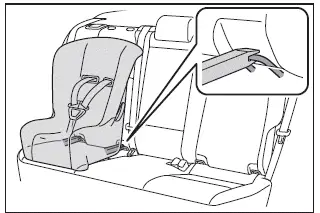
Child restraint LATCH anchors attachment
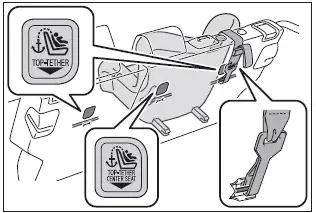
Anchor brackets (for top tether strap) attachment
Additional safety recommendation: Proper installation and consistent use of a child restraint system in the Subaru Solterra significantly improves child passenger safety, ensuring that advanced vehicle protection systems work effectively together.
When using a child restraint system
■ When installing a child restraint system to a front passenger seat
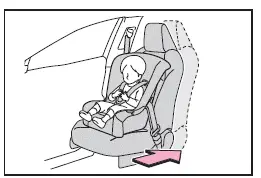
For optimal child safety in the Subaru Solterra, a child restraint system should always be installed on a rear seat whenever possible. The rear seating area provides a significantly safer environment for children. However, if installation on the front passenger seat of the Subaru Solterra is absolutely unavoidable, carefully adjust the seat and surrounding components as described below before installation.
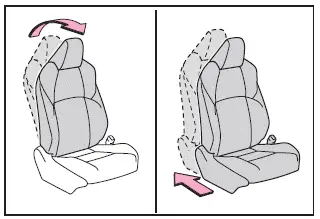
- Set the seatback to the most upright position to ensure proper support and alignment of the child restraint system.
- Slide the front passenger seat fully rearward to maximize the distance between
the child and the airbag deployment zone.
If your Subaru Solterra allows seat height adjustment, raise the seat to its highest position to improve positioning and safety.
- If the head restraint interferes with proper installation and can be removed,
take it out completely.
If removal is not possible, adjust the head restraint to its highest position to avoid obstruction.
WARNING
■ When using a child restraint system
Strictly follow the precautions below when using a child restraint system in your Subaru Solterra.
Failure to comply with these safety instructions may result in serious injury or fatal consequences.
- Never install a rear-facing child restraint system on the front passenger
seat of the Subaru Solterra, even if the "AIR BAG OFF" indicator light is illuminated.
In the event of a collision, the force of airbag deployment can be extremely dangerous and may result in severe injury or death to a child seated in a rear-facing position.
- A forward-facing child restraint system should only be installed on the front passenger seat if absolutely necessary. Systems that require a top tether strap must not be used in the front seat, as the Subaru Solterra does not provide a suitable anchor point in that position.
- When installing a forward-facing child restraint system on the front
passenger seat, always ensure that the seatback is fully upright and the seat
is positioned as far back as possible, regardless of whether the "AIR BAG OFF"
indicator is illuminated.
If the head restraint interferes with installation, remove it if possible to allow proper positioning of the child restraint system.
- Ensure that the child does not lean their head or any part of their body
against the door, window, pillars, or roof side rails of the Subaru Solterra.
These areas contain SRS side airbags and curtain shield airbags, and contact during deployment can result in severe injury or fatal consequences.
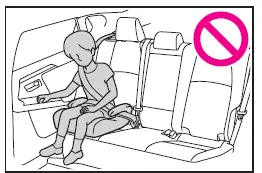
- When using a booster seat in the Subaru Solterra, ensure that the shoulder belt is properly positioned across the center of the child’s shoulder. It should not touch the neck or slip off the shoulder.
- Always select a child restraint system that is appropriate for the child’s size and age, and install it in a rear seat whenever possible.
- If the driver’s seat interferes with proper installation of the child restraint system, relocate the system to the right-hand rear seat to ensure secure positioning.
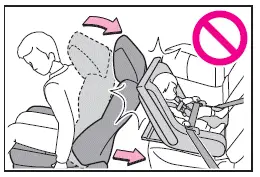
- Adjust the front passenger seat position carefully so that it does not interfere with the installed child restraint system in the Subaru Solterra.
Additional safety recommendation: Proper positioning and installation of a child restraint system in the Subaru Solterra ensures that all integrated safety systems, including airbags and seat belts, function together effectively to provide maximum protection for young passengers.
 Riding with children
When traveling with children in the Subaru Solterra, always follow
these important safety recommendations to ensure their protection and comfort during
every journey.
Always use a child restraint ...
 Child restraint system fixed with a seat belt
In the Subaru Solterra, a child restraint system for infants or small children
must be properly secured using the lap portion of the lap/shoulder seat belt. Correct
installation is essential to en ...
Other materials:
Side Turn Light Inspection
Side turn light illumination inspection
1. Disconnect the negative battery cable..
2. Remove the outer mirror glass..
3. Remove the outer mirror garnish..
4. Remove the side turn light..
5. Connect the battery voltage as shown in the figure.
If the side turn light does illuminat ...
Child-Restraint System Installation
Child-Restraint System Types
In this owner's manual, explanation of
child-restraint systems is provided for the
following three types of popular childrestraint
systems: infant seat, child seat,
booster seat.
NOTE
Installation position is determined
by the type of child-restraint system.
...
Towing
Proper lifting and towing are necessary to prevent damage to the vehicle.
Government and local laws must be followed.
A towed vehicle usually should have its drive wheel (front wheels) off the
ground. If excessive damage or other conditions prevent this, use wheel dollies.
...
