Mazda 3 Service Manual: Front Seat Cover Removal/Installation [Vehicles Without Power Seat System]
WARNING:
-
Handling a front seat (with built-in side air bag) improperly can accidentally operate (deploy) the air bag, which may seriously injure you. Read the service warnings before handling a front seat (with built-in side air bag)..
CAUTION:
-
After removing a front seat, do not operate the slider lever. If the slider lever is operated, the left and right slide positions will deviate, and the slide adjuster may be damaged after the front seat is installed.
-
Verify that there are no malfunctions in the sliding mechanism after installing a front seat.
-
When performing the procedure with a front seat removed from the vehicle, perform the procedure on a clean rag so as not to damage or soil the seat.
-
When the passenger's seat is removed, perform the seat weight sensor inspection using the M-MDS after installing the passenger's seat..
-
When the passenger's seat is replaced with a new one, perform the seat weight sensor calibration using the M-MDS..
Side Cover
Driver-side
1. Switch the ignition to off.
2. Remove the battery cover..
3. Disconnect the negative battery cable and wait 1 min or more
..
4. Remove the front seat..
5. Operate the lift lever in the direction of arrow (1) shown in the figure.
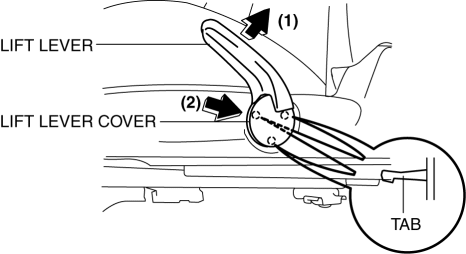
6. Insert a fastener remover from the position of arrow (2) shown in the figure, and remove the lift lever cover by disengaging the tab.
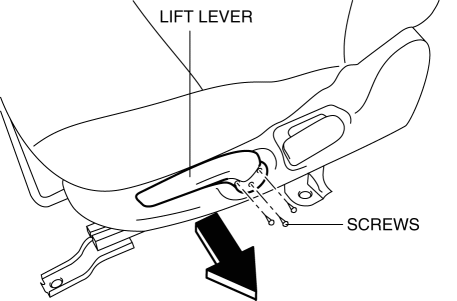
7. Remove the screws, then remove the lift lever in the direction of the arrow.
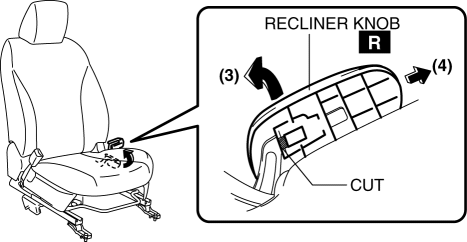
8. After operating the recliner knob in the upward direction (3), cut the area indicated in the figure, then remove the recliner knob in the direction of arrow (4).
CAUTION:
-
The seat back folds forward when the recliner knob is operated. Be careful when operating the recliner knob.
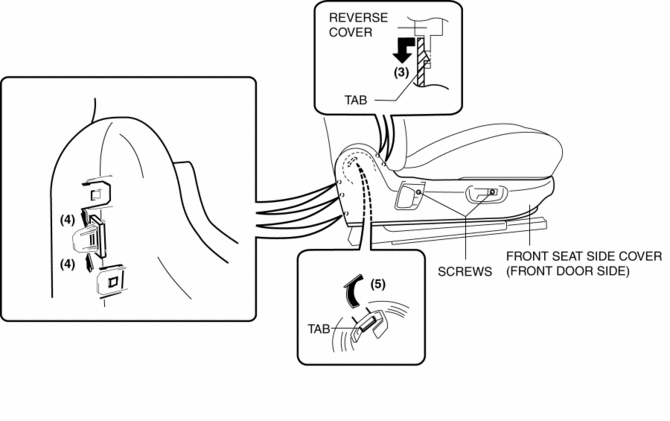
9. Remove the screw.
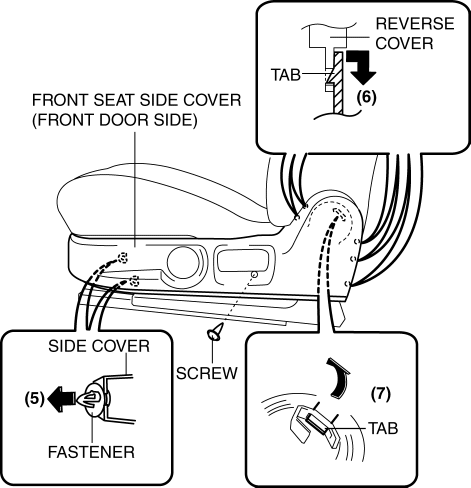
10. Pull the side cover (front door side) in the order of (5), (6), (7) shown in the figure to disengage the fastener and tab.
11. Remove the front seat side cover (front door side).
12. Remove the fastener left to the front seat frame and install it to the original position of the cover.
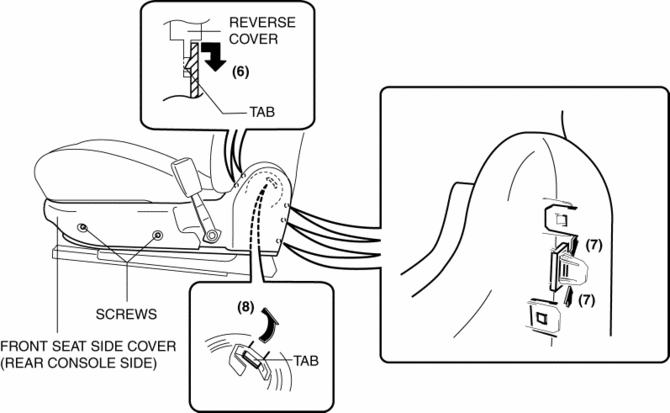
13. Remove the screw.
14. Remove the screws, and pull the side cover (rear console side) in the order of (8), (9), (10) shown in the figure to disengage the fastener and tab.
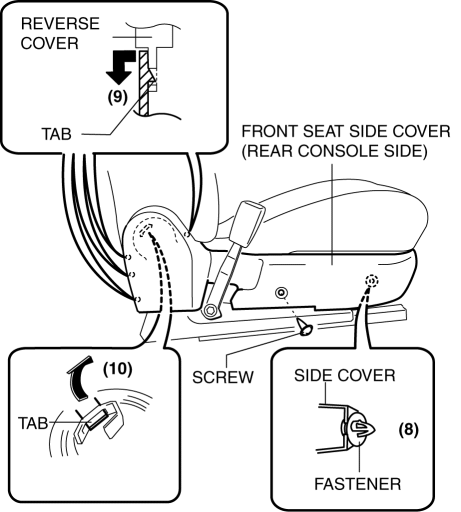
15. Remove the front seat side cover (rear console side).
16. Remove the fastener left to the front seat frame and install it to the original position of the cover.
17. Install in the reverse order of removal.
Passenger-side
1. After operating the recliner knob in the upward direction (1), cut the area indicated in the figure, then remove the recliner knob in the direction of arrow (2).
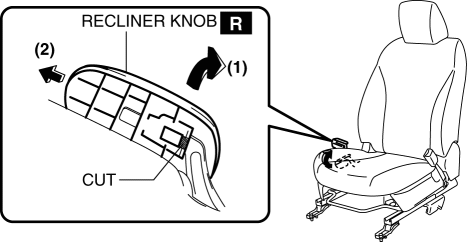
CAUTION:
-
The seat back folds forward when the recliner knob is operated. Be careful when operating the recliner knob.
2. Remove the screws, and pull the side cover (front door side) in the order of (3), (4), (5) shown in the figure to disengage the tab.
3. Remove the front seat side cover (front door side).
4. Remove the screws, and pull the side cover (rear console side) in the order of (6), (7), (8) shown in the figure to disengage the tab.
5. Remove the front seat side cover (rear console side).
6. Install in the reverse order of removal.
 Front Seat Cover Removal/Installation [Vehicles With Power Seat System]
WARNING:
Handling a front seat (with built-in side air bag) improperly can accidentally
operate (deploy) the air bag, which may seriously injure you. Read the service
warnings before han ...
 Front Seat Cushion Trim Removal/Installation
WARNING:
Handling a front seat (with built-in side air bag) improperly can accidentally
operate (deploy) the air bag, which may seriously injure you. Read the service
warnings before han ...
Other materials:
Rear Seat Back Frame Removal/Installation
1. Remove the rear seat cushion..
2. Remove the rear buckle installation bolt..
3. Remove the rear seat back..
4. Remove the headrest.
5. Open the fasteners.
6. Detach the hooks.
7. Remove the child-restraint seat anchor covers in the order of (1), (2) as
shown in the figure. (5H ...
Saving Fuel and Protection of the
Environment
How you operate your Mazda determines
how far it will travel on a tank of fuel. Use
these suggestions to help save fuel and
reduce CO2.
Avoid long warm-ups. Once the engine
runs smoothly, begin driving.
Avoid fast starts.
Drive at lower speeds.
Anticipate when to apply the brakes
(a ...
Advanced Park guidance screens
The Subaru Solterra Advanced Park system provides clear and intuitive guidance
screens on the multimedia display, helping the driver easily understand vehicle
positioning and parking operations in real time.
Guidance screen (When assistance starts)
Target parking space box (blue)
Ad ...
