Mazda 3 Service Manual: Front Seat Cushion Trim Removal/Installation
WARNING:
-
Handling a front seat (with built-in side air bag) improperly can accidentally operate (deploy) the air bag, which may seriously injure you. Read the service warnings before handling a front seat (with built-in side air bag)..
CAUTION:
-
After removing a front seat, do not operate the slider lever. If the slider lever is operated, the left and right slide positions will deviate, and the slide adjuster may be damaged after the front seat is installed.
-
Verify that there are no malfunctions in the sliding mechanism after installing a front seat.
-
When performing the procedure with a front seat removed from the vehicle, perform the procedure on a clean rag so as not to damage or soil the seat.
-
When the passenger's seat is removed, perform the seat weight sensor inspection using the M-MDS after installing the passenger's seat..
-
When the passenger's seat is replaced with a new one, perform the seat weight sensor calibration using the M-MDS..
1. Switch the ignition to off.
2. Remove the battery cover..
3. Disconnect the negative battery cable and wait 1 min or more
..
4. Remove the front seat..
5. Remove the side cover..
6. Detach hook A and B in the direction of the arrow shown in the figure.
7. Detach hook C by sliding it in the order of (1), (2), and (3) as shown in the figure.
8. Remove the seat cushion trim and the seat cushion pad from the seat frame as a single unit.
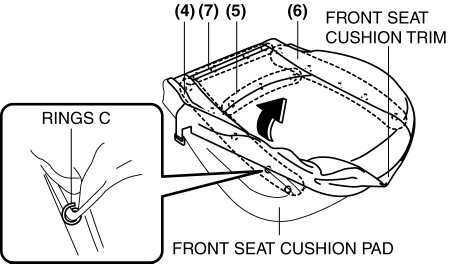
9. Remove rings C in the order of (4), (5), (6) and (7) as shown in the figure, then remove the seat cushion trim from the seat cushion pad in the direction of the arrow shown in the figure.
10. Install in the reverse order of removal.
 Front Seat Cover Removal/Installation [Vehicles Without Power Seat System]
WARNING:
Handling a front seat (with built-in side air bag) improperly can accidentally
operate (deploy) the air bag, which may seriously injure you. Read the service
warnings before han ...
 Front Seat Rail Guide Cover Removal/Installation
WARNING:
Handling a front seat (with built-in side air bag) improperly can accidentally
operate (deploy) the air bag, which may seriously injure you. Read the service
warnings before han ...
Other materials:
Locking, Unlocking with Request
Switch (With the advanced keyless
function)
All doors and the liftgate can be locked/
unlocked by pressing the request switch
on the front doors while the key is being
carried.
(5–door)
The request switch on the liftgate can only
be used to lock all doors and the liftgate.
Front doors
Liftgate (5-door Lock only)
To lock
To ...
Neutral Switch Removal/Installation [A26 M R]
1. Disconnect the negative battery cable.
2. Disconnect the neutral switch connector.
3. Remove the aerodynamic under cover No.2..
4. Remove the neutral switch with the gasket.
5. Install a new gasket and the neutral switch to the transaxle case.
Tightening torque
29—39 N·m ...
Smart City Brake Support
(SCBS)
The Smart City Brake Support (SCBS) system is designed to reduce damage in
the event
of a collision by operating the brake control (SCBS brake) when the system's
laser sensor
(front) detects a vehicle ahead and determines that a collision with a vehicle
ahead is
unavoidable. It may also be ...
