
Subaru Solterra 2023-2026 Owner's Manual: Pictorial index
■ Exterior
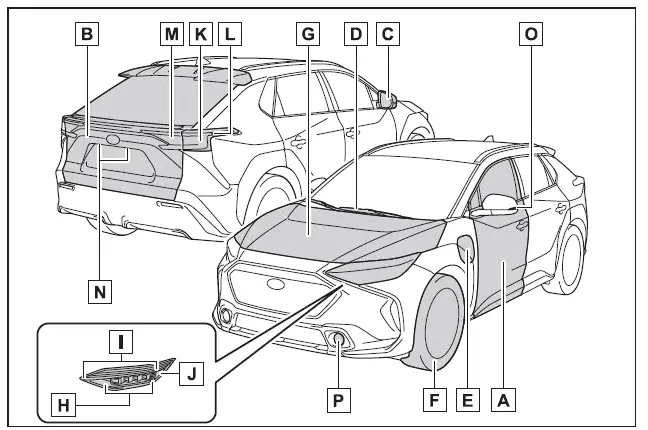
- Side doors
Locking/unlocking
Opening/closing the side windows
Locking/unlocking by using the mechanical key
Warning messages related to Subaru Solterra door systems - Back door
Locking/unlocking
Opening/closing the back door
Warning messages
Power back door* functionality in Subaru Solterra - Outside rear view mirrors
Adjusting the mirror angle
Folding the mirrors
Defogging features for improved visibility in Subaru Solterra - Windshield wipers
Precautions for winter conditions
Anti-freezing measures (windshield wiper de-icer)
Car wash precautions
Rain-sensing windshield wipers in Subaru Solterra - Charging port
Charging methods and safe usage for the Subaru Solterra electric system - Tires
Tire size and correct inflation pressure
Winter tires and tire chains
Inspection, rotation, and tire pressure monitoring system*
Handling and managing flat tires on Subaru Solterra - Hood
Opening procedures
Overheating response guidelines
Warning messages - Headlights
- Parking lights/turn signal lights/ daytime running lights
- Front side marker lights
- Tail lights
Turn signal lights
Stop lights - Rear side marker lights
- Tail lights
Back-up light
Shifting the shift position to R in Subaru Solterra - License plate lights
- Side turn signal lights
- Front fog lights*
*: If equipped
■ Instrument panel
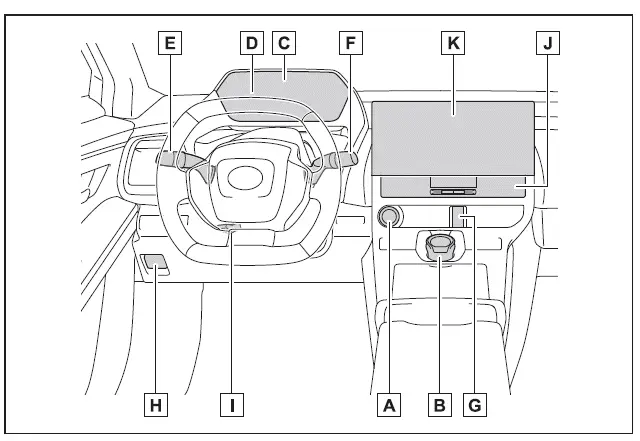
- Power switch
Starting the EV system and selecting operating modes in Subaru Solterra
Emergency shutdown procedures
Troubleshooting when the EV system fails to start
Warning messages - Rotary shifter
Changing drive positions
Towing precautions specific to Subaru Solterra - Meters
Reading and adjusting instrument panel illumination
Understanding warning and indicator lights
Response when alerts appear - Multi-information display
Display functions
Handling warning notifications in Subaru Solterra - Turn signal lever
Headlight switch
Control of lighting systems including DRL and fog lights*1 - Windshield wiper and washer switch
Operation
Adding washer fluid
Warning messages - Emergency flasher switch
- Hood lock release lever
- Tilt and telescopic steering lock release lever
Adjustment procedures - Air conditioning system
Usage and climate control in Subaru Solterra
Rear window defogger - Multimedia system*2
*1:If equipped
*2:Refer to "MULTIMEDIA OWNER'S MANUAL".
■ Switches
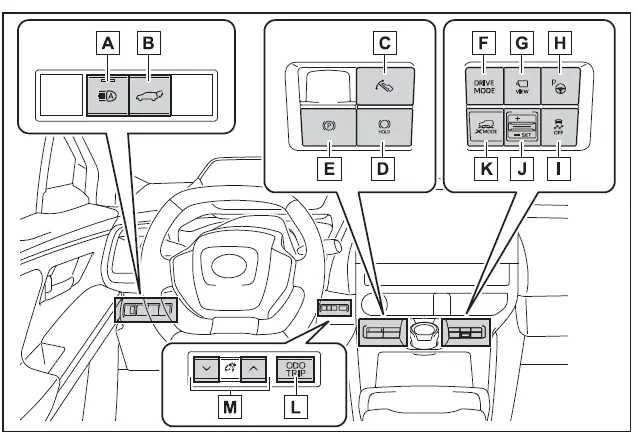
- Automatic High Beam switch
- Power back door switch*1
- "S PEDAL DRIVE" switch
- Brake hold switch
- Parking brake switch
Applying/releasing
Winter precautions
Warning alerts - Drive mode select switch
- Camera switch*1, 2
- Advanced Park system switch*1
- VSC off switch
- Grip control switch
- "X-MODE" switch
- "ODO TRIP" switch
- Instrument panel brightness control
*1:If equipped
*2:Refer to "MULTIMEDIA OWNER'S MANUAL".
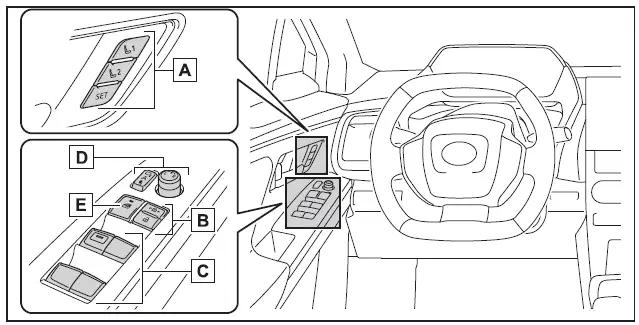
- Position memory switches*
- Door lock switches
- Power window switches
- Outside rear view mirror switches
- Window lock switch
*: If equipped
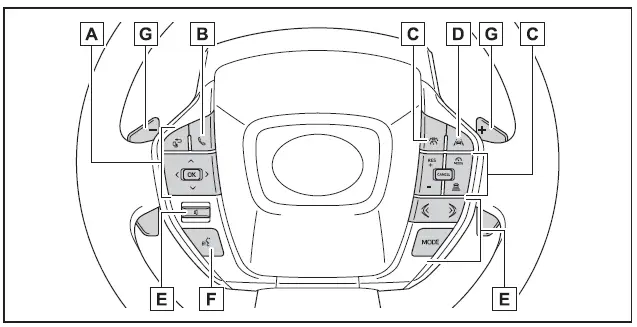
- Meter control switches
- TEL switch*
- Cruise control switch
Dynamic radar cruise control
Cruise control - LTA switch
- Audio remote control switches*
- Talk switch*
- Paddle switches
*: Refer to "MULTIMEDIA OWNER'S MANUAL".
■ Interior
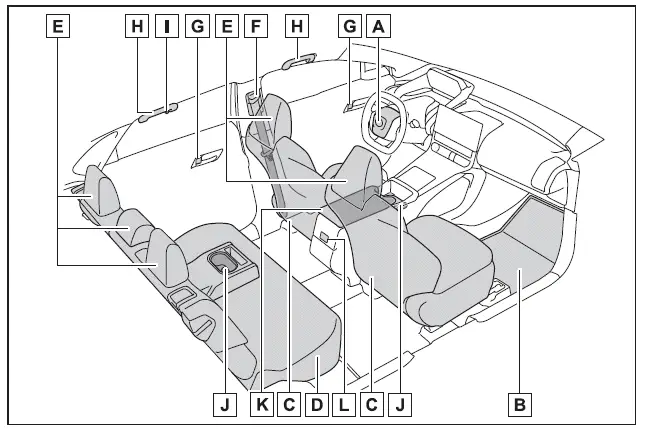
- SRS airbags
- Floor mats
- Front seats
- Rear seats
- Head restraints
- Seat belts
- Inside lock buttons
- Assist grips
- Coat hooks
- Cup holders
- Console box
- Rear seat heater switches*
*: If equipped
■ Ceiling
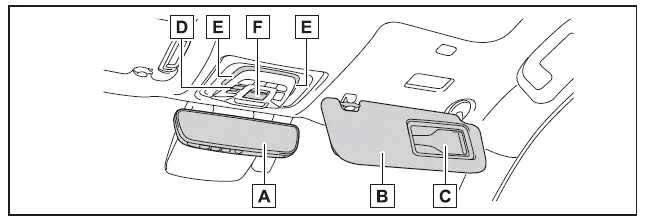
- Inside rear view mirror*1
Digital inner mirror*1 - Sun visors
- Vanity mirrors
- Electronic sunshade switches*1
- Interior lights*2
Personal lights - OS" button
*1:If equipped
*2:The illustration shows the front, but they are also equipped in the rear.
This detailed pictorial index for the Subaru Solterra is designed to help you quickly locate and understand all major systems, controls, and components, ensuring a smoother and more intuitive ownership experience.
 Reading this manual
Explains symbols used in this manual
Symbols in this manual
WARNING:
In the Subaru Solterra Owner’s Manual, this symbol highlights
critical information that must be followed without except ...

Other materials:
No.16 Judder Upon Torque Converter Clutch (TCC) Operation [FS5 A EL]
16
Judder upon torque converter clutch (TCC) operation
DESCRIPTION
Vehicle jolts when TCC is engaged.
POSSIBLE CAUSE
Poor TCC engagement due to either slippage because the TCC is stuck
...
Steering SST
49 H032 301
Wrench
49 F017 1A0
Universal wrench
49 F032 303
Handle
49 B032 323
Rod seal remover body
49 N032 319A
Support plate
49 ...
BSM OFF Indicator Light
This indicator light illuminates for a few
seconds when the ignition is switched ON.
The BSM OFF indicator light illuminates
when the BSM system is turned off by
pressing the BSM OFF switch.
The indicator light flashes if the BSM
system has a malfunction. Consult an
Authorized Mazda D ...
