Mazda 3 Service Manual: Rear Center Seat Belt Removal/Installation
CAUTION:
-
The ELR (emergency locking retractor) has a spring that will unwind if the retractor cover is removed. The spring cannot be rewound by hand. If this occurs, the ELR will not work properly. Therefore, do not disassemble the retractor.
4SD
1. Remove the following parts:
a. Rear scuff plate.
b. Rear seat cushion.
c. Rear seat back.
d. Tire house trim.
e. C-pillar trim..
f. Rear package trim.
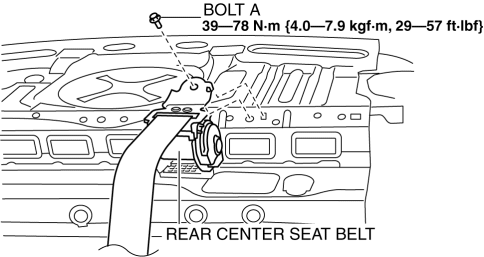
2. Remove the bolt A.
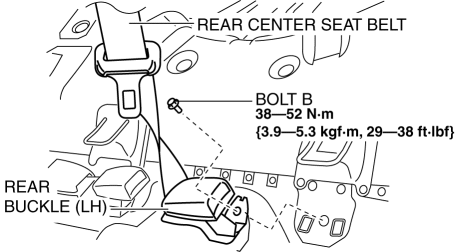
3. Remove the bolt B.
4. Remove the rear center seat belt.
5. Install in the reverse order of removal..
5HB
1. Remove the following parts:
a. Rear scuff plate.
b. Rear seat cushion.
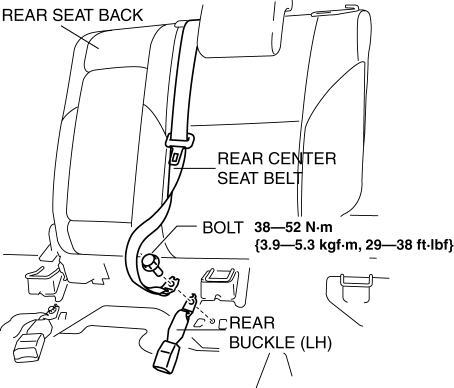
2. Remove the bolt.
3. Remove the rear center seat belt with the rear seat back..
4. Install in the reverse order of removal..
Rear Center Seat Belt Installation Note
-
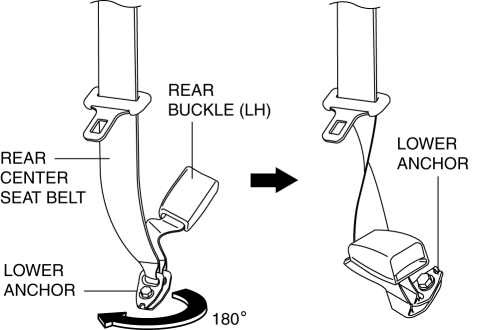
Rotate the rear center seat belt lower anchor clockwise 180° and install it.
 Drive Belt Removal/Installation [Skyactiv G 2.0]
WARNING:
A hot engine can cause severe burns. Turn off the engine and wait until it
is cool before servicing.
NOTE:
Remove/install the drive belt from the underside of the veh ...
 Timing Chain Removal/Installation [Mzr 2.0, Mzr 2.5]
1. Remove the battery cover..
2. Disconnect the negative battery cable..
3. Remove the plug hole plate..
4. Disconnect the wiring harness.
5. Remove the ignition coils..
6. Remove the spark ...
Other materials:
Operating Tips
Operate the climate control system with
the engine running.
To prevent the battery from being
discharged, do not leave the fan control
dial on for a long period of time with the
ignition switched ON when the engine is
not running.
Clear all obstructions such as leaves,
snow and ic ...
Recommended Oil
U.S.A., Canada, and Puerto Rico
Use SAE 0W-20 engine oil.
Mazda Genuine Oil is used in your
Mazda vehicle. Mazda Genuine 0W-20
Oil is required to achieve optimum fuel
economy.
For maintenance service, Mazda
recommends Mazda Genuine Parts and
Castrol ® (U.S.A. only).
Only use SAE 0W ...
Intake Air System Removal/Installation [Mzr 2.0, Mzr 2.5]
WARNING:
A hot engine and intake air system can cause severe burns. Turn off the engine
and wait until they are cool before removing the intake air system.
Fuel is very flammable liquid. If fuel spills or leaks from the pressurized
fuel system, it will cause serious injury or d ...
