Mazda 3 Owners Manual: Schedule 1
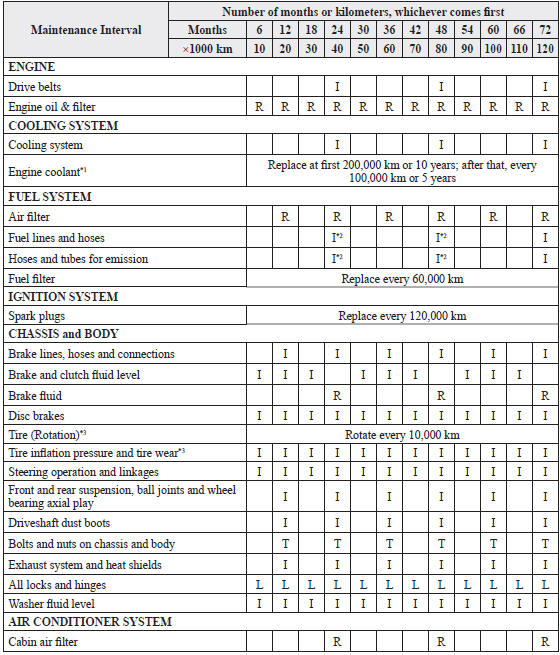
Chart symbols:
I: Inspect: Inspect and clean, repair, adjust, fill up, or replace if
necessary.
R: Replace
L : Lubricate
T: Tighten
Remarks:
*1 Use of FL-22 is recommended when replacing engine coolant. Using engine
coolant other than FL-22 may
cause serious damage to the engine and cooling system.
*2 According to state/provincial and federal regulations, failure to perform maintenance on these items will not void your emissions warranties. However, Mazda recommends that all maintenance services be performed at the recommended time or kilometer period to ensure long-term reliability.
*3 The Tire Pressure Monitoring System (TPMS) initialization must be performed so that the system operates normally (if equipped).
 Scheduled Maintenance (Mexico)
Follow Schedule 1 if the vehicle is operated mainly where none of the
following conditions
(severe driving conditions) apply.
Repeated short-distance driving
Driving in dusty conditions
Dri ...
 Schedule 2
Chart symbols:
I: Inspect: Inspect and clean, repair, adjust, fill up, or replace if
necessary.
R: Replace
L : Lubricate
C: Clean
T: Tighten
Remarks:
*1 Use of FL-22 is recommended when r ...
Other materials:
Torque Converter Clutch (TCC) Non Operation [Fw6 A EL]
TROUBLESHOOTING ITEM
Torque converter clutch (TCC) non-operation
DESCRIPTION
TCC does not operate when vehicle reaches TCC operation range.
POSSIBLE CAUSE
Signal malfunction
...
Storage Compartments
WARNING
Keep storage boxes closed when
driving:
Driving with the storage boxes open is
dangerous. To reduce the possibility of
injury in an accident or a sudden stop,
keep the storage boxes closed when
driving.
Do not put articles in storage spaces
with no lid:
...
Liftgate Removal/Installation
WARNING:
When removing the stay damper, serious injury may occur if the stay damper
is removed without supporting the liftgate. Always perform the procedure with
at least another person.
1. Disconnect the negative battery cable..
2. Remove the following parts:
a. Rear scuff p ...
