
Mazda 3 Service Manual: Air Filter Removal/Installation
1. Disconnect the negative battery cable..
2. Remove the side wall..
3. Disconnect the evaporator temperature sensor connector.
4. Disconnect the power MOS FET connector. (Full-auto air conditioner)
5. Disconnect the resistor connector. (Manual air conditioner)
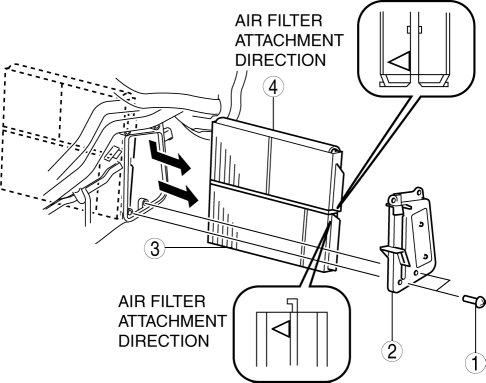
6. Remove in the order indicated in the table.
|
1 |
Screw |
|
2 |
Air filter cover |
|
3 |
Air filter (2) (See Air Filter Installation Note.) |
|
4 |
Air filter (1) (See Air Filter Installation Note.) |
7. Install in the reverse order of removal.
Air Filter Installation Note
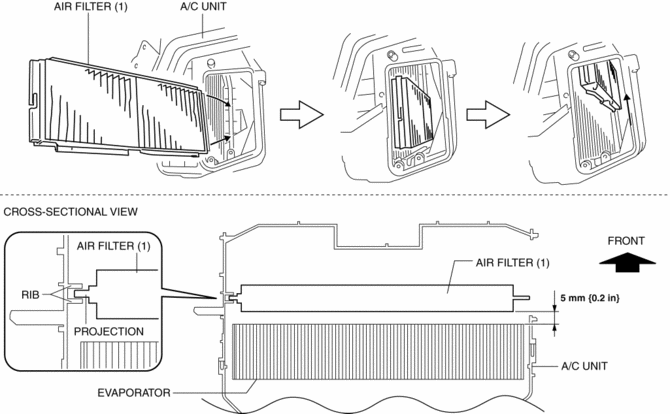
1. Insert the air filter projection between the ribs of the A/C unit and assemble the air filter (1) in the order shown in the figure.
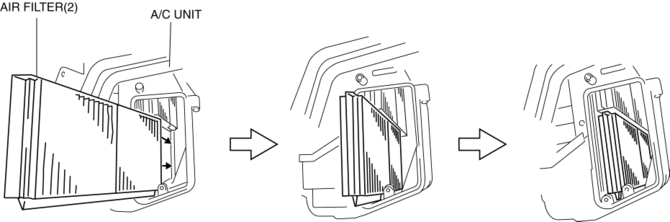
2. Assemble the air filter (2) in the order shown in the figure.
 Air Filter Inspection [Mzr 2.0, Mzr 2.5]
Except for Mexico
Airflow inspection
1. Remove the air filter..
2. Blow from port A and verify that there is airflow from port B.
If there is no airflow, replace the air filter..
...
 Air Filter Removal/Installation [Mzr 2.0, Mzr 2.5]
Except for Mexico
1. Remove the fuel-filler pipe protector..
2. Remove in the order indicated in the table.
1
Evaporative hose
2
Air filter ...
Other materials:
Seat Weight Sensor Calibration [Two Step Deployment Control System]
CAUTION:
If any of the following work is performed, perform the seat weight sensor
calibration using the M-MDS.
Replacement with a new seat weight sensor
Replacement with a new seat weight sensor control module
Replacement with new passenger-side seat pa ...
Parking/Front Side Marker/Front Turn Light Bulb Removal/Installation
1. Disconnect the negative battery cable..
2. Slightly bend back the front mudguard..
3. Rotate the parking/front side marker/front turn light socket in the direction
of the arrow shown in the figure.
4. Remove the parking/front side marker/front turn light bulb.
5. Install in the ...
Base Installation
1. Cut away all of the original sealant using a razor.
WARNING:
Using a razor with bare hands can cause injury. Always wear gloves when using
a razor.
2. Clean and degrease the ceramic coating on the glass and the base.
CAUTION:
Keep the area free of dirt and grease, and ...
