Mazda 3 Service Manual: Charcoal Canister Removal/Installation [Mzr 2.0, Mzr 2.5]
Except for Mexico
1. Remove in the order indicated in the table.
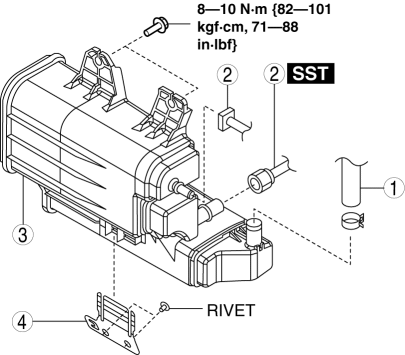
|
1 |
Evaporative hose |
|
2 |
Quick release connector (See QUICK RELEASE CONNECTOR (EMISSION SYSTEM) REMOVAL/INSTALLATION [MZR 2.0, MZR 2.5].) |
|
3 |
Charcoal canister (See Charcoal canister removal note.) |
|
4 |
Charcoal canister bracket (See Charcoal canister bracket removal note.) |
2. Install in the reverse order of removal.
Charcoal canister removal note
1. Remove the rear stabilizer..
2. Remove the rear coil spring..
3. Remove the rear lower arm..
4. Remove the rear crossmember component..
5. Remove the charcoal canister.
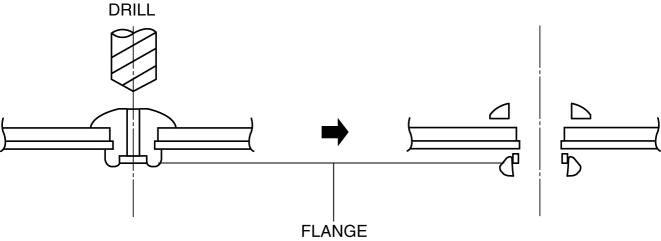
Charcoal canister bracket removal note
NOTE:
-
The charcoal canister bracket is installed using rivets.
1. Push out the mandrel using a hammer and punch (2—2.8 mm {0.08—0.11 in}
diameter).
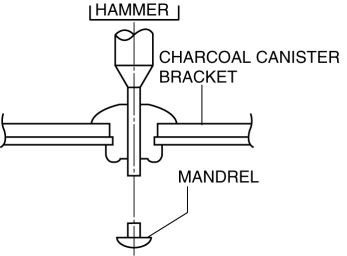
2. Remove the flange using a drill (5 mm {0.20 in}
drill bit).
Mexico
1. Remove in the order indicated in the table.
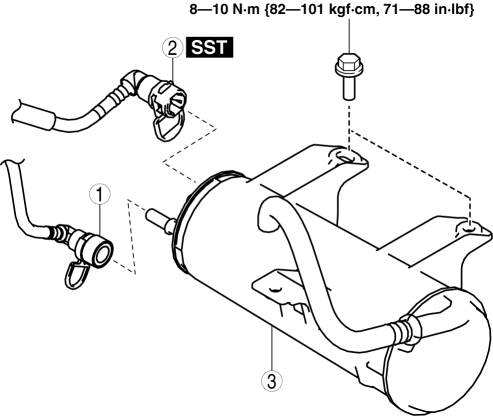
|
1 |
Quick release connector (See QUICK RELEASE CONNECTOR (EMISSION SYSTEM) REMOVAL/INSTALLATION [MZR 2.0, MZR 2.5].) |
|
2 |
Quick release connector (See QUICK RELEASE CONNECTOR (EMISSION SYSTEM) REMOVAL/INSTALLATION [MZR 2.0, MZR 2.5].) |
|
3 |
Charcoal canister |
2. Install in the reverse order of removal.
 Charcoal Canister Inspection [Mzr 2.0, Mzr 2.5]
Leakage Inspection
1. Perform the following procedures:
Assemble the hose used for inspection to port A.
Cover ports B and C with the caps.
Except for Mexico
Mexico
C ...
 Check Valve (One Way) Inspection [Mzr 2.3 Disi Turbo]
1. Disconnect the vacuum hose connected between the check valve and the purge
solenoid valve from the purge solenoid valve..
2. Disconnect the vacuum hose connected between the check valve (one-wa ...
Other materials:
Air Intake Actuator Removal/Installation [Full Auto Air Conditioner]
1. Set the air intake mode to FRESH.
2. Disconnect the negative battery cable..
3. Remove the following parts:
a. Front scuff plate (Passenger-side).
b. Front side trim (Passenger-side).
c. Dashboard under cover.
d. Glove compartment.
e. Lower panel (Passenger-side).
f. Shower duct ( ...
Side Wall Removal/Installation
1. Pull out the side wall in the direction shown in the direction of the arrow
shown in the figure, then remove the clips.
2. Remove the side wall in the direction of the arrow shown in the figure.
CAUTION:
When remove the side wall, be careful not to damage the guide.
3 ...
Sunroof Motor Removal/Installation
1. Disconnect the negative battery cable..
2. Remove the rain sensor cover. (Vehicles with auto light/wiper system).
3. Disconnect the rain sensor connector. (Vehicles with auto light/wiper system)
4. Partially peel back the seaming welts.
5. Remove the following parts:
a. Sunroof seaming ...
