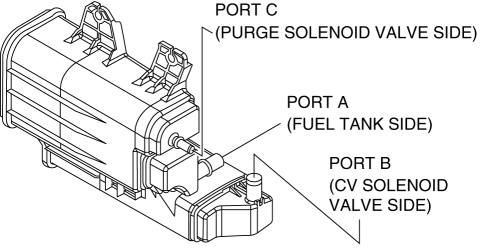
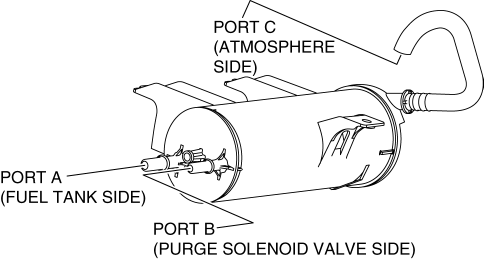
Mazda 3 Service Manual: Charcoal Canister Inspection [Mzr 2.0, Mzr 2.5]
Leakage Inspection
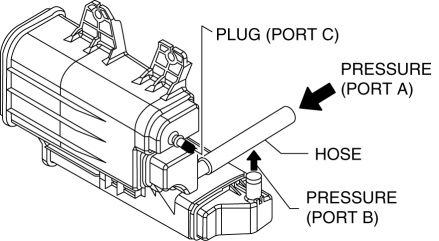
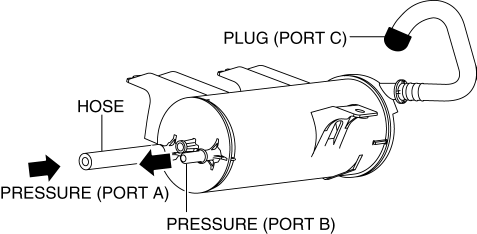
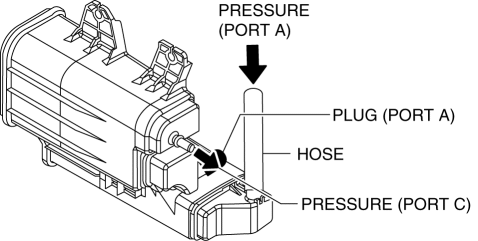
1. Perform the following procedures:
-
Assemble the hose used for inspection to port A.
-
Cover ports B and C with the caps.
Except for Mexico
Mexico
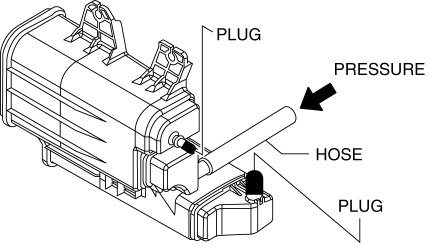
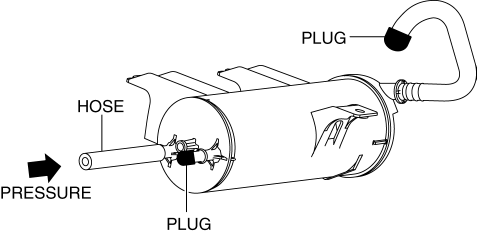
CAUTION:
-
Do not apply a pressure 20 kPa {150 mmHg, 5.91 inHg} or more to the charcoal canister for 1 min. or more. Doing so will damage the charcoal canister.
2. Apply pressure (19.6 kPa {147 mmHg, 5.79 inHg}
) through the hose, and verify that air does not leak from the charcoal canister.
Except for Mexico
Mexico
-
If there is airflow, replace the charcoal canister..
-
If there is no airflow, perform the following “Airflow Inspection”.
Airflow Inspection
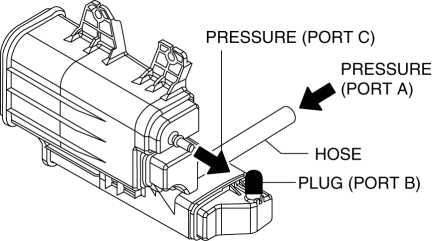
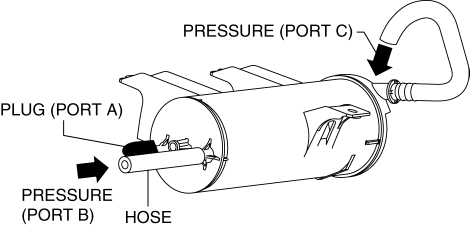
1. Perform the following procedure to verify the charcoal canister airflow.
-
Between port A and port B
-
Plug the port C.
Except for Mexico
Mexico
-
Apply a pressure of 19.6 kPa {147 mmHg, 5.79 inHg}
to port A.
-
Verify that there is airflow from port B.
-
If there is no airflow, replace the charcoal canister..
-
Between port A and port C
-
Plug the port B.
Except for Mexico
Mexico
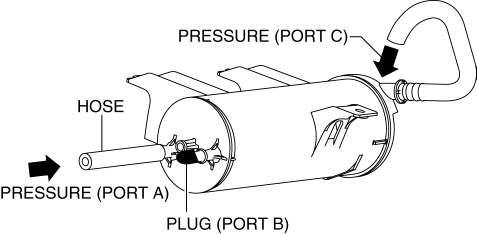
-
Apply a pressure of 19.6 kPa {147 mmHg, 5.79 inHg}
to port A.
-
Verify that there is airflow from port C.
-
If there is no airflow, replace the charcoal canister..
-
Between port B and port C
-
Plug the port A.
Except for Mexico
Mexico
-
Apply a pressure of 19.6 kPa {147 mmHg, 5.79 inHg}
to port B.
-
Verify that there is airflow from port C.
-
If there is no airflow, replace the charcoal canister..
 Catch Tank Inspection [Skyactiv G 2.0]
1. Remove the catch tank..
2. Plug the catch tank of the purge solenoid valve side.
3. Inspect for air leakage when blowing air pressure from charcoal canister side.
If there is air l ...
 Charcoal Canister Removal/Installation [Mzr 2.0, Mzr 2.5]
Except for Mexico
1. Remove in the order indicated in the table.
1
Evaporative hose
2
Quick release connector
(See QUICK RELEASE CONNECTOR ...
Other materials:
Schedule 1
U.S.A. residents - Engine oil flexible maintenance interval
Use when the maintenance monitor for “Oil Change” is set to “Flexible”. For
details, see maintenance monitor.
Chart symbols:
I: Inspect: Inspect and clean, repair, adjust, fill up, or replace if
necessary.
T: Tighten
R ...
Evaporator Temperature Sensor Inspection [Manual Air Conditioner]
NOTE:
Inspect the evaporator temperature sensor when it is installed to the A/C
unit.
1. Set the fan speed MAX HI.
2. Set the temperature control at MAX COLD.
3. Set the RECIRCULATE mode.
4. Turn the A/C switch off.
5. Close all doors and windows.
6. Wait for 5 min.
7. D ...
Clutch Fluid Inspection [C66 M R]
NOTE:
A common reserve tank is used for the clutch system and brake system.
1. Verify that the clutch fluid is between the MIN mark and the MAX mark.
Verify that there is no clutch fluid leakage then add clutch fluid to the
level between the MIN mark and the MAX mark..
...
