Mazda 3 Service Manual: Airflow Mode Actuator Inspection [Full Auto Air Conditioner]
CAUTION:
-
If the lever position exceeds the operation range shown in the figure, the circuit in the actuator could be damaged. Always perform an actuator operation inspection with the lever movement within the range shown in the figure.
1. Connect battery positive voltage to airflow mode actuator terminal D (or F), connect terminal F (or D) to ground, and then verify that the airflow mode actuator operates as shown in the table.
-
If the operation condition is not normal, replace the airflow mode actuator.

|
Terminal |
Airflow mode actuator operation |
|
|
D |
F |
|
|
B+ |
Ground |
DEFROSTER → VENT |
|
Ground |
B+ |
VENT → DEFROSTER |
2. Verify that the resistance between terminals B and C, C and A matches the airflow mode actuator operation as shown in the graph.
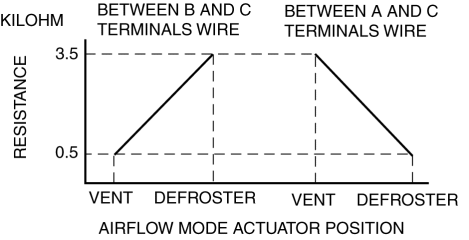
-
If the operation condition and resistance are not normal, replace the airflow mode actuator.
 Air Mix Actuator Removal/Installation [Full Auto Air Conditioner]
Driver-side
1. Disconnect the negative battery cable..
2. Disconnect the connector.
3. Remove the hook (1), remove the rod (2) from the air mix actuator link.
4. Remove the screw.
5. ...
 Airflow Mode Actuator Removal/Installation [Full Auto Air Conditioner]
1. Set the air intake mode to FRESH.
2. Set the air mix mode to MAX COLD.
3. Disconnect the negative battery cable..
4. Remove the following parts:
a. Front doors.
b. Front scuff plate.
c. ...
Other materials:
Front Shock Absorber Disposal
1. Place the front shock absorber on a level surface or with the piston pointing
downwards.
2. Drill a 2—3 mm {0.08—0.11 in} hole at the point A shown in the figure
so that the gas can escape.
WARNING:
Whenever drilling into a shock absorber, wear protective eye wear. The gas ...
Power Outer Mirror Inspection
Mirror Glass Adjustment Motor
1. Disconnect the negative battery cable..
2. Remove the inner garnish..
3. Disconnect the power outer mirror connector.
4. Remove the front door trim..
5. Apply battery positive voltage and connect the ground to the power outer mirror
terminals and inspect t ...
Battery Recharging [Mzr 2.3 Disi Turbo]
Using GR8-1291:
(See GR8-1291 INSTANT TRAINING MODULE (VIDEO) .)
WARNING:
Keep all flames away from the battery, otherwise evaporated gas from the
battery fluid may catch fire and cause serious injury.
1. Remove the battery filler caps and check the water level. If necessary, add ...
