Mazda 3 Service Manual: Fuel Tank Inspection [Mzr 2.0, Mzr 2.5]
WARNING:
-
Fuel is very flammable liquid. If fuel spills or leaks from the pressurized fuel system, it will cause serious injury or death and facility breakage. Fuel can also irritate skin and eyes. To prevent this, always complete the “Fuel Line Safety Procedure”, while referring to the “BEFORE SERVICE PRECAUTION”.
-
A person charged with static electricity could cause a fire or explosion, resulting in death or serious injury. Before draining fuel, make sure to discharge static electricity by touching the vehicle body.
NOTE:
-
The rollover valve and the fuel shut-off valve or check valve (two-way) built into the fuel tank and fuel tank leakage are inspected in this inspection.
1. Complete the “BEFORE SERVICE PRECAUTION”..
2. Remove the battery cover..
3. Disconnect the negative battery cable..
4. Remove the rear seat cushion..
5. Disconnect the fuel pump unit connector..
6. Remove the fuel tank and the fuel pump unit as a single unit..
7. Perform the following procedure to verify the fuel tank airtightness.
a. Plug the fuel pump unit pipe, ports B and C.
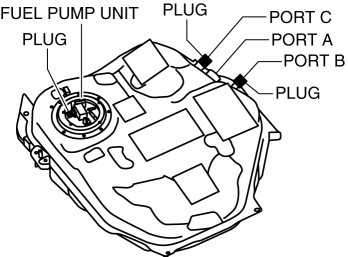
b. Apply a pressure of 3 kPa {23 mmHg, 0.9 inHg}
to port A and wait for a while.
c. Verify that there is no air flow leakage from the fuel tank.
-
If there is air flow, replace the fuel tank..
8. Plug the fuel pump unit pipe and port B.
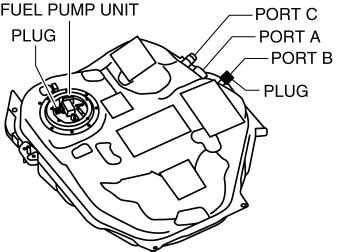
9. Level the fuel tank.
10. Apply a pressure of 3 kPa {23 mmHg, 0.9 inHg}
to port A and wait for a while.
11. With the pressure still applied, verify that there is air flow port C and the pressure is 0—3 kPa {0—23 mmHg, 0—0.9 inHg}
.
-
If there is no air flow, replace the fuel tank..
12. Apply a pressure of -0.5 kPa {-3.8 mmHg, -0.1 inHg}
to port A and wait for a while.
13. With the pressure still applied, verify that there is air flow port C and the pressure is -0.5—0 kPa {-3.8—0 mmHg, -0.1—0 inHg}
.
-
If there is no air flow, replace the fuel tank..
-
If there is air flow, place the fuel tank upside down.
14. Apply a pressure to port A and wait for a while.
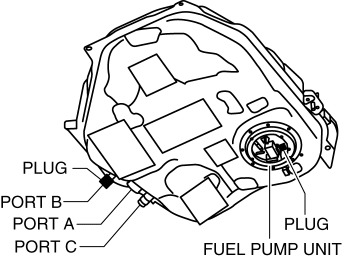
15. With the pressure still applied, verify that there is no air flow from port C.
-
If there is air flow, replace the fuel tank..
 Fuel Shut Off Valve Removal/Installation [Mzr 2.0, Mzr 2.5]
Except for Mexico
NOTE:
The fuel shut-off valve cannot be removed as it is built into the fuel tank.
1. Remove the fuel tank.. ...
 Fuel Tank Removal/Installation [Mzr 2.0, Mzr 2.5]
WARNING:
Fuel is very flammable liquid. If fuel spills or leaks from the pressurized
fuel system, it will cause serious injury or death and facility breakage. Fuel
can also irritate skin ...
Other materials:
Active Driving Display
WARNING
Always adjust the display brightness and position with the vehicle
stopped:
Adjusting the display brightness and position while driving the vehicle
is dangerous as
doing so could distract your attention from the road ahead and lead to
an accident.
...
Joint Shaft Removal/Installation [Mzr 2.0, Mzr 2.3 Disi Turbo, Mzr 2.5]
CAUTION:
Performing the following procedures without first removing the ABS wheel-speed
sensor may possibly cause an open circuit in the wiring harness if it is pulled
by mistake. Before performing the following procedures, remove the ABS wheel-speed
sensor connector (axle side) and ...
PID/Data Monitor Inspection [Blind Spot Monitoring (Bsm)]
1. Connect the M-MDS (IDS) to the DLC-2.
2. After the vehicle is identified, select the following items from the initialization
screen of the IDS.
a. Select “DataLogger”.
b. Select “Modules”.
c. Select “BSML” or “BSMR”.
3. Select the applicable PID from the PID table.
4. Verify the ...
