
Mazda 3 Service Manual: Auto Dimming Mirror Inspection
1. Measure the voltage at each terminal.
-
If the voltage is not as specified in the Terminal Voltage Table (Reference), inspect the parts under “Inspection item (s)” and related wiring harnesses.
-
If the system does not work properly even though the inspection items or related wiring harnesses do not have any malfunction, replace the auto-dimming mirror.
Terminal Voltage Table (Reference)
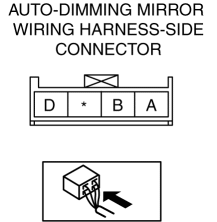
|
Terminal |
Signal name |
Connected to |
Measured condition |
Voltage (V) |
Inspection item(s) |
|
A |
Power supply (IG1) |
|
Switch the ignition to ON |
B+ |
|
|
Switch the ignition to Off |
1.0 or less |
||||
|
B |
R position signal |
Back-up light switch/TR switch |
R position |
B+ |
|
|
Other than R position |
1.0 or less |
||||
|
D |
GND |
Body ground |
Under any condition |
1.0 or less |
|
 Mirrors
...
 Auto Dimming Mirror Installation
1. Install the auto-dimming mirror onto the base.
2. Install the screw.
3. Connect the auto-dimming mirror connector.
4. Connect the negative battery cable.. ...
Other materials:
Starter Cut Relay Inspection [MTX]
Advanced Keyless Entry And Push Button Start System Only
1. Disconnect the negative battery cable.
2. Remove the following parts:
a. Front scuff plate (LH).
b. Front side trim (LH).
c. Side wall.
d. Console.
3. Set the bonnet release lever out of the way..
4. Remove the lower panel.. ...
Before Service Precaution [Mzr 2.0, Mzr 2.5]
WARNING:
Fuel vapor is hazardous. It can very easily ignite, causing serious injury
and damage. Always keep sparks and flames away from fuel.
Fuel line spills and leakage from the pressurized fuel system are dangerous.
Fuel can ignite and cause serious injury or death and damag ...
Starter Cut Relay Removal/Installation [MTX]
Advanced Keyless Entry And Push Button Start System Only
1. Disconnect the negative battery cable..
2. Remove the following parts:
Front scuff plate (LH).
Front side trim (LH).
Side wall.
Console.
3. Set the hood release lever out of the way..
4. Remove the ...
