Mazda 3 Service Manual: Drive Shaft (Double Offset Joint) Disassembly/Assembly
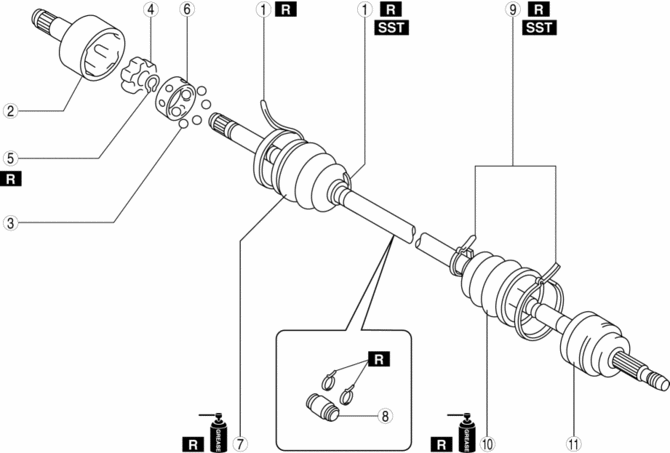
1. Disassemble in the order indicated in the table.
2. Assemble in the reverse order of disassembly.
|
1 |
Boot band (transaxle side) (See DRIVE SHAFT (TRIPOD JOINT) DISASSEMBLY/ASSEMBLY.) |
|
2 |
Outer ring (See Outer Ring, Clip Assembly Note.) |
|
3 |
Balls (See Cage, Inner Ring, Balls, Snap Ring Assembly Note.) |
|
4 |
Inner Ring (See Inner Ring Disassembly Note.) (See Cage, Inner Ring, Balls, Snap Ring Assembly Note.) |
|
5 |
Snap ring (See Cage, Inner Ring, Balls, Snap Ring Assembly Note.) |
|
6 |
Cage |
|
7 |
Boot (See Boot Assembly Note.) |
|
8 |
Dynamic damper (See Dynamic Damper Assembly Note.) |
|
9 |
Boot band (wheel side) (See DRIVE SHAFT (TRIPOD JOINT) DISASSEMBLY/ASSEMBLY.) |
|
10 |
Boot (See Boot Assembly Note.) |
|
11 |
Shaft and ball joint component |
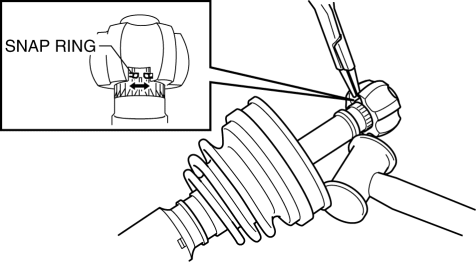
Inner Ring Disassembly Note
1. Move the dynamic damper to the wheel side of the drive shaft.
2. Move the boot and cage to the wheel side of the drive shaft.
3. Tap the inner ring using a plastic hammer while spreading the snap ring, and disassemble the inner ring from the drive shaft.
Boot Assembly Note
NOTE:
-
The wheel-side and transaxle-side boots are different.
1. Fill the boot (wheel side) with the specified grease.
NOTE:
-
Do not touch grease with your hand. Apply it from the tube to prevent foreign matter from entering the boot.
-
Grease amount
-
MZR 2.0, MZR 2.5: 96—106 g {3.4—3.7 oz}
-
SKYACTIV-G 2.0: 95—115 g {3.4—4.0 oz}
-
MZR 2.3 DISI Turbo: 106—116 g {3.74—4.09 oz}
2. Install the boot with the splines of the shaft still wrapped in tape from disassembly.
3. Remove the tape.
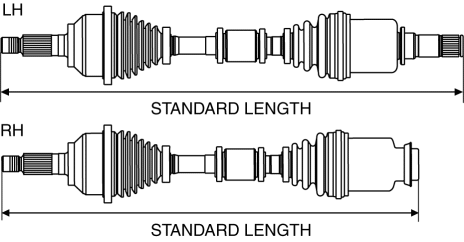
Dynamic Damper Assembly Note
1. Install the dynamic damper as shown in the figure.
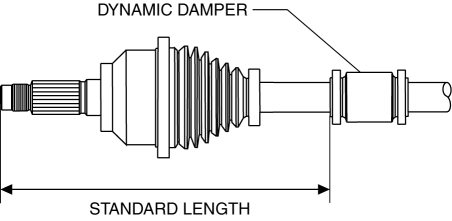
-
Standard length (Except for SKYACTIV-G 2.0)
-
LH: 289.7—301.7 mm {11.41—11.87 in}
-
RH: 304.7—316.7 mm {12.00—12.46 in}
-
Standard length (SKYACTIV-G 2.0)
-
292.7—298.7 mm {11.53—11.75 in}
2. Install a new boot band onto the dynamic damper (except for SKYACTIV-G 2.0).
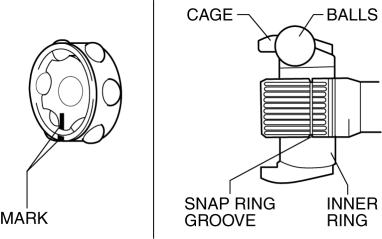
Cage, Inner Ring, Balls, Snap Ring Assembly Note
1. Tap the inner ring using a plastic hammer while spreading the snap ring, and assemble the inner ring to the drive shaft.
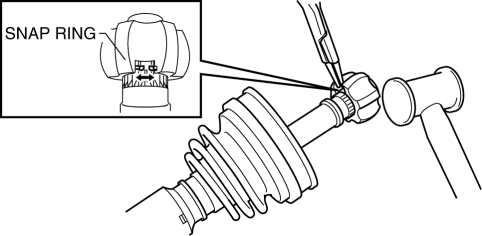
2. Align the marks and install the balls and cage to the inner ring as shown in the figure.
Outer Ring, Clip Assembly Note
1. Fill the outer ring and boot (transaxle side) with the specified grease.
NOTE:
-
Do not touch grease with your hand. Apply it from the tube to prevent foreign matter from entering the boot.
-
Grease amount
-
MZR 2.0, MZR 2.5: 139—149 g {4.91—5.25 oz}
-
SKYACTIV-G 2.0: 80—100 g {2.9—3.5 oz}
-
MZR 2.3 DISI Turbo: 155—165 g {5.47—5.82 oz}
2. Install the outer ring on to the shaft.
3. Install the boot.
4. Set the drive shaft to the standard length.
-
Front drive shaft standard length
-
MZR 2.0, MZR 2.5
-
LH: 656.56—665.56 mm {25.849—26.203 in}
-
RH: 607.54—616.54 mm {23.919—24.273 in}
-
SKYACTIV-G 2.0
-
LH: 642.4—652.4 mm {25.30—25.68 in}
-
RH: 573.8—583.8 mm {22.60—22.98 in}
-
MZR 2.3 DISI Turbo
-
LH: 619.07—628.07 mm {24.373—24.727 in}
-
RH: 611.24—620.24 mm {24.065—24.418 in}
5. Release any trapped air from the boots by carefully lifting up the small end of each boot with a cloth wrapped screwdriver.

CAUTION:
-
Be careful not to allow the grease to leak.
-
Do not damage the boot.
6. Verify that the drive shaft length is within the specification.
 Driveshafts
...
 Drive Shaft (Tripod Joint) Disassembly/Assembly
1. Disassemble in the order indicated in the table.
2. Assemble in the reverse order of disassembly.
1
Boot band (transaxle side)
(See Boot Band (Transaxle Side) Dis ...
Other materials:
Climate Control Unit Removal/Installation [Full Auto Air Conditioner]
1. Disconnect the negative battery cable..
2. Remove the following parts:
a. Upper panel.
b. Shift lever knob (MTX).
c. Selector lever knob (ATX).
d. Shift panel.
e. Side wall.
f. Console.
g. Center panel.
h. Audio unit.
3. Remove in the order indicated in the table.
...
Precaution
Intermittent Concern Troubleshooting
Vibration method
If malfunction occurs or becomes worse while driving on a rough road or when
the engine is vibrating, perform the steps below.
NOTE:
There are several reasons why vehicle or engine vibration could cause an
electrical m ...
Front passenger occupant classification system
The Subaru Solterra is equipped with an advanced front passenger
occupant classification system that continuously monitors the status of the front
passenger seat. Based on detected conditions, this intelligent system automatically
activates or deactivates specific SRS airbags to optimize safet ...
