Mazda 3 Service Manual: Auxiliary Jack/Usb Port Removal/Installation
1. Disconnect the negative battery cable..
2. Remove the following parts:
a. Upper panel.
b. Shift lever knob (MTX).
c. Selector lever knob (ATX).
d. Shift panel.
e. Side wall.
f. Console.
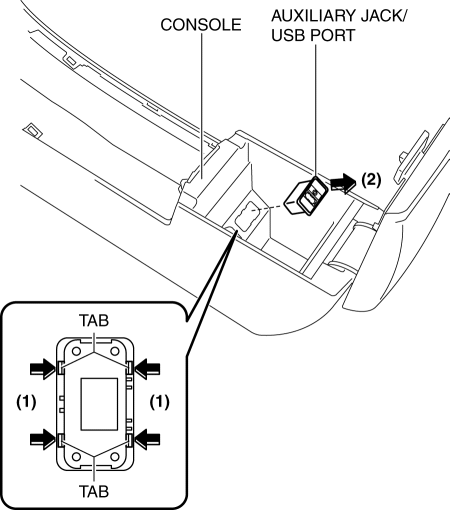
3. Remove the auxiliary jack/USB port in the direction of the arrow (2) shown in the figure while pressing the auxiliary jack/USB port tabs in the direction of the arrow (1).
4. Install in the reverse order of removal.
 Auxiliary Jack/Usb Port Inspection
Auxiliary jack inspection
1. Disconnect the negative battery cable..
2. Remove the following parts:
a. Upper panel.
b. Shift lever knob (MTX).
c. Selector lever knob (ATX).
d. Shift panel. ...
 Bass Box Inspection
1. Disconnect the negative battery cable..
2. Disconnect the connector..
3. Verify the resistance between bass-box terminals.
If not within the specification, replace the bass-box.
...
Other materials:
Oil Pump Removal/Installation [Mzr 2.3 Disi Turbo]
WARNING:
Hot engines and engine oil can cause severe burns. Turn off the engine and
wait until it and the engine oil have cooled.
A vehicle that is lifted but not securely supported on safety stands is dangerous.
It can slip or fall, causing death or serious injury. Never work ...
Body And Accessories SST
49 L067 001
Reflector
49 L067 002
Tripod
49 L067 003
Plum-bob
49 L067 006
Plum-bob
—
—
...
If you think something is wrong
If you observe any unusual behavior while operating your Subaru Solterra,
it may indicate that the vehicle requires inspection, adjustment, or repair. Promptly
contacting an authorized SUBARU dealer is strongly recommended to ensure continued
safety and reliability.
Visible symptoms
Fluid ...
