Mazda 3 Owners Manual: High Beam Control System (HBC)
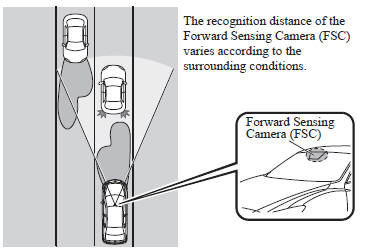
The High Beam Control System (HBC) determines the conditions in front of the vehicle using the Forward Sensing Camera (FSC) while driving in darkness to automatically switch the headlights between high and low beams.
Refer to Warning/Indicator Lights on .
While driving the vehicle at a speed of about 30 km/h (18 mph), the headlights are switched to high beams when there are no vehicles ahead or approaching in the opposite direction.
The system switches the headlights to low beams when one of the following occurs:
- The system detects a vehicle or the headlights/lights of a vehicle approaching in the opposite direction.
- The vehicle is driven on roads lined with streetlamps or on roads in well-lit cities and towns.
- The vehicle is driven at less than about 20 km/h (12 mph).
The warning light flashes when the system has a malfunction.
Refer to Warning Lights on .
CAUTION
|
NOTE The timing in which the system switches the headlights changes under the following conditions. If the system does not switch the headlights appropriately, manually switch between high and low beams according to the visibility as well as road and traffic conditions.
- When there are sources of light in the area such as street lamps, illuminated signboards, and traffic signals.
- When there are reflective objects in the surrounding area such as reflective plates and signs.
- When visibility is reduced under rain, snow and foggy conditions.
- When driving on roads with sharp turn or hilly terrain.
- When the headlights/rear lamps of vehicles in front of you or in the opposite lane are dim or not illuminated.
- When there is sufficient darkness such as at dawn or dusk.
- When the luggage compartment is loaded with heavy objects or the rear passenger seats are occupied.
- When visibility is reduced due to a vehicle in front of you spraying water from its tires onto your windshield.
To Operate the System
The High Beam Control System (HBC) operates to switch the headlights automatically between high and low beams after the ignition is switched ON and the headlight switch is in the AUTO and high beam position.
The High Beam Control System (HBC) determines that it is dark based on the brightness of the surrounding area. At the same time, the High Beam Control System (HBC) indicator light (green) in the instrument cluster illuminates.

NOTE
- When the vehicle speed is 30 km/h
(18 mph) or higher, the headlights
automatically switch to high beams
when there are no vehicles ahead or
approaching in the opposite direction.
When the vehicle speed is less than about 20 km/h (12 mph), the High Beam Control System (HBC) switches the headlights to low beams.
- The low beams may not switch to high beams when cornering.
- Operation of the High Beam Control
System (HBC) function can be disabled.
Refer to Personalization Features on
Manual Switching
Switching to low beams
Shift the lever to the low beam position.
The High Beam Control System (HBC) indicator light (green) turns off.
Switching to high beams
Turn the headlight switch to the
position.
The High Beam Control System (HBC)
indicator light (green) turns off and the

is illuminated.
 Adaptive Front Lighting System
(AFS)
Adaptive Front Lighting System
(AFS)
The adaptive front lighting system (AFS)
automatically adjusts the headlight beams
to the left or right in conjunction with the
operation of the steering wheel after the
headlights have been turne ...
 Lane Departure Warning System (LDWS)
The LDWS notifies the driver that the vehicle may be deviating from its
lane.
The system detects the white or yellow lines on the traffic lane using the
Forward Sensing
Camera (FSC). If it det ...
Other materials:
Tire Pressure Monitoring System
The Tire Pressure Monitoring System (TPMS) monitors the air pressure of all
four tires. If
the air pressure of one or more tires is too low, the system warns the driver by
indicating the
tire pressure monitoring system warning light in the instrument cluster and
operating a beep
sound. The ...
Trunk Lid Removal/Installation
WARNING:
Removing the trunk lid stay damper without supporting the trunk lid can be
dangerous. The trunk lid may fall and injure you. Be sure to open the trunk
lid completely and support it securely before removing the trunk lid stay damper.
1. Disconnect the negative battery cab ...
Drive Belt Removal/Installation [Skyactiv G 2.0]
WARNING:
A hot engine can cause severe burns. Turn off the engine and wait until it
is cool before servicing.
NOTE:
Remove/install the drive belt from the underside of the vehicle.
Generator Drive Belt Removal/Installation
CAUTION:
To prevent damage to the dri ...
