Mazda 3 Service Manual: Brake Pedal Removal/Installation
CAUTION:
-
The clearance between the brake switch and the brake pedal is automatically adjusted to the correct amount when the brake switch is inserted into the installation hole on the brake pedal and rotated to fix in place. If the brake switch is not properly installed, the clearance may be incorrect, causing a brake light malfunction. Therefore, always verify that the brake pedal is properly installed and fully released before installing the brake switch to the pedal.
-
Once the brake switch clearance has automatically been adjusted, it cannot be adjusted again. Therefore, replace the switch with a new one when replacing the power brake unit or the pedal, or performing any procedure that changes the pedal stroke.
-
Secure the steering wheel using tape or a cable to prevent the steering shaft from rotating after disconnecting the steering shaft. If the steering wheel rotates after the steering shaft and the steering gear and linkage are disconnected, the internal parts of the clock spring could be damaged.
1. Remove the battery and battery tray..
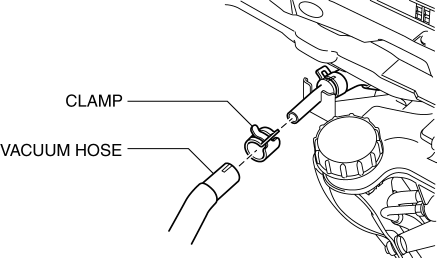
2. Disconnect the vacuum hose from the insulator bracket as shown in the figure. (MZR 2.3 DISI Turbo)
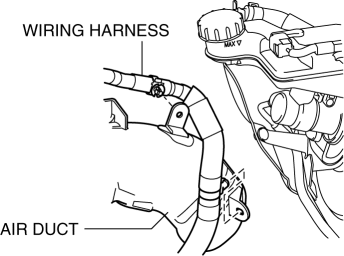
3. Remove the wiring harness from the air duct. (MZR 2.3 DISI Turbo)
4. Remove the side wall (driver side)..
5. Disconnect the steering shaft from the steering gear and linkage..
6. Remove the accelerator pedal..
7. Remove in the order indicated in the table.
8. Install in the reverse order of removal.
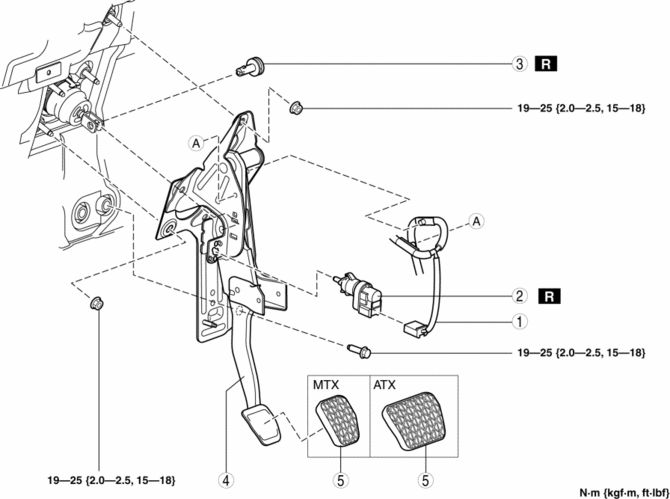
|
1 |
Brake switch connector, wiring harness |
|
2 |
Brake switch (See Brake Switch Installation Note.) |
|
3 |
Joint pin (See Joint Pin Installation Note.) |
|
4 |
Brake pedal (See Brake Pedal Removal Note.) |
|
5 |
Pedal pad |
Brake Pedal Removal Note
1. Remove the brake pedal installation bolt and nuts.
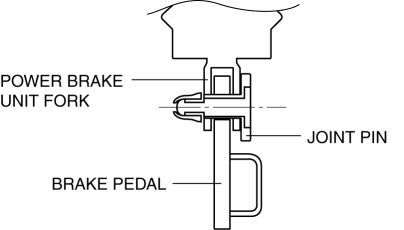
2. Move the power brake unit to the vehicle front where the power brake unit fork does not interfere with the brake pedal arm.
3. Remove the brake pedal.
Joint Pin Installation Note
1. Install the new joint pin by aligning the pin holes of the brake pedal and power brake unit fork.
2. Verify that the joint pin touches the power brake unit fork completely.
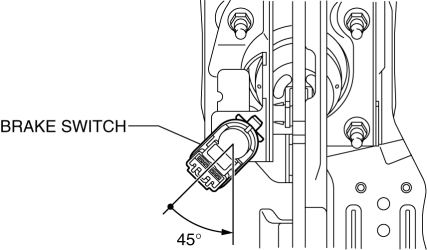
Brake Switch Installation Note
1. Inspect the brake pedal..
2. With the brake pedal fully released, insert a new brake switch into the installation hole on the brake pedal.
3. Secure the brake switch by turning it counterclockwise 45°
.
 Brake Pedal Inspection
Pedal Height Inspection
1. Measure the distance from the center of the upper surface of the pedal pad
to the floor covering and verify that it is as specified.
If not within the specifi ...
 Brake/Taillight Bulb Removal/Installation
4SD
1. Disconnect the negative battery cable..
2. Remove the following parts:
a. Trunk mat.
b. Trunk board.
c. Trunk end trim.
3. Partially peel back the trunk side trim..
4. Remove in th ...
Other materials:
Vehicle load limits
The Subaru Solterra vehicle load limits define the maximum allowable
weight parameters, including total load capacity, seating capacity, TWR (Trailer
Weight Rating), and cargo capacity, all of which must be respected for safe operation.
Understanding and correctly applying these limits in the S ...
M Position Switch Inspection [Fw6 A EL]
Continuity Inspection
NOTE:
The M position switch is built into the selector lever component.
1. Remove the battery cover..
2. Disconnect the negative battery cable..
3. Remove the console..
4. Disconnect the selector lever component connector.
5. Verify that the continuit ...
Oil Pressure Switch Removal
MZR 2.0, MZR 2.5, MZR 2.3 DISI Turbo
WARNING:
A hot engine can cause severe burns. Turn off the engine and wait until it
is cool before removing the exhaust system.
1. Disconnect the negative battery cable.
2. Remove the aerodynamic under cover No.2..
3. Disconnect the connecto ...
