Mazda 3 Service Manual: Compression Inspection [Mzr 2.0, Mzr 2.5]
WARNING:
-
Hot engines and oil can cause severe burns. Be careful not to burn yourself during removal/installation of each component.
-
Fuel vapor is hazardous. It can very easily ignite, causing serious injury and damage. Always keep sparks and flames away from fuel.
-
Fuel line spills and leakage are dangerous. Fuel can ignite and cause serious injuries or death and damage. Fuel can also irritate skin and eyes. To prevent this, always complete the “Fuel Line Safety Procedure”..
1. Verify that the battery is fully charged..
-
Recharge it if necessary..
2. Warm up the engine to the normal operating temperature.
3. Perform “Fuel Line Safety Procedures”. Leave the fuel pump relay removed..
4. Remove the plug hole plate..
5. Remove the ignition coils..
6. Remove the spark plugs..
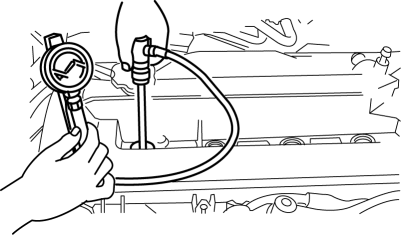
7. Connect a compression gauge into the spark plug hole.

8. Fully depress the accelerator pedal and crank the engine.
9. Note down the maximum gauge reading.
10. Inspect each cylinder as above.
-
Compression [MZR 2.0]
-
Standard: 1,400 kPa {14.28 kgf/cm2
, 203.1 psi} [300 rpm]
-
Minimum: 980 kPa {10.0 kgf/cm2
, 142.2 psi} [300 rpm]
-
Maximum difference between cylinders: 196.1 kPa {2.0 kgf/cm2
, 28.5 psi}
-
Compression [MZR 2.5]
-
Standard: 1,324 kPa {13.50 kgf/cm2
, 192.0 psi} [300 rpm]
-
Minimum: 927 kPa {9.45 kgf/cm2
, 134 psi} [300 rpm]
-
Maximum difference between cylinders: 196.1 kPa {2.0 kgf/cm2
, 28.5 psi}
-
If the measured value is less than the limited value, or there is a cylinder whose compression value varies from that of other cylinders by 196.1 kPa {2.0 kgf/cm2, 28.5 psi}
or more, add a small amount of engine oil through the spark plug hole. Then measure the compression pressure and perform the respective operations for the following cases.
-
If the compression increases, the piston, the piston rings, or cylinder wall may be worn and overhaul is required.
-
If the compression stays low, a valve may be stuck or improperly seated and overhaul is required.
-
If the compression in adjacent cylinders stays low, the cylinder head gasket may be damaged or the cylinder head distorted and overhaul is required.
11. Disconnect the compression gauge.
12. Install the following parts.
a. Spark plugs..
b. Ignition coils..
c. Plug hole plate..
d. Fuel pump relay..
 Check Valve Inspection [Skyactiv G 2.0]
Airflow Inspection
1. Remove the vacuum hose..
2. Blow air into the vacuum hose using your mouth from the vacuum pump side and
verify that the air flows to the intake manifold side, then blow air ...
 Compression Inspection [Mzr 2.3 Disi Turbo]
WARNING:
Hot engines and oil can cause severe burns. Be careful not to burn yourself
during removal/installation of each component.
Fuel vapor is hazardous. It can very easily ignit ...
Other materials:
Knock Sensor (Ks) Inspection [Mzr 2.0, Mzr 2.5]
Resistance Inspection
1. Remove the battery cover..
2. Disconnect the negative battery cable..
3. Disconnect the KS connector.
4. Measure the resistance between KS terminals A and B.
If not as specified, replace the KS..
Specification
Approx. 4.87 megohms [normal tem ...
Power Steering Fluid Inspection
Fluid Level Inspection
1. Verify that the fluid level is between MAX and MIN of the sub tank when the
engine is cold.
If the fluid is not at the specified level, adjust the fluid level (MIN-MAX
on sub tank) by adding/draining the fluid.
Power steering fluid type
Mazda Gen ...
Armrest
The rear armrest in the center of the rear
seatback can be used (no occupant in the
center seat) or placed upright.
WARNING
Never put your hands and fi ngers
around the moving parts of the seat and
armrest:
Putting your hands and fi ngers around
the moving parts of the s ...
