Mazda 3 Service Manual: Rear Door Removal/Installation
WARNING:
-
Removing the rear door without supporting it could cause the rear door to fall and cause serious injury. Always perform the procedure with at least another person to prevent the rear door from falling.
1. Disconnect the negative battery cable..
2. Remove in the order indicated in the table.
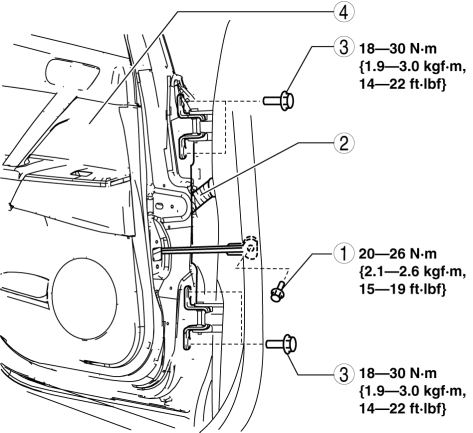
|
1 |
Bolt A |
|
2 |
Connector (See Connector Removal Note.) |
|
3 |
Bolt B |
|
4 |
Rear door |
3. Install in the reverse order of removal.
4. Adjust the rear door..
Connector Removal Note
1. While pressing the tab in the direction of arrow (1), disconnect the connector in the direction of arrow (2).

 Rear Door Pad Removal/Installation
1. Fully open the rear door glass.
2. Disconnect the negative battery cable..
3. Remove the following parts:
a. Rear door trim.
b. Rear door speaker.
c. Rear power window motor.
d. Rear do ...
 Rear Outer Handle Removal/Installation
1. Fully close the rear door glass.
2. Disconnect the negative battery cable..
3. Remove the rear door trim..
4. Remove the service hole cover.
5. Remove the screw from the service hole.
...
Other materials:
Clock Spring Removal/Installation
1. Disconnect the negative battery cable..
2. Remove the driver-side air bag module..
3. Remove the steering wheel..
4. Remove the column cover.
5. Remove the connectors.
6. Remove the tab direction of the arrow shown in the figure.
7. Remove the screws.
8. Remove the clock spring. ...
Sunroof Switch Inspection
NOTE:
The sunroof switch is together with the front map light.
1. Disconnect the negative battery cable..
2. Remove the map light from the headliner..
3. Inspect for continuity between the sunroof switch terminals using an ohmmeter.
If not as specified, replace the sun ...
Vehicle Speed Sensor (VSS) Removal/Installation [FS5 A EL]
CAUTION:
If foreign materials are stuck to the sensor, disturbance by magnetic flux
can cause sensor output to be abnormal and thereby negatively affect control.
Make sure that foreign materials such as iron filings are not stuck to the sensor
during installation.
1. Perform t ...
