Mazda 3 Service Manual: Oil Seal (Control Valve Body) Replacement [Fw6 A EL]
1. Remove the battery cover..
2. Disconnect the negative battery cable..
3. Remove the air cleaner component..
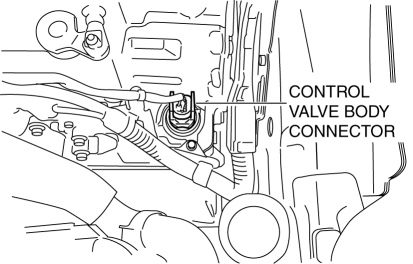
4. Disconnect the control valve body connector.
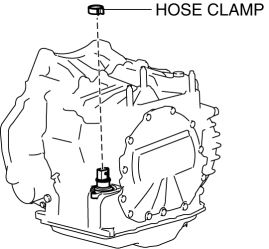
5. Remove the hose clamp.
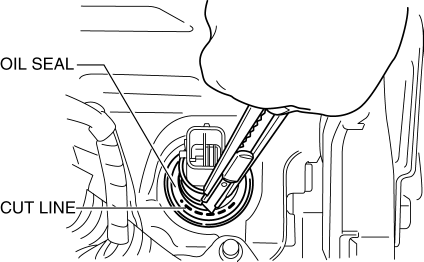
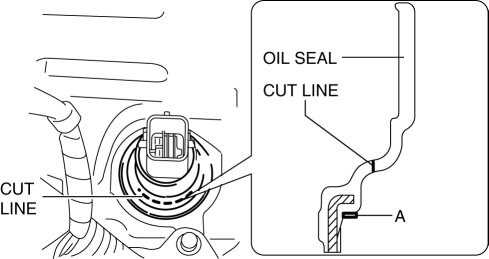
6. Cut the oil seal using a utility knife as shown in the following illustration.
CAUTION:
-
Do not damage the transaxle case.
-
Do not damage the control valve body coupler connector.
-
To prevent foreign matter penetration, clean the oil seal part before cutting the oil seal.
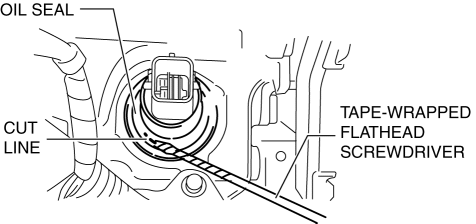
7. Using a tape-wrapped flathead screwdriver, remove the oil seal from the transaxle case.
NOTE:
-
Remove the oil seal by tapping the tip of a tape-wrapped flathead screwdriver on the inner circumference surface A area of the oil seal.
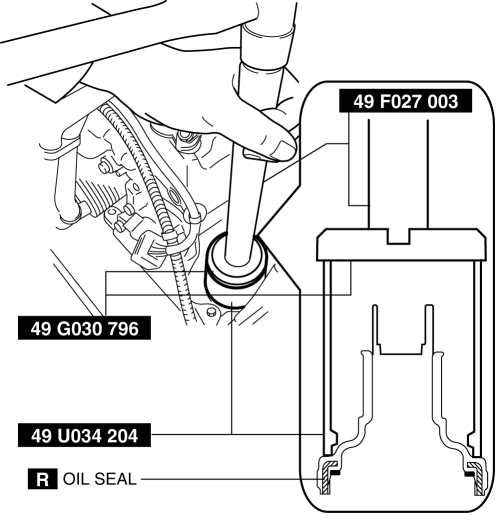
8. Temporarily install the oil seal (control valve body) by hand.
9. Using the SSTs
and a hammer, install the oil seal (control valve body) so that it is not tilted and there is no height difference between the transaxle case surface and the end surface of the oil seal.
CAUTION:
-
When installing the oil seal (control valve body), do not mistakenly hit the control valve body connector with the hammer. Otherwise the control valve body connector could be damaged making it no longer waterproof.
10. Install a new hose clamp to the position shown in the figure.
CAUTION:
-
If the hose clamp is reused it could cause ATF leakage, therefore use a new hose clamp.
-
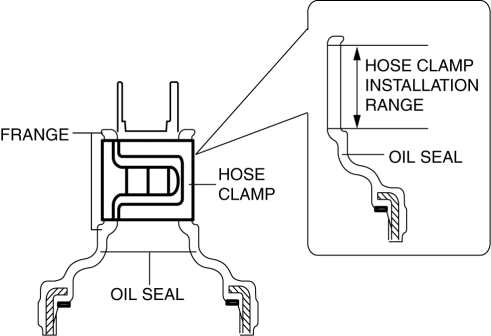
Install the hose clamp tab to within the range shown in the figure.
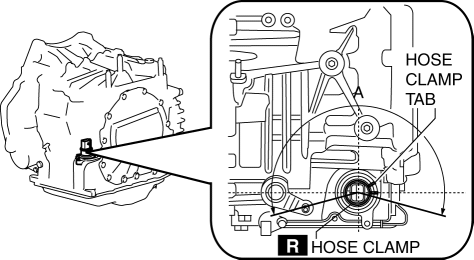
A:210°
CAUTION:
-
Install the hose clamp so that it does not interfere with the top and bottom flanges of the oil seal to maintain the waterproofing integrity.
11. Connect the control valve body connector.
CAUTION:
-
Make sure that your hand does not touch the terminal as the connector terminal could be damaged.
-
Verify that there is no fluid or foreign matter adhering to the connector before connecting the connector.
-
Insert the connector straight as the connector terminal could be damaged.
-
Rotate the connector lever until a click is heard.
12. Install the air cleaner component..
13. Connect the negative battery cable..
14. Install the battery cover..
 Oil Pump Removal/Installation [Skyactiv G 2.0]
WARNING:
Hot engines and engine oil can cause severe burns. Turn off the engine and
wait until it and the engine oil have cooled.
A vehicle that is lifted but not securely supported ...
 On/Off Solenoid Removal/Installation [Fw6 A EL]
WARNING:
A hot transaxle and ATF can cause severe burns. Turn off the engine and wait
until they are cool.
Always wear protective eye wear when using the air compressor. If the ...
Other materials:
ABS HU/CM Removal/Installation
WARNING:
If the ABS HU/CM configuration is not completed, it could result in an unexpected
accident due to the ABS being inoperative. If the ABS HU/CM or ABS CM is replaced,
always use the automatic configuration function so that the ABS operation conditions
are correct.
CAUTI ...
Front Wheel Hub Bolt Replacement
1. Remove the brake calliper component and disc plate..
2. Remove the wheel hub bolt using the SST as shown in the figure.
NOTE:
When removing the wheel hub bolts, perform the work between range A shown
in the figure to assure a space for the bolt removal.
3. Place a new whe ...
Armrest
The rear armrest in the center of the rear
seatback can be used (no occupant in the
center seat) or placed upright.
WARNING
Never put your hands and fi ngers
around the moving parts of the seat and
armrest:
Putting your hands and fi ngers around
the moving parts of the s ...
