Mazda 3 Service Manual: On/Off Solenoid Removal/Installation [Fw6 A EL]
WARNING:
-
A hot transaxle and ATF can cause severe burns. Turn off the engine and wait until they are cool.
-
Always wear protective eye wear when using the air compressor. If the air compressor is used, any particles of dirt or soiling could spatter and get into the eyes.
1. Remove the battery cover..
2. Disconnect the negative battery cable..
3. Remove the aerodynamic under cover No.2..
4. Clean the transaxle exterior throughout with a steam cleaner or cleaning solvents.
5. Drain the ATF..
6. Remove the oil pan.
CAUTION:
-
To avoid damaging the control valve body, if there is a large amount of foreign material at the bottom of the oil pan when the oil pan is removed, replace the oil strainer with a new one.
-
If there is not a large amount of foreign material at the bottom of the oil pan, the oil strainer does not have to be replaced.
NOTE:
-
Always use new oil pan installation bolts when re-installing the oil pan because the oil pan installation bolts cannot be reused.
7. Disconnect the on/off solenoid connector.
NOTE:
-
Disconnect the on/off solenoid connector by pressing the connector tab with your fingers.
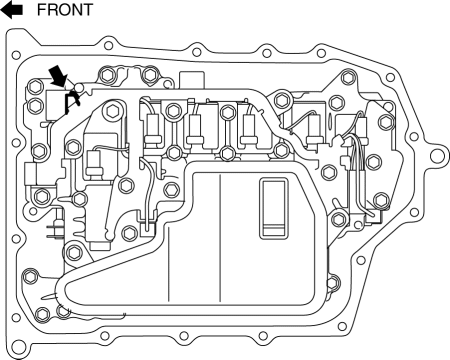
8. Remove the on/off solenoid.
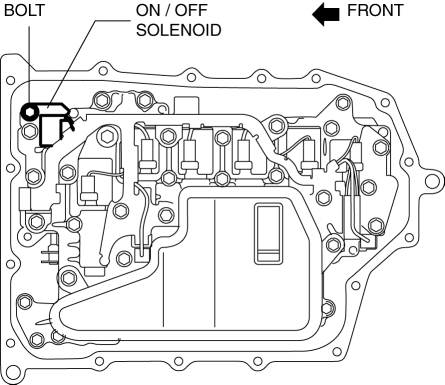
9. Install the on/off solenoid.
-
Tightening torque
-
9—10 N·m {92—101 kgf·cm, 80—88 in·lbf}
10. Connect the on/off solenoid connector.
11. Apply a light coat of silicon sealant (TB1217E) to the contact surfaces of the oil pan and transaxle case.
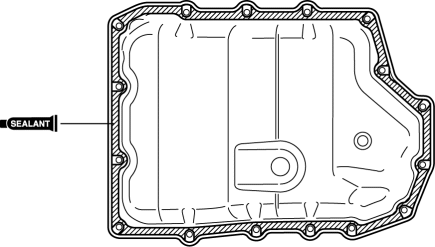
CAUTION:
-
If any sealant remains on the sealing surfaces of the transaxle case and oil pan, transaxle damage may occur. Use a cleaning fluid to remove any old sealant from the transaxle case and oil pan.
12. Install the oil pan with new bolts before the applied sealant starts to harden.
-
Tightening torque
-
8—10 N·m {82—101 kgf·cm, 71—88 in·lbf}
13. Install the aerodynamic under cover No.2..
14. Add the ATF..
15. Connect the negative battery cable..
16. Install the battery cover..
17. Perform the “Mechanical System Test”..
 Oil Seal (Control Valve Body) Replacement [Fw6 A EL]
1. Remove the battery cover..
2. Disconnect the negative battery cable..
3. Remove the air cleaner component..
4. Disconnect the control valve body connector.
5. Remove the hose clamp.
...
 Pilot Bearing Inspection [A26 M R]
CAUTION:
Secure the steering wheel using tape or a cable to prevent the steering shaft
from rotating after disconnecting the steering shaft. If the steering wheel
rotates after the steer ...
Other materials:
Precaution
Intermittent Concern Troubleshooting
Vibration method
If a malfunction occurs or becomes worse while driving on a rough road or
when the engine is vibrating, perform the following steps.
NOTE:
There are several reasons why vehicle or engine vibration could cause an
electr ...
Glass Antenna
Purpose, Function
4SD
The AM/FM radio waves and RDS-TMC (Radio Data System-Traffic Message Channel)
radio waves are converted to an electrical signal and the signal is sent to
the audio unit.
5HB (With audio unit (with display))
The RDS-TCM (Radio Data System-Traffic Mes ...
Inspecting Engine Oil Level
Be sure the vehicle is on a level
surface.
Warm up the engine to normal
operating temperature.
Turn it off and wait at least 5 minutes
for the oil to return to the oil pan.
Pull out the dipstick, wipe it clean, and
reinsert it fully.
Pull it out again and examine the level ...
