Mazda 3 Owners Manual: Overheating
If the high engine coolant temperature warning light illuminates, the vehicle loses power, or you hear a loud knocking or pinging noise, the engine is probably too hot.
| WARNING
Open the hood ONLY after steam is no longer escaping from the engine: Steam from an overheated engine is dangerous. The escaping steam could seriously burn you. |

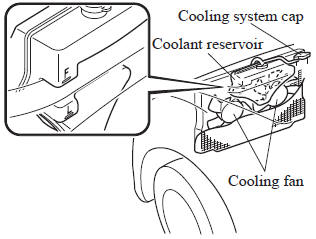
 Do not remove either
If the high engine coolant temperature warning light illuminates:
- Drive safely to the side of the road and park off the right-of-way.
- Put a vehicle with an automatic transaxle in park (P), a manual transaxle in neutral.
- Apply the parking brake.
- Turn off the air conditioner.
- Check whether coolant or steam is escaping from the engine compartment.
If steam is coming from the engine compartment: Do not go near the front of the vehicle.
Stop the engine.
Wait until the steam dissipates, then open the hood and start the engine.
If neither coolant nor steam is escaping: Open the hood and idle the engine until it cools.
| CAUTION If the cooling fan does not operate while the engine is running, the engine temperature will increase. Stop the engine and call an Authorized Mazda Dealer. |
- Make sure the cooling fan is operating, then turn off the engine after the temperature has decreased.
- When cool, check the coolant level.
If it is low, look for coolant leaks from the radiator and hoses.
If you find a leak or other damage, or if coolant is still leaking:
Stop the engine and call an Authorized Mazda Dealer.
If you find no problems, the engine is cool, and no leaks are obvious:
Carefully add coolant as required .
| CAUTION If the engine continues to overheat or frequently overheats, have the cooling system inspected. The engine could be seriously damaged unless repairs are made. Consult an Authorized Mazda Dealer. |
 Push-Starting
Do not push-start your Mazda.
WARNING
Never tow a vehicle to start it:
Towing a vehicle to start it is
dangerous. The vehicle being towed
could surge forward when its engine
sta ...
 Emergency Towing
...
Other materials:
Rear Package Trim Removal/Installation
1. Remove the following parts:
a. Rear seat cushion.
b. Rear scuff plate.
c. Tire house trim.
d. C-pillar trim.
2. Fold the rear seat back.
3. Remove the fasteners.
4. Pull up the rear package trim in the direction of the arrow (1) shown in the
figure while remove the clips and p ...
Hood Latch And Release Lever Removal/Installation
Hood latch
1. Open the hood.
2. Disconnect the negative battery cable..
3. Disconnect the hood latch switch connector. (vehicles with theft-deterrent
system)
4. Remove the bolts.
5. Remove the hood latch.
6. Install in the reverse order of removal.
7. Adjust the hood..
Hood ...
Blind Spot Monitoring (Bsm) Control Module Inspection
1. Disconnect the negative battery cable.
2. Remove the rear combination light..
3. Remove the rear bumper..
4. Connect the negative battery cable..
5. Measure the voltage at each terminal is as indicated in the Terminal Voltage
Tables.
If the voltage or continuity is not as specif ...
