Mazda 3 Service Manual: Buckle Switch Inspection
Driver Side
1. Switch the ignition to off.
2. Disconnect the negative battery cable..
3. Remove the front seat..
4. Remove the front buckle..
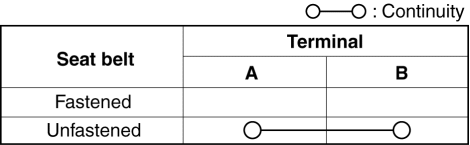
5. Inspect for continuity between the buckle switch terminals using a tester.

-
If not as indicated in the table, replace the driver side front buckle.
Passenger Side
1. Connect the M-MDS (IDS) to the DLC-2.
2. After the vehicle is identified, select the following items from the initialization screen of the IDS.
a. Select “DataLogger”.
b. Select “Modules”.
c. Select “RCM”.
3. Verify that it is displayed according to the table using “BUCKLE_P”.
|
M-MDS display |
Operation Status |
|
Unbuckled |
Passenger-side front seat belt not fastened |
|
Buckled |
Passenger-side front seat belt fastened |
-
If not as indicated in the table, replace the passenger side front buckle.
 Air Bag Module And Pre Tensioner Seat Belt Disposal Procedures
WARNING:
A live (undeployed) air bag module or pre-tensioner seat belt may accidentally
operate (deploy) when it is disposed of and cause serious injury. Always refer
to the “AIR BAG ...
 Child Restraint Seat Anchor Removal/Installation
4SD
1. Remove the cover.
2. Remove the bolt and child-restraint seat anchor.
3. Install in the reverse order of removal.
5HB
1. Remove the trunk end trim..
2. Remove the bolt and ...
Other materials:
Down Switch Inspection [Fw6 A EL]
Continuity Inspection
NOTE:
The down switch is built into the selector lever component.
1. Remove the battery cover..
2. Disconnect the negative battery cable..
3. Remove the console..
4. Disconnect the selector lever component connector.
5. Verify that the continuity betw ...
Automatic Transaxle Removal/Installation [Fw6 A EL]
CAUTION:
Secure the steering wheel using tape or a cable to prevent the steering shaft
from rotating after disconnecting the steering shaft. If the steering wheel
rotates after the steering shaft and the steering gear and linkage are disconnected,
the internal parts of the clock spr ...
Battery Recharging [Skyactiv G 2.0]
Using GR8-1291:
(See GR8-1291 INSTANT TRAINING MODULE (VIDEO) .)
WARNING:
Keep all flames away from the battery, otherwise evaporated gas from the
battery fluid may catch fire and cause serious injury.
1. Remove the battery filler caps and check the water level. If necessary, add ...
