Mazda 3 Service Manual: Engine Disassembly/Assembly [Skyactiv G 2.0]
CAUTION:
-
When the transaxle is installed, do not suspend the engine. Otherwise, the SST installation area of the cylinder head may be damaged due to excess weight. Only suspend the engine after separating the engine and transaxle.
-
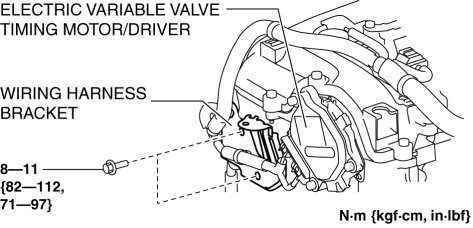
Applying excessive force (force of 100 N {10.2 kgf, 22.5 lbf} or more) to the electric variable valve timing motor/driver may cause a malfunction. When servicing, be careful not to apply excessive force to the electric variable valve timing motor/driver using other parts or tools.
1. To enable to install the SST
, disconnect the clip shown in the figure and set the wiring harness aside.

2. Install the SST
using part number 99794 1025
or an M10×1.25
, length
25 mm {0.98 in}
bolt as shown in the figure.
Engine front side
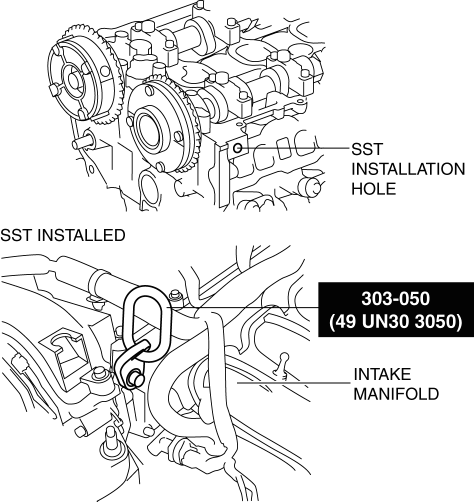
Engine rear side
-
38—51 N·m {3.9—5.2 kgf·m, 29—37 ft·lbf}
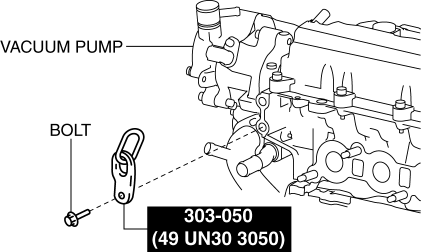
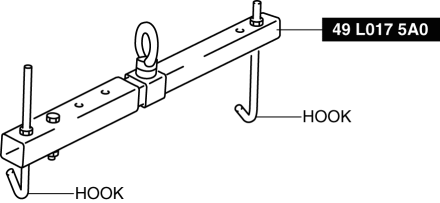
3. Engage the hook for the SST (49 L017 5A0)
to the SST (49 UN30 3050)
.
4. To ensure the safety of the work (control engine and transaxle sway), set a hoist as shown in the figure.
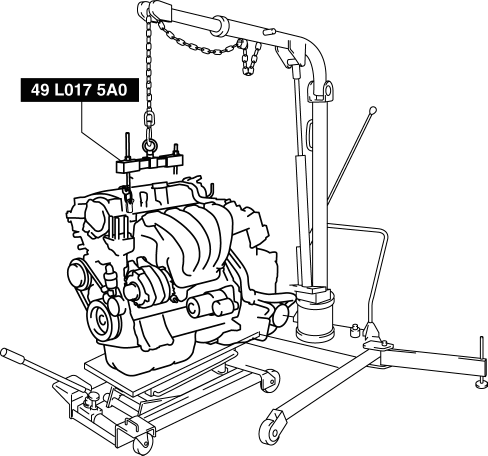
CAUTION:
-
Do not lift up the engine.
5. Remove the exhaust system..
6. Remove the joint shaft and joint shaft bracket.(See JOINT SHAFT ASSEMBLY [SKYACTIV-G 2.0].)
7. Remove the starter..
8. Remove the generator..
9. Fix the drive plate using the crankshaft pulley lock bolt. (ATX)
10. Remove the torque converter installation nut from the starter installation hole..
11. Disconnect the engine and transaxle, and lower only the engine from the engine lifter..
12. Remove the intake-air system..
13. Remove the fuel injectors..
14. Remove the camshaft position (CMP) sensor..
15. Remove the vacuum pump..
16. Remove the high pressure fuel pump and rear housing..
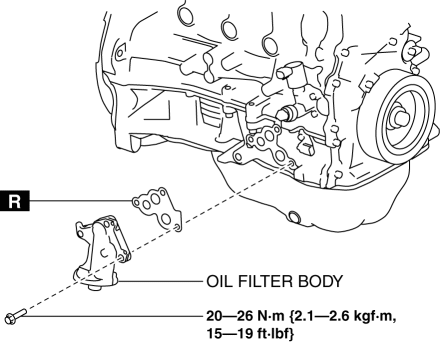
17. Remove the oil filter..
18. Remove the engine oil solenoid valve..
19. Remove the crankshaft position (CKP) sensor..
20. Remove the ignition coil/ion sensors..
21. Remove the wiring harness bracket shown in the figure.
22. Remove the emission harness.
23. Remove the water pump drive belt..
24. Remove the oil filter body.
25. Assemble in the reverse order of disassembly.
 Engine Disassembly/Assembly [Mzr 2.3 Disi Turbo]
1. Remove the engine from the transaxle..
2. Remove the intake-air system..
3. Remove the exhaust system..
4. Remove the generator..
5. Remove the EGR valve..
6. Remove the ignition coils.. ...
 Engine Removal/Installation [Mzr 2.0, Mzr 2.5]
WARNING:
Fuel vapor is hazardous. It can very easily ignite, causing serious injury
and damage. Always keep sparks and flames away from fuel.
Fuel line spills and leakage are danger ...
Other materials:
Air Intake Actuator Removal/Installation [Full Auto Air Conditioner]
1. Set the air intake mode to FRESH.
2. Disconnect the negative battery cable..
3. Remove the following parts:
a. Front scuff plate (Passenger-side).
b. Front side trim (Passenger-side).
c. Dashboard under cover.
d. Glove compartment.
e. Lower panel (Passenger-side).
f. Shower duct ( ...
Cooling System Service Warnings [Mzr 2.0, Mzr 2.5]
WARNING:
Never remove the cooling system cap or loosen the radiator drain plug while
the engine is running, or when the engine and radiator are hot. Scalding engine
coolant and steam may shoot out and cause serious injury. It may also damage
the engine and cooling system.
Tu ...
Charcoal Canister Removal/Installation [Mzr 2.0, Mzr 2.5]
Except for Mexico
1. Remove in the order indicated in the table.
1
Evaporative hose
2
Quick release connector
(See QUICK RELEASE CONNECTOR (EMISSION SYSTEM) REMOVAL/INSTALLATION [MZR
2.0, MZR 2.5].)
3
Charc ...
