Mazda 3 Service Manual: Engine Disassembly/Assembly [Mzr 2.3 Disi Turbo]
1. Remove the engine from the transaxle..
2. Remove the intake-air system..
3. Remove the exhaust system..
4. Remove the generator..
5. Remove the EGR valve..
6. Remove the ignition coils..
7. Remove the high pressure fuel pump and high pressure fuel pump cover..
8. Remove the fuel injectors..
9. Remove the crankshaft position (CKP) sensor..
10. Disassemble in the order indicated in the table.
11. Assemble in the reverse order of disassembly.
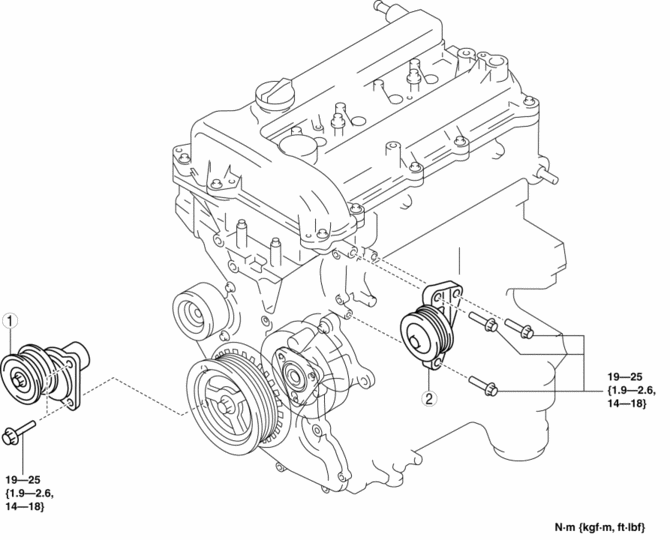
|
1 |
Drive belt auto tensioner |
|
2 |
Drive belt idler pulley |
 Engine Disassembly/Assembly [Mzr 2.0, Mzr 2.5]
1. Remove the engine from the transaxle..
2. Remove the generator..
3. Remove the exhaust system..
4. Remove the EGR valve..
5. Remove the intake-air system..
6. Remove the fuel injectors.. ...
 Engine Disassembly/Assembly [Skyactiv G 2.0]
CAUTION:
When the transaxle is installed, do not suspend the engine. Otherwise, the
SST installation area of the cylinder head may be damaged due to excess weight.
Only suspend the engin ...
Other materials:
Starter Interlock Switch Inspection [Mzr 2.3 Disi Turbo]
CAUTION:
Do not reuse the starter interlock switch if it is removed from the vehicle
even once. Replace with a new starter interlock switch when installing.
1. Remove the battery cover..
2. Disconnect the negative battery cable..
3. Disconnect the starter interlock switch connec ...
Maintaining the Finish
Washing
CAUTION
When the wiper lever is in the
position and the ignition is switched ON,
the wipers may move automatically in
the following cases:
If the windshield above the rain
sensor is touched or wiped with a
cloth.
If the windshield is struc ...
Types of cameras and sensors used for the Advanced Park
The Subaru Solterra Advanced Park system relies on a network of high-precision
cameras and sensors designed to detect surrounding vehicles and environmental features,
helping the driver accurately identify suitable parking spaces and improve overall
parking efficiency.
Front camera
Sid ...
