Mazda 3 Service Manual: Exhaust System Removal/Installation [Mzr 2.0, Mzr 2.5]
WARNING:
-
A hot engine and exhaust system can cause severe burns. Turn off the engine and wait until they are cool before removing the exhaust system.
1. Remove the battery cover..
2. Disconnect the negative battery cable..
3. Remove the plug hole plate..
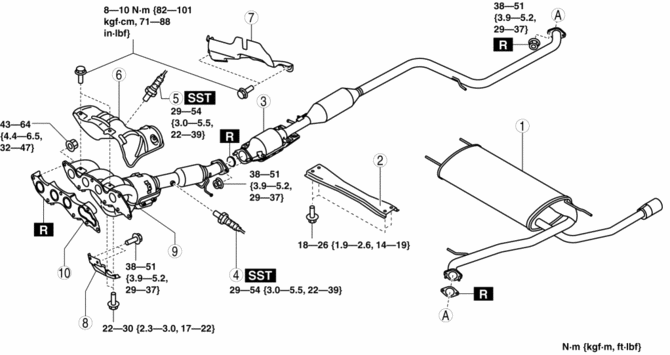
4. Remove in the order indicated in the table.
5. Remove the insulator..
6. Install in the reverse order of removal.
MZR 2.0
|
1 |
Main silencer |
|
2 |
Tunnel member (rear) |
|
3 |
TWC |
|
4 |
HO2S (See HEATED OXYGEN SENSOR (HO2S) REMOVAL/INSTALLATION [MZR 2.0, MZR 2.5].) |
|
5 |
A/F sensor (See AIR FUEL RATIO (A/F) SENSOR REMOVAL/INSTALLATION [MZR 2.0, MZR 2.5].) |
|
6 |
Exhaust manifold insulator (See Exhaust Manifold Installation Note.) |
|
7 |
insulator |
|
8 |
Exhaust manifold bracket |
|
9 |
Exhaust manifold (See Exhaust Manifold Removal Note.) |
|
10 |
Exhaust manifold gasket |
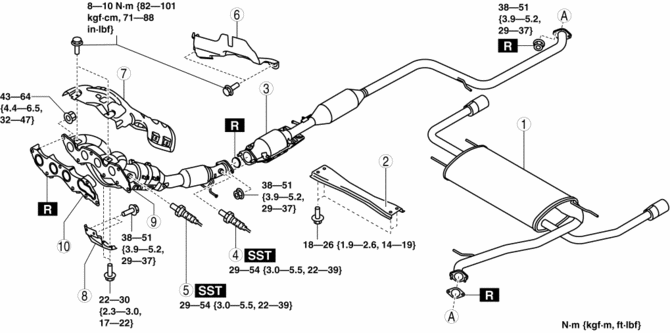
MZR 2.5 (Except for Mexico)
MZR 2.5 (Mexico)

|
1 |
Main silencer |
|
2 |
Tunnel member (rear) |
|
3 |
TWC |
|
4 |
HO2S (See HEATED OXYGEN SENSOR (HO2S) REMOVAL/INSTALLATION [MZR 2.0, MZR 2.5].) |
|
5 |
A/F sensor (See AIR FUEL RATIO (A/F) SENSOR REMOVAL/INSTALLATION [MZR 2.0, MZR 2.5].) |
|
6 |
insulator |
|
7 |
Exhaust manifold insulator (See Exhaust Manifold Installation Note.) |
|
8 |
Exhaust manifold bracket |
|
9 |
Exhaust manifold (See Exhaust Manifold Removal Note.) |
|
10 |
Exhaust manifold gasket |
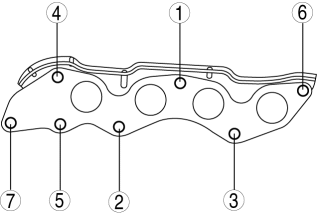
Exhaust System Insulator Removal/installation Note
1. Remove the exhaust system insulator in the order shown in the figure.
2. Install in the reverse order of removal.
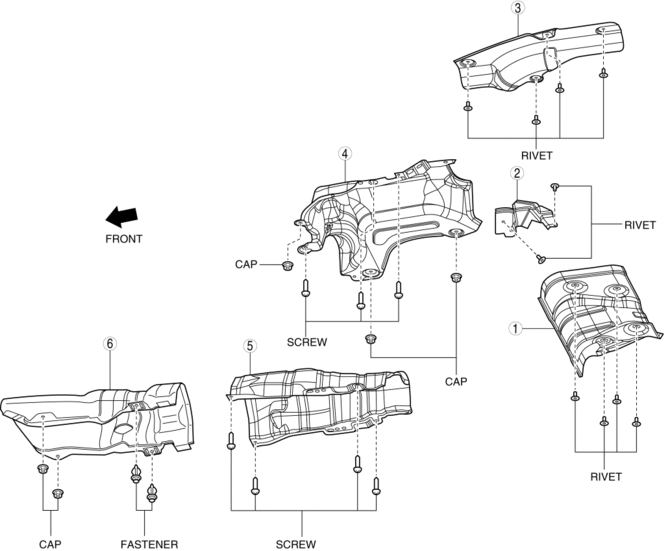
|
1 |
Insulator (rear No.1) (See Insulator (Rear No.1, No.2, No.3) Removal Note.) |
|
2 |
Insulator (rear No.2) (See Insulator (Rear No.1, No.2, No.3) Removal Note.) |
|
3 |
Insulator (rear No.3) (See Insulator (Rear No.1, No.2, No.3) Removal Note.) |
|
4 |
Insulator (middle No.1) |
|
5 |
Insulator (middle No.2) |
|
6 |
Insulator (front) (See Insulator (Front) Removal Note.) |
Insulator (Rear No.1, No.2, No.3) Removal Note
NOTE:
-
The insulator (rear No.1, No.2, No.3) are installed using rivets.
1. Push out the mandrel using a hammer and punch (2—2.8 mm {0.08—0.11 in} diameter).
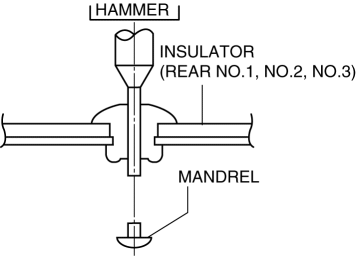
2. Remove the flange using a drill (5 mm {0.20 in} drill bit).
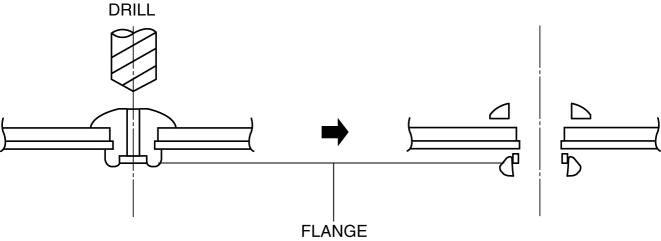
Insulator (Front) Removal Note
1. Remove the tunnel member (front).
2. Remove the insulator (front).
Exhaust Manifold Removal Note
1. Windshield wiper arm and blade..
2. Remove the cowl grille..
3. Remove the windshield wiper motor..
4. Remove the cowl panel..
5. Remove the exhaust manifold.
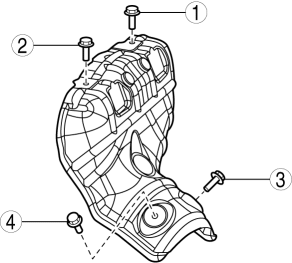
Exhaust Manifold Installation Note
1. Temporarily tighten the exhaust manifold installation nuts.
2. Tighten the exhaust manifold new installation nuts in the order shown in the figure.
-
Tightening torque
-
43—64 N·m {4.4—6.5 kgf·m, 32—47 ft·Ibf}
Exhaust Manifold Insulator Installation Note
1. Temporarily tighten the exhaust manifold insulator.
2. Tighten the exhaust manifold insulator in the order shown in the figure.
MZR 2.0
MZR 2.5
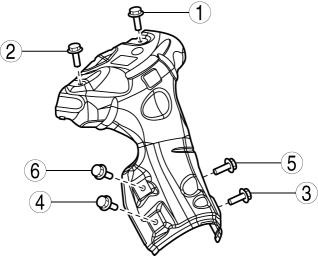
-
Tightening torque
-
8—10 N·m {82—101 kgf·cm, 71—88 in·Ibf}
 Exhaust System Inspection [Mzr 2.0, Mzr 2.5]
1. Start the engine and inspect each exhaust system component for exhaust gas
leakage.
If there is leakage, repair or replace the appropriate component..
...
 Forced Induction
...
Other materials:
Starter Cut Relay Inspection [MTX]
Advanced Keyless Entry And Push Button Start System Only
1. Disconnect the negative battery cable.
2. Remove the following parts:
a. Front scuff plate (LH).
b. Front side trim (LH).
c. Side wall.
d. Console.
3. Set the bonnet release lever out of the way..
4. Remove the lower panel.. ...
Seat Operation
*1: With power operation seat only
1. Seat Slide
(Manual Seat)
To move a seat forward or backward, raise the lever and slide the seat to the
desired position
and release the lever.
Make sure the lever returns to its original position and the seat is locked in
place by
attempting to p ...
Service Cautions
Injury/damage Prevention Precautions
Depending on the vehicle, the cooling fan may operate suddenly even when
the ignition is switched to off. Therefore, keep hands and tools away from the
cooling fan even if the cooling fan is not operating to prevent injury to personnel
or damage t ...
