Mazda 3 Service Manual: Expansion Valve Removal/Installation
1. Disconnect the negative battery cable..
2. Discharge the refrigerant from the system..
CAUTION:
-
If moisture or foreign material enters the refrigeration cycle, cooling ability will be lowered and abnormal noise will occur. Always immediately plug all open fittings after removing any refrigeration cycle parts to keep moisture or foreign material out of the cycle.
3. Disconnect the cooler hose (LO) and cooler pipe. Do not allow compressor oil to spill..
4. Remove the following parts:
a. Front side trim (RH).
b. Front scuff plate.
c. Dashboard under cover.
d. Glove compartment.
e. Lower panel (passenger-side).
f. Side wall (RH).
g. Shower duct (RH).
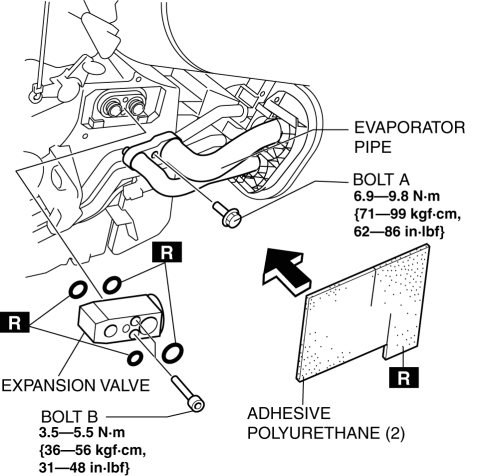
5. Remove the adhesive polyurethane (2)..
6. Remove the bolt A.
7. Disconnect the evaporator pipe.
8. Remove the bolt B.
9. Remove the expansion valve. Do not allow compressor oil to spill.
10. Install in the reverse order of removal.
11. Perform the refrigerant system performance test..
 Evaporator Inspection
1. Inspect the evaporator for damage, cracks, and oil leakage.
If there is any malfunction, replace the evaporator.
2. Visually inspect the fins for bending.
If there is any bend ...
 Fan Switch Inspection [Manual Air Conditioner]
1. Disconnect the negative battery cable..
2. Remove the following parts:
a. Upper panel.
b. Shift lever knob (MTX).
c. Selector lever knob (ATX).
d. Shift panel.
e. Side wall.
f. Consol ...
Other materials:
Seat Weight Sensor Control Module Removal/Installation [Two Step Deployment
Control System]
CAUTION:
When the seat weight sensor control module is replaced with a new one, perform
the seat weight sensor calibration using the M–MDS..
1. Switch the ignition to off.
2. Disconnect the negative battery cable and wait for 1 min or more..
3. Disconnect the connectors.
...
Auto Lock/Unlock Function
WARNING
Do not pull the inner handle on a front
door:
Pulling the inner handle on a front
door while the vehicle is moving
is dangerous. Passengers can fall
out of the vehicle if the door opens
accidentally , which could result in
death or serious injury.
When ...
Transaxle Oil Inspection [G35 M R]
1. Park the vehicle on level ground.
2. Remove the aerodynamic under cover No.2..
3. Remove the oil level plug and washer.
4. Verify that the oil is near the brim of the plug port.
If the oil level is lower than the low level, add the specified amount and
type of oil through the ...
