Mazda 3 Service Manual: Front Door Key Cylinder Switch Inspection
1. To access the glass installation bolt, position the front door glass so that the distance from the top of the front door glass to the upper part of the front beltline molding is approx. 80 mm {3.1 in}
.

2. Disconnect the negative battery cable..
3. Remove the following parts:
a. Inner garnish.
b. Front door trim.
c. Front door speaker.
d. Front door glass.
e. Front door module panel.
f. Front door latch and lock actuator.
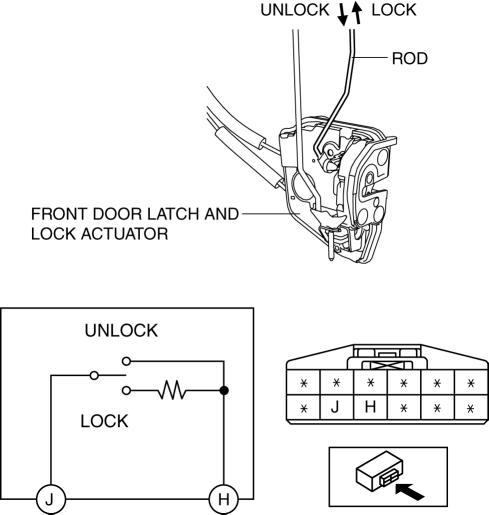
4. Move the rod of the door key cylinder switch in the direction of the arrow shown in the figure, and verify that the continuity is as indicated in the table.
-
If not as indicated in the table, replace the front door latch and lock actuator.

 Front Door Key Cylinder Removal/Installation
1. To access the glass installation bolt, position the front door glass so that
the distance from the top of the front door glass to the upper part of the front
beltline molding is approx. 80 mm { ...
 Trunk Lid Key Cylinder Removal/Installation
1. Disconnect the negative battery cable..
2. Remove the trunk lid trim..
3. Lift the clip in the direction of the arrow (1), and pull out the key rod
in the direction of the arrow (2).
4. ...
Other materials:
Disc Pad (Front) Replacement [Mzr 2.3 Disi Turbo]
1. Remove in the order indicated in the table.
2. Install in the reverse order of removal.
3. After installation, pump the brake pedal a few times and verify that the brakes
do not drag.
1
Clip
2
Retaining clip
(See FRONT BRAKE (DISC ...
Combination Switch Disassembly/Assembly
CAUTION:
Handling the air bag module improperly can accidentally deploy the air bag
module, which may seriously injure you. Read the air bag system service warnings
and cautions before handling the air bag module..
1. Switch the ignition to off.
2. Disconnect the negative batte ...
Keyless Antenna Removal/Installation
Interior, Front
1. Disconnect the negative battery cable..
2. Remove the following parts:
a. Upper panel.
b. Shift knob (MTX).
c. Selector lever knob (ATX).
d. Shift panel.
e. Side wall.
f. Center panel.
g. Audio unit.
h. Rear heat duct (1).
3. Disconnect the connector.
4. ...
