Mazda 3 Service Manual: Front Drain Hose Removal
1. Set the air intake mode to FRESH.
2. Set the air mix mode to MAX COLD.
3. Disconnect the negative battery cable.
4. Remove the rain sensor cover. (Vehicles with auto light / wiper system).
5. Disconnect the rain sensor connector. (Vehicles with auto light / wiper system)
6. Partially peel back the seaming welt.
7. Remove the following parts:
a. Front doors.
b. Front scuff plate.
c. Front side trim.
d. Dashboard under cover.
e. Glove compartment.
f. Upper panel.
g. Shift lever knob (MTX).
h. Selector lever knob (ATX).
i. Shift panel.
j. Side wall.
k. Console.
l. Shift lever component (MTX).
m. Selector lever component (ATX).
n. Hood release lever from the lower panel.
o. Lower panel.
p. Knee bolster.
q. Driver-side air bag module.
r. Steering wheel.
s. Column cover.
t. Combination switch.
u. Joint cover.
v. Steering shaft.
w. Center panel.
x. Audio unit.
y. Climate control unit.
z. Instrument cluster.
aa. Center cover.
ab. Dashboard upper panel.
ac. Hole cover.
ad. Information display (with information display).
ae. multi information display (with multi information display).
af. A-pillar trim.
ag. Windshield wiper arm and blade.
ah. Front fender molding.
ai. Cowl grille.
aj. Windshield wiper motor.
ak. Dashboard.
al. Sunroof seaming welt
am. Rear scuff plate.
an. B-pillar lower trim.
ao. Upper anchor of the front seat belt.
ap. B-pillar upper trim.
aq. Rear seat cushion.
ar. Tire house trim.
as. Trunk side upper trim (5HB).
at. C-pillar trim.
au. Map light.
av. Sunvisor.
aw. Assist handle.
ax. Headliner.
8. Disconnect the auto-dimming mirror connector. (vehicles with auto-dimming mirror)
9. Disconnect the roof harness connector, remove the clip, and remove the connector.
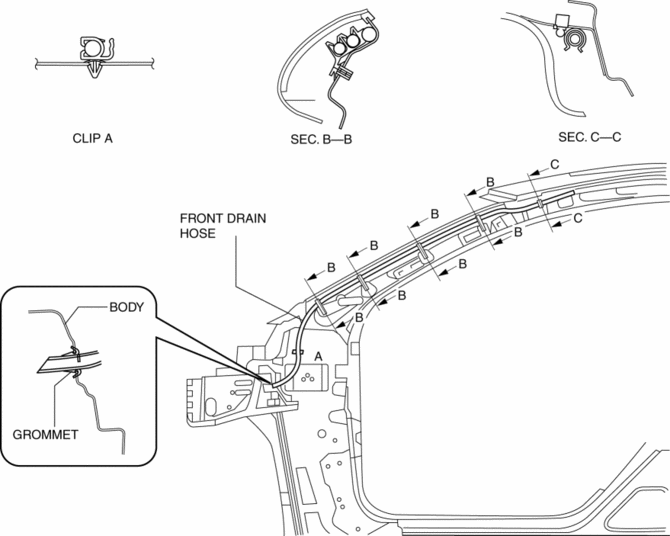
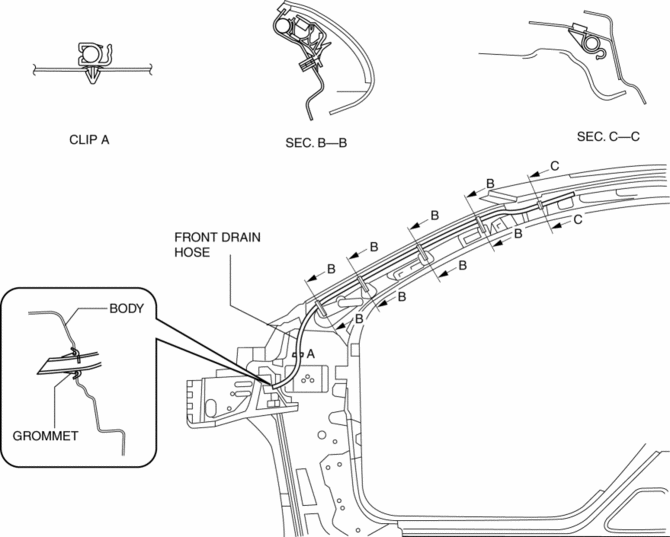
10. Disconnect the front drain hose from the sunroof frame.
11. Remove the front drain hose from the clips.
12. Pull the front drain hose into the room side.
13. Remove the front drain hose.
LH
RH
 Front Drain Hose Installation
CAUTION:
If the front drain hose is pinched or bent anywhere, the water in the hose
may not discharge and enter the inside of the vehicle. During and after installation
of the trims and ...
 Glass Panel Adjustment
1. Fully close the glass panel.
2. Measure the gap and height between the glass panel and body.
If not as specified, loosen the glass panel installation screws and reposition
the glas ...
Other materials:
On Board Diagnostic System Simulation Inspection [Fw6 A EL]
1. Connect the M-MDS (IDS) to the DLC-2.
2. After the vehicle is identified, select the following items from the initialization
screen of the IDS.
a. Select “DataLogger”.
b. Select “Modules”.
c. Select “TCM”.
3. Select the simulation items from the PID table.
4. Perform ...
Viewing the Display
Guide lines which indicate the width of the vehicle (yellow) are displayed on
the screen as a
reference to the approximate width of the vehicle in comparison to the width of
the parking
space you are about to back into.
Use this display view for parking your vehicle in a parking space or ga ...
Driving In Flooded Area
WARNING
Dry off brakes that have become
wet by driving slowly, releasing the
accelerator pedal and lightly applying
the brakes several times until the brake
performance returns to normal:
Driving with wet brakes is dangerous.
Increased stopping distance or the
vehicle ...
