
Mazda 3 Service Manual: Fuel Line Pressure Inspection [Mzr 2.0, Mzr 2.5]
WARNING:
-
Fuel line spills and leakage from the pressurized fuel system are dangerous. Fuel can ignite and cause serious injury or death and damage. To prevent this, complete the following inspection with the engine stopped.
-
Fuel is very flammable liquid. If fuel spills or leaks from the pressurized fuel system, it will cause serious injury or death and facility breakage. Fuel can also irritate skin and eyes. To prevent this, always complete the “Fuel Line Safety Procedure”, while referring to the “BEFORE SERVICE PRECAUTION”.
-
A person charged with static electricity could cause a fire or explosion, resulting in death or serious injury. Before performing work on the fuel system, discharge static electricity by touching the vehicle body.
CAUTION:
-
Disconnecting/connecting the quick release connector without cleaning it may possibly cause damage to the fuel pipe and quick release connector. Always clean the quick release connector joint area before disconnecting/connecting using cloth or soft brush, and make sure that it is free of foreign material.
1. Complete the “BEFORE SERVICE PRECAUTION”..
2. Remove the battery cover..
3. Disconnect the negative battery cable..
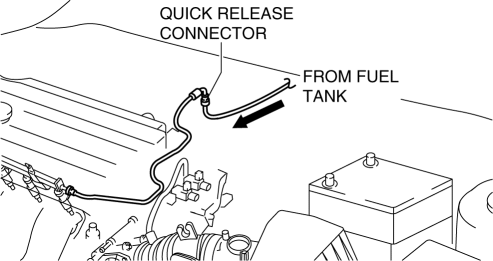
4. Disconnect the quick release connector..
5. Turn the lever of the SST
parallel to the hose as shown in the figure.
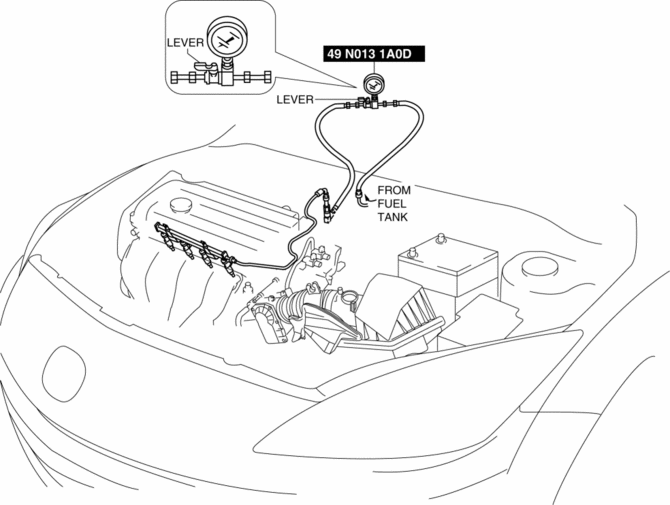
6. Insert the SST
quick release connector into the fuel pipe until a click is heard.
7. Verify that the quick release connector is firmly connected by pulling it by hand.
8. Start the fuel pump using the following procedure.
-
Using M-MDS
-
Connect the negative battery cable..
-
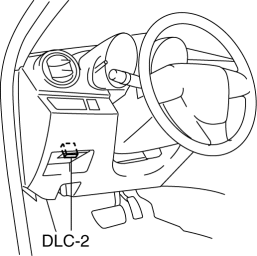
Connect the M-MDS to the DLC-2.
-
Using the simulation function “FP”, start the fuel pump..
-
Without using M-MDS
-
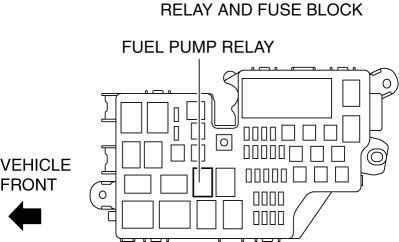
Remove the fuel pump relay.
CAUTION:
-
Short the specified terminals because shorting the wrong terminal of the relay and fuse block may cause malfunctions.
-
-
Using a jumper wire, short fuel pump relay terminals C and D in the relay and fuse block.
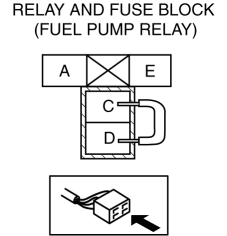
-
Connect the negative battery cable and operate the fuel pump..
9. Operate the fuel pump for 10 s
.
10. Measure the fuel line pressure.
-
If not within the specification, inspect the following:
-
Fuel pump unit
-
Fuel line for clogging or leakage
-
Fuel line clogging
-
If it less than the specification:
-
If it exceeds the specification:
-
Fuel pressure
-
350—430 kPa {3.57—4.38 kgf/cm2, 50.8—62.3 psi}
11. Stop the fuel pump using the following procedure.
-
Using M-MDS
-
Using the simulation function “FP”, stop the fuel pump..
-
Without using M-MDS
-
Disconnect the negative battery cable to stop the fuel pump..
12. Measure the fuel hold pressure after 5 min
.
-
If not within the specification, inspect the following:
-
Fuel line leakage
-
Fuel hold pressure
-
210 kPa {2.14 kgf/cm2, 30.5 psi} or more
13. Complete the “BEFORE SERVICE PRECAUTION”..
14. Disconnect the SST
.
15. Connect the quick release connector..
16. Complete the “AFTER SERVICE PRECAUTION”..
 Fuel Injector Removal/Installation [Mzr 2.0, Mzr 2.5]
WARNING:
Fuel is very flammable liquid. If fuel spills or leaks from the pressurized
fuel system, it will cause serious injury or death and facility breakage. Fuel
can also irritate skin ...
 Fuel Pump Unit Disassembly/Assembly [Mzr 2.0, Mzr 2.5]
WARNING:
Fuel is very flammable liquid. If fuel spills or leaks from the pressurized
fuel system, it will cause serious injury or death and facility breakage. Fuel
can also irritate skin ...
Other materials:
Sunvisor Removal/Installation
1. Disconnect the negative battery cable..
2. Remove the screw.
3. Rotate the sunvisor in the direction of the arrow.
4. Unhook and remove the sunvisor.
5. Disconnect the vanity mirror illumination connector. (Vehicles with vanity
mirror illumination)
6. Press the center adaptor tabs ...
Oil Control Valve (OCV) Removal/Installation [Mzr 2.0, Mzr 2.5]
1. Remove the battery cover..
2. Disconnect the negative battery cable..
3. Remove the plug hole plate..
4. Disconnect the wiring harness.
5. Remove the ignition coils..
6. Remove the ventilation hose.
7. Remove the oil level gauge.
8. Remove the cylinder head cover..
9. Remove in th ...
Liftgate Opener Switch Removal/Installation
1. Disconnect the negative battery cable..
2. Remove the following parts:
a. Liftgate upper trim.
b. Liftgate side trim.
c. Liftgate lower trim.
d. Liftgate latch and lock actuator.
3. Disconnect the connector.
4. Pull out the retainer in the direction of the arrow.
5. Remove the ...
