Mazda 3 Service Manual: Crankshaft Position (CKP) Sensor Inspection [Mzr 2.0, Mzr 2.5]
Visual Inspection
CAUTION:
-
When foreign material such as an iron chip is on the CKP sensor, it can cause abnormal output from the sensor because of flux turbulence and adversely affect the engine control. Be sure there is no foreign material on the CKP sensor when replacing.
-
Do not assemble the CKP sensor or change the installation position using any method other than the following. Otherwise, it could negatively affect engine controls, such as the ignition timing and fuel injection.
1. Remove the battery cover..
2. Disconnect the negative battery cable..
3. Perform the following procedure for easier access.
a. Remove the aerodynamic under cover No.2..
b. Remove the front splash shield (RH)..
4. Disconnect the CKP sensor connector.
5. Remove the CKP sensor..
6. Verify that there are no metal shavings on the sensor.
-
If there is a malfunction, remove any metal shavings that are adhering.
Air Gap Inspection
1. Verify that the CKP sensor is securely installed..
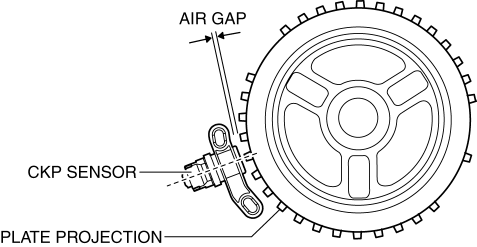
2. Using a thickness gauge, measure the air gap between the plate projections at the back of crankshaft pulley and the CKP sensor.

-
If not within the specification, inspect the plate projections for cracks or bending.
-
If there is any malfunction, replace the crankshaft pulley..
-
CKP sensor air gap
-
0.5—1.5 mm {0.02—0.05 in}
Voltage Inspection
CAUTION:
-
When foreign material such as an iron chip is on the CKP sensor, it can cause abnormal output from the sensor because of flux turbulence and adversely affect the engine control. Be sure there is no foreign material on the CKP sensor when replacing.
-
Do not assemble the CKP sensor or change the installation position using any method other than the following. Otherwise, it could negatively affect engine controls, such as the ignition timing and fuel injection.
-
If the wiring harnesses or waterproof connectors are damaged, water penetrating the connector will cause a sensor malfunction. To prevent this, be careful not to damage wiring harnesses or waterproof connectors.
1. Idle the engine.
2. Measure the CKP signal and verify that rectangular waves are produced..
-
If not as specified, replace the CKP sensor..
 Crank, Balancer
...
 Crankshaft Position (CKP) Sensor Removal/Installation [Mzr 2.0, Mzr 2.5]
Removal
CAUTION:
When foreign material such as an iron chip is on the CKP sensor, it can cause
abnormal output from the sensor because of flux turbulence and adversely affect
the engine ...
Other materials:
Mute
The microphone can be muted during a
call.
Press the talk button with a short press.
Say: [Beep] “Mute”
Prompt: “Microphone muted”
Canceling mute
Press the talk button with a short press.
Say: [Beep] “Mute off”
Prompt: “Microphone unmuted”
Transferring a Call from Hands-
Free ...
Applicable Bluetooth ® specification
(Recommended)
Ver. 1.1/1.2/2.0 EDR/2.1 EDR/3.0
(conformity)
Response profile
A2DP (Advanced Audio Distribution
Profile) Ver. 1.0/1.2
AVRCP (Audio/Video Remote Control
Profile) Ver. 1.0/1.3/1.4
A2DP is a profile which transmits only
audio to the Bluetooth ® unit. If your
Bluetooth ® audio device c ...
Inspecting Engine Oil Level
Be sure the vehicle is on a level
surface.
Warm up the engine to normal
operating temperature.
Turn it off and wait at least 5 minutes
for the oil to return to the oil pan.
Pull out the dipstick, wipe it clean, and
reinsert it fully.
Pull it out again and examine the level ...
