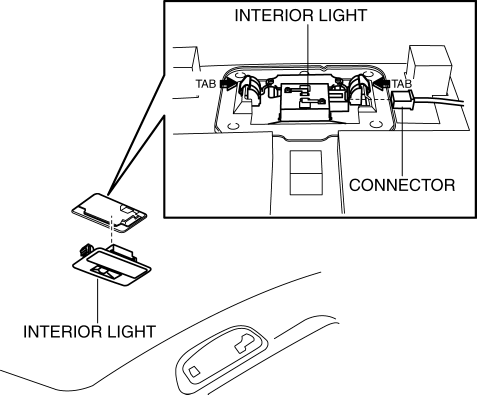
Mazda 3 Service Manual: Interior Light Removal/Installation
1. Disconnect the negative battery cable..
2. Remove the rain sensor cover. (Vehicles with auto light/wiper system).
3. Remove the following parts:
a. Sunroof seaming welt (vehicles with sunroof)
b. A-pillar trim.
c. Front scuff plate.
d. Rear scuff plate.
e. B-pillar lower trim.
f. Upper anchor of the front seat belt.
g. B-pillar upper trim.
h. Rear seat cushion.
i. Tire house trim.
j. Trunk side upper trim (5HB).
k. C-pillar trim.
l. Map light.
m. Sunvisor.
n. Assist handle.
o. Headliner.
4. Pull in the direction of the arrows and detach the tabs.

5. Disconnect the connector.
6. Remove the interior light.
7. Install in the reverse order of removal.
NOTE:
-
After installing the wiring harness, reinforce the urethane that was cut when removing the valve housing with vinyl tape.
 Interior Light Bulb Removal/Installation
1. Disconnect the negative battery cable..
2. Insert a tape-wrapped fastener remover into the service hole and pry with
the screwdriver in the direction shown by the arrow to remove the lens.
...
 Map Light Bulb Removal/Installation
1. Disconnect the negative battery cable..
2. Insert a tape-wrapped fastener remover into the service hole and pry with
the screwdriver in the direction shown by the arrow to remove the lens.
...
Other materials:
On Board Diagnostic System PID/Data Monitor Inspection [Fw6 A EL]
1. Connect the M-MDS (IDS) to the DLC-2.
2. After the vehicle is identified, select the following items from the initialization
screen of the IDS.
a. Select “DataLogger”.
b. Select “Modules”.
c. Select “TCM”.
3. Select the applicable PID from the PID table.
4. Verify the PID data a ...
Drive Belt Removal/Installation [Mzr 2.3 Disi Turbo]
1. Remove the aerodynamic under cover No.2 and splash shield as a single unit..
2. Rotate the drive belt auto tensioner in the direction shown in the figure
and remove the drive belt.
3. Install the drive belt.
4. Verify that the drive belt auto tensioner indicator mark does not exceed ...
Audio Unit Disassembly/Assembly
CAUTION:
When disassembling the audio unit, it could get scratched if it is placed
directly on the ground. When disassembling the audio unit, spread a soft cloth
underneath to perform the work.
1. Disassemble in the order indicated in the table.
2. Assemble in the reverse order ...
