Mazda 3 Service Manual: Front Door Latch Switch Inspection
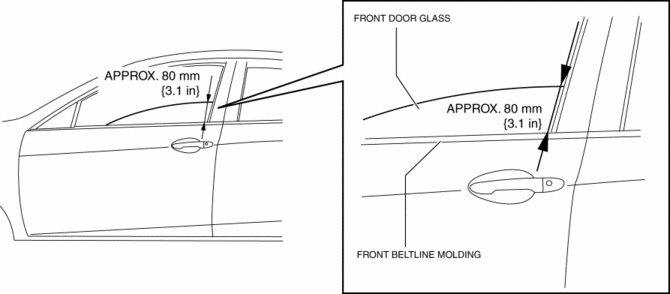
1. To access the glass installation bolt, position the front door glass so that the distance from the top of the front door glass to the upper part of the front beltline molding is approx. 80 mm {3.1 in}
.

2. Disconnect the negative battery cable..
3. Remove the following parts:
a. Inner garnish.
b. Front door trim.
c. Front door speaker.
d. Front door glass.
e. Front door module panel.
f. Front door latch and lock actuator.
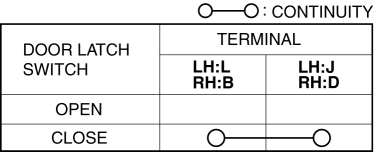
4. Verify that the continuity is as indicated in the table.

-
If not as indicated in the table, replace the front door latch and lock actuator.

NOTE:
-
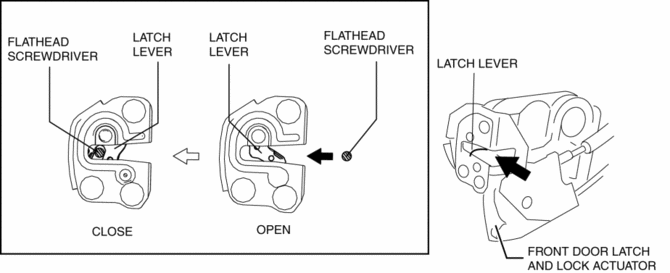
When inspecting the close condition of the front door latch switch, press in the latch lever using a flathead screwdriver.

 Front Door Latch And Lock Actuator Removal/Installation
1. To access the glass installation bolt, position the front door glass so that
the distance from the top of the front door glass to the upper part of the front
beltline molding is approx. 80 mm { ...
 Front Door Module Panel Removal/Installation
1. To access the glass installation bolt, position the front door glass so that
the distance from the top of the front door glass to the upper part of the front
beltline molding is approx. 80 mm { ...
Other materials:
Crankshaft Position (CKP) Sensor Removal/Installation [Mzr 2.0, Mzr 2.5]
Removal
CAUTION:
When foreign material such as an iron chip is on the CKP sensor, it can cause
abnormal output from the sensor because of flux turbulence and adversely affect
the engine control. Be sure there is no foreign material on the CKP sensor when
replacing.
Do not a ...
Supplemental Restraint System Components
(With Front Passenger Occupant Classification System)
(Without Front Passenger Occupant Classification System)
Driver/Front passenger inflators and air bags
Roll-over sensor * , crash sensors, and diagnostic module (SAS unit)
Seat belt pretensioners
Front air bag sensors
Side c ...
Passenger Compartment Temperature Sensor Inspection [Full Auto Air Conditioner]
1. Measure the temperature around the passenger compartment temperature sensor
and measure the resistance between passenger compartment temperature sensor terminals
B and D.
If the characteristics of the passenger compartment temperature sensor are
not as shown in the graph, repla ...
