Mazda 3 Service Manual: Glass Panel Adjustment
1. Fully close the glass panel.
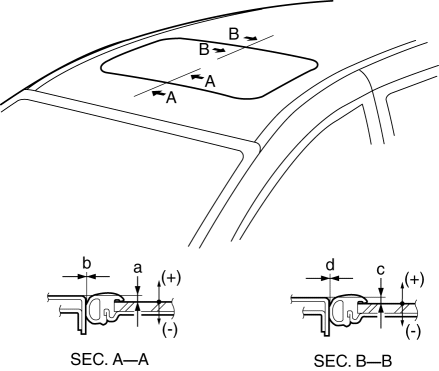
2. Measure the gap and height between the glass panel and body.
-
If not as specified, loosen the glass panel installation screws and reposition the glass panel.
-
Clearance (4SD)
-
a: -2.4—0.2 mm {-0.09—0.01 in}
-
b: 0 mm {0 in}
-
c: -2.2—0.4 mm {-0.08—0.01 in}
-
d: 0 mm {0 in}
-
Clearance (5HB)
-
a: -2.3—0.3 mm {-0.09—0.01 in}
-
b: 0 mm {0 in}
-
c: -2.3—0.3 mm {-0.09—0.01 in}
-
d: 0 mm {0 in}
3. Tighten the installation screws.
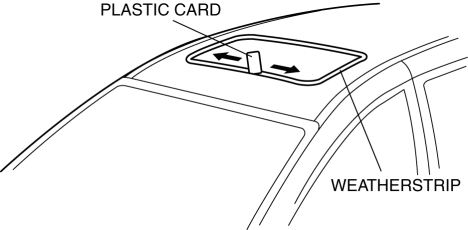
4. Insert a plastic card between the weatherstrip and the body of the vehicle. Verify that the sunroof is shut tightly (there is resistance when the plastic card is moved).
-
If the sunroof is not shut tightly, readjust by performing Steps 2 and 3.
 Front Drain Hose Removal
1. Set the air intake mode to FRESH.
2. Set the air mix mode to MAX COLD.
3. Disconnect the negative battery cable.
4. Remove the rain sensor cover. (Vehicles with auto light / wiper system).
...
 Glass Panel Removal/Installation
1. Fully close the glass panel.
2. Fully open the sunshade.
3. Remove the screws, and then remove the glass panel.
4. Peel the weatherstrip off the glass panel.
5. Install in the rever ...
Other materials:
Oil Seal (Differential) Replacement [C66 M R]
1. Remove the aerodynamic under cover No.2 and the splash shield as a single
unit..
2. Drain the manual transaxle oil..
3. Disconnect the drive shaft (LH) from the MTX..
4. Disconnect the drive shaft (RH) from the joint shaft..
5. Remove the joint shaft..
6. Remove the oil seal (LH).
...
Electric Variable Valve Timing Motor/Driver Removal/Installation [Skyactiv G
2.0]
WARNING:
A hot engine can cause severe burns. Turn off the engine and wait until it
is cool before servicing.
CAUTION:
Applying excessive force (force of 100 N {10.2 kgf, 22.5 lbf} or more) to
the electric variable valve timing motor/driver may cause a malfunction. When
...
Headlight Leveling
The number of passengers and weight of
cargo in the luggage compartment change
the angle of the headlights.
Auto type
The angle of the headlights will be
automatically adjusted when turning on
the headlights.
The warning/indicator light turns on when
the system has a malfunction.
Refer ...
