Mazda 3 Service Manual: Non Return Valve Inspection [Mzr 2.0, Mzr 2.5]
WARNING:
-
Fuel is very flammable liquid. If fuel spills or leaks from the pressurized fuel system, it will cause serious injury or death and facility breakage. Fuel can also irritate skin and eyes. To prevent this, always complete the “Fuel Line Safety Procedure”, while referring to the “BEFORE SERVICE PRECAUTION”.
-
A person charged with static electricity could cause a fire or explosion, resulting in death or serious injury. Before draining fuel, make sure to discharge static electricity by touching the vehicle body.
Except for Mexico
1. Complete the “BEFORE SERVICE PRECAUTION”..
2. Disconnect the negative battery cable..
3. Remove the fuel pump unit..
4. Siphon the fuel from the fuel tank.
NOTE:
-
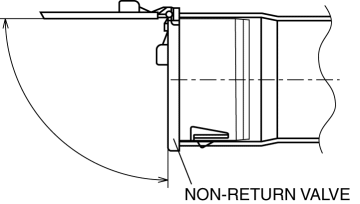
The non-return valve is integrated in the fuel tank.
-
The non-return valve is normally closed by the spring force.
5. Verify that the non-return valve is closed.
-
If the non-return valve is stuck open and does not open even when pulled up by a finger, replace the fuel tank..
Mexico
1. Complete the “BEFORE SERVICE PRECAUTION”..
2. Remove the non-return valve..
3. Verify that the non-return valve is closed.
-
If malfunction, replace the non-return valve..
4. Verify that the non-return valve is not stuck open and does not open even when pulled up by a finger.
-
If malfunction, replace the non-return valve..
 Engine Tune Up [Skyactiv G 2.0]
Engine Tune-up Preparation
NOTE:
If the accelerator pedal is depressed continuously for a specified time,
the engine speed may decrease to the idle speed. This is due to the fuel cut
co ...
 Non Return Valve Inspection [Mzr 2.3 Disi Turbo]
WARNING:
Fuel is very flammable liquid. If fuel spills or leaks from the pressurized
fuel system, it will cause serious injury or death and facility breakage. Fuel
can also irritate skin ...
Other materials:
SUBARU Safety Sense
The SUBARU Safety Sense suite in the Subaru Solterra integrates a
range of advanced driver assistance technologies designed to support the driver
and enhance both safety and comfort during everyday driving. These intelligent systems
work together to help reduce collision risk, improve awarenes ...
Trunk Lid Opener Lever Removal/Installation
1. Remove the front scuff plate (LH)..
2. Remove the front side trim (LH)..
3. Remove the fuel-filler lid opener bezel..
4. Partially peel back the floor covering.
5. Remove the bolts.
6. Disconnect the cable and trunk lid opener lever.
7. Install in the reverse order of removal. ...
Starter Interlock Switch Inspection [Mzr 2.0, Mzr 2.5]
CAUTION:
Do not reuse the starter interlock switch if it is removed from the vehicle
even once. Replace with a new starter interlock switch when installing.
1. Remove the battery cover..
2. Disconnect the negative battery cable..
3. Disconnect the starter interlock switch connec ...
